1. Rhagymadrodd
This user manual provides comprehensive instructions for the ASRock B860M-X Micro ATX motherboard. It covers installation, configuration, operation, and troubleshooting to ensure optimal performance and longevity of your system. The ASRock B860M-X is designed to support Intel Core Ultra processors with an LGA1851 socket, offering advanced features for a powerful computing experience.
2. Gwybodaeth Diogelwch
Dilynwch y rhagofalon diogelwch canlynol bob amser yn ystod y gosodiad a'r gweithrediad:
- Disconnect the power cord from the wall outlet before touching any components.
- Gwisgwch strap arddwrn gwrth-statig i atal difrod rhyddhau electrostatig (ESD) i gydrannau.
- Trin cydrannau wrth eu hymylon er mwyn osgoi cyffwrdd â rhannau sensitif.
- Sicrhewch awyru digonol o fewn cas eich cyfrifiadur personol i atal gorboethi.
- Peidiwch ag amlygu'r famfwrdd i leithder na thymheredd eithafol.
3. Cynnwys Pecyn
Gwiriwch fod yr holl eitemau yn bresennol ym mhecyn eich mamfwrdd:
- ASRock B860M-X Micro ATX Motherboard
- Canllaw Gosod Cyflym
- Rhybudd Rheoleiddio
- Ceblau Data SATA
- Shield I / O
- Sgriwiau/Standoffs M.2

Image: ASRock B860M-X Motherboard and included accessories.
4. Cynllun Motherboard
Familiarize yourself with the key components and connectors on your ASRock B860M-X motherboard.

Delwedd: O'r brig i lawr view of the ASRock B860M-X Micro ATX Motherboard, highlighting the CPU socket, RAM slots, and various connectors.
Panel I/O Cefn
The rear I/O panel provides various ports for connecting peripherals.
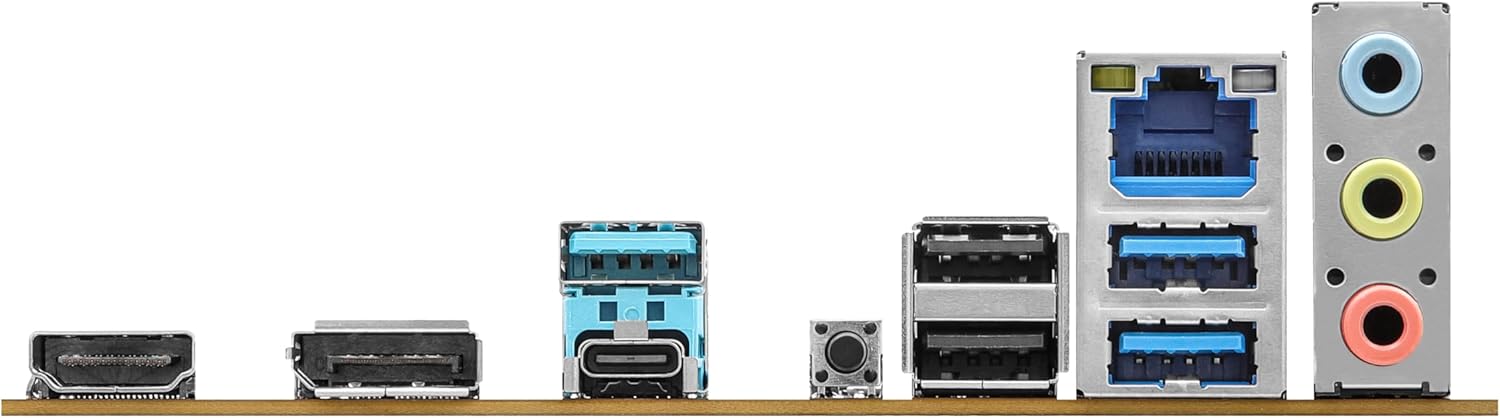
Image: Close-up of the rear I/O panel, showing USB ports, HDMI, DisplayPort, Ethernet, and audio jacks.
5. Gosod a Gosod
Dilynwch y camau hyn i osod eich mamfwrdd a'ch cydrannau'n iawn.
5.1 CPU Installation (LGA1851)
- Agorwch lifer soced y CPU.
- Carefully align the CPU with the socket, ensuring the notches match.
- Rhowch y CPU yn ysgafn yn y soced heb ei orfodi.
- Caewch lifer y soced i sicrhau'r CPU.
5.2 Gosod Cof (RAM)
The ASRock B860M-X supports 2 x DDR5 DIMMs for dual-channel memory up to 9066+ MHz (OC).
- Agorwch y clipiau ar ddau ben y slot DIMM.
- Align the memory module with the slot, ensuring the notch on the module matches the slot key.
- Pwyswch i lawr yn gadarn ar ddau ben y modiwl cof nes bod y clipiau'n clicio i'w lle.
5.3 Storage Installation (M.2 and SATA)
The motherboard supports M.2 drives and up to 4 SATA3 6.0 Gb/s devices.
- M.2 SSD: Locate the M.2 slot(s). Insert the M.2 SSD into the slot at an angle and secure it with the provided screw/standoff.
- Gyriannau SATA: Connect SATA data cables from your storage devices (HDDs/SSDs) to the SATA3 ports on the motherboard. Connect power cables from your power supply to the SATA devices.
5.4 Gosod Cerdyn Ehangu (PCIe)
The motherboard features PCIe slots for graphics cards and other expansion cards.
- Align your graphics card or other PCIe card with the appropriate slot.
- Pwyswch i lawr yn gadarn nes bod y cerdyn wedi'i osod yn gywir a bod y clip cadw yn cloi.
- Sicrhewch y cerdyn i gas y cyfrifiadur gyda sgriw.
5.5 Cysylltiadau Cyflenwad Pŵer
Cysylltwch y cysylltydd pŵer ATX 24-pin a'r cysylltydd pŵer CPU 8-pin o'ch cyflenwad pŵer â'r porthladdoedd cyfatebol ar y famfwrdd.
5.6 Cysylltiadau Panel Blaen
Connect the front panel cables (power button, reset button, USB ports, audio jacks, etc.) to their respective headers on the motherboard. Refer to the motherboard diagram for exact locations.
6. Cyfarwyddiadau Gweithredu
6.1 Cychwyn Cyntaf
After assembling your system, connect your monitor, keyboard, and mouse. Power on your system. The system should display the ASRock logo and enter the BIOS setup or begin the operating system installation process.
6.2 Gosod BIOS/UEFI
To enter the BIOS setup utility, press the Dileu or F2 key during the Power-On Self-Test (POST) screen. Here you can configure various system settings, including boot order, CPU settings, memory timings, and fan speeds.
6.3 Gosod Gyrwyr
After installing your operating system, install the necessary drivers for your motherboard components (chipset, audio, LAN, graphics, etc.) from the ASRock website or the included driver CD/USB drive.
7. cynnal
7.1 Diweddariad BIOS
Keeping your BIOS updated ensures compatibility with new hardware and improves system stability. ASRock provides two methods for BIOS updates: USB BIOS Flashback and Instant Flash.
Video: ASRock Motherboard BIOS Update Tutorial. This video demonstrates two methods for updating your ASRock motherboard's BIOS: USB BIOS Flashback and Instant Flash.
7.2 Glanhau
Regularly clean your PC case and motherboard to prevent dust buildup, which can lead to overheating and component failure. Use compressed air to remove dust from fans, heatsinks, and other components. Ensure the system is powered off and unplugged before cleaning.
8. Datrys Problemau
Os byddwch chi'n dod ar draws problemau, cyfeiriwch at yr awgrymiadau cyffredin hyn ar gyfer datrys problemau:
- Dim pŵer: Check all power connections (24-pin ATX, 8-pin CPU, GPU, SATA). Ensure the power supply switch is on.
- Dim Arddangosfa: Verify monitor connection and input source. Reseat the graphics card and memory modules.
- Ansefydlogrwydd System: Check memory compatibility and seating. Ensure CPU cooler is properly installed. Update BIOS and drivers.
- Problemau Cychwyn: Check boot order in BIOS. Verify storage device connections.
9. manylebau
Key technical specifications for the ASRock B860M-X Micro ATX Motherboard:
| Nodwedd | Manyleb |
|---|---|
| Brand | ASRock |
| Enw Model | B860M-X |
| Soced CPU | LGA 1851 |
| Proseswyr Cydnaws | Intel Craidd Ultra |
| Math o Sglodion | Intel B860 |
| Technoleg Cof RAM | DDR5 |
| Cyflymder Cloc Cof | 9066 MHz (OC) |
| Capasiti Storio Cof Uchaf | 128 GB |
| Slotiau Cof Ar Gael | 2 |
| Total SATA Ports | 4 |
| Total PCIe Ports | 3 |
| Graphics Output Options | 1 HDMI, 1 DisplayPort |
| Nifer y Porthladdoedd Ethernet | 1 |
| Codec Sain | Realtek ALC1220 7.1 CH HD Audio Codec |
| Power Phase Design | 7+1+1+1+1 |
| Goleuadau RGB | Polychrome RGB |
Fideo: Drosoddview of Intel B860 Series Motherboards. This video highlights key features and design aspects of the ASRock B860 motherboard series.
10. Gwarant a Chefnogaeth
ASRock provides a 3-year warranty for this product. For technical support, driver downloads, and further information, please visit the official ASRock website. You can also find additional support resources and FAQs there.
For warranty claims or service, please contact your retailer or authorized ASRock service center with your proof of purchase.


