1. Rhagymadrodd
This manual provides comprehensive instructions for the assembly, operation, maintenance, and troubleshooting of your new DWVO Makeup Vanity with Large Mirror and Lights. Please read this manual thoroughly before assembly and use to ensure safe and efficient operation. Keep this manual for future reference.

Image 1.1: The DWVO Makeup Vanity with Large Mirror and Lights in Ivory White, featuring the vanity desk, mirror, and matching stool.
2. Gwybodaeth Diogelwch
Observe the following safety precautions to reduce the risk of injury or damage to the product:
- Rhowch y cynnyrch bob amser ar arwyneb meddal a glân i atal crafiadau.
- Gwnewch yn siŵr bod yr holl sgriwiau a chaewyr wedi'u tynhau'n ddiogel cyn eu defnyddio. Gwiriwch o bryd i'w gilydd ac ail-dynhewch yn ôl yr angen.
- Peidiwch â gorlwytho droriau na silffoedd. Dosbarthwch y pwysau'n gyfartal.
- Keep electrical components (mirror, power outlet) away from water or excessive moisture.
- Use only the provided power cord and ensure it is properly plugged into a grounded outlet.
- Peidiwch â cheisio addasu na thrwsio'r cydrannau trydanol eich hun. Cysylltwch â phersonél cymwys i gael gwasanaeth.
- Cadwch rannau bach a deunyddiau pecynnu i ffwrdd oddi wrth blant i atal peryglon tagu.
3. Cynnwys Pecyn
Cyn dechrau cydosod, gwiriwch fod yr holl gydrannau a restrir isod yn bresennol ac yn ddi-ddifrod. Os oes unrhyw rannau ar goll neu wedi'u difrodi, cysylltwch â chymorth cwsmeriaid ar unwaith.
- Vanity Desk Frame (Main sections)
- Uned Drych LED
- Storage Stool
- 11 Uned Drôr
- Drawer Handles and Runners
- Caledwedd Cydosod (Sgriwiau, dowels, cloeon cam, ac ati)
- Power Cord for LED Mirror/Outlet
- Deiliad Sychwr Gwallt
- Llawlyfr Cyfarwyddiadau (Y ddogfen hon)
4. Cyfarwyddiadau Cymanfa
Assembly typically requires two adults and a clear, spacious area. Follow the steps carefully. Do not overtighten screws.
- Dadbacio ac Adnabod Rhannau: Carefully remove all components from the packaging. Lay them out on a soft, clean surface to prevent scratches. Identify each part using the provided parts list (if applicable, refer to diagrams in the separate assembly guide).
- Cydosodwch y Prif Ffrâm Desg: Begin by connecting the side panels to the base and back panels of the vanity desk using the provided hardware. Ensure all connections are secure and stable.
- Gosod Rhedwyr Drôr: Attach the drawer runners to the inside of the desk frame according to the pre-drilled holes. Ensure they are level and aligned for smooth drawer operation.
- Cydosod Droriau: Construct each of the 11 drawers by attaching the sides, front, and back panels to the drawer bottom. Install the drawer handles on the front panels.
- Mewnosod Droriau: Carefully slide the assembled drawers onto their respective runners within the vanity desk frame.
- Attach the LED Mirror Unit: Secure the large LED mirror unit to the top surface of the vanity desk. Ensure it is centered and firmly attached using the designated fasteners.
- Assemble the Storage Stool: Connect the legs to the stool seat. Ensure all connections are tight and the stool is stable.
- Install Hair Dryer Holder: Attach the hair dryer holder to the side of the vanity desk as desired, using the provided hardware.
- Pwer Cysylltu: Plug the power cord from the LED mirror/power outlet unit into a standard wall outlet.

Image 4.1: Fully assembled DWVO Makeup Vanity with the stool positioned underneath.
5. Cyfarwyddiadau Gweithredu
5.1 Gweithrediad Drych LED
The large mirror features integrated LED lighting with touch control for brightness and color temperature adjustments.
- Pŵer ymlaen / i ffwrdd: Lightly touch the power icon (usually a circle or button symbol) on the mirror surface to turn the lights on or off.
- Addasu Disgleirdeb: Press and hold the power icon to continuously adjust the brightness level. Release when the desired brightness is achieved.
- Newid tymheredd lliw: Tap the color temperature icon (often a 'M' or sun symbol) to cycle through different light settings: Warm White, Cool White, and Warm Yellow.

Image 5.1: Visual representation of the three adjustable light color temperatures: Warm White, Cool White, and Warm Yellow, available on the LED mirror.
5.2 Integrated Power Outlet and USB Ports
The vanity desk is equipped with a built-in power station for convenience.
- Allfeydd AC: Use the two standard 125V/12A AC outlets to power hair dryers, curlheyrn, neu offer bach eraill.
- Porthladdoedd USB: Use the two 5V/2A USB ports to charge mobile phones, tablets, or other USB-powered devices.
- Hair Dryer Cradle: Utilize the dedicated cradle for convenient storage of your hair dryer when not in use.

Delwedd 5.2: Llun agos view of the integrated power station, showing two AC outlets, two USB ports, and the hair dryer cradle.
5.3 Trefniadaeth y Droriau
The vanity features 11 drawers designed for organized storage of cosmetics, jewelry, and styling tools.
- Utilize the various drawer sizes to categorize and store items efficiently.
- Avoid placing excessively heavy items in drawers to ensure smooth operation and prevent damage.

Image 5.3: The vanity desk with multiple drawers open, illustrating the amplle storio ar gyfer amrywiol eitemau.
6. Cynnal a Chadw a Gofal
Proper care will extend the life and appearance of your vanity desk.
- Glanhau: Sychwch arwynebau gyda meddal, damp cloth. Avoid abrasive cleaners, harsh chemicals, or solvents that may damage the finish.
- Gofal Drych: Glanhewch wyneb y drych gyda glanhawr gwydr a lliain di-flwff. Peidiwch â chwistrellu glanhawr yn uniongyrchol ar y drych; rhowch ef ar y lliain yn gyntaf.
- Gollyngiadau: Sychwch unrhyw ollyngiadau ar unwaith i atal staenio neu ddifrod i'r pren wedi'i beiriannu.
- Caledwedd: Gwiriwch yr holl sgriwiau a chauwyr yn rheolaidd i sicrhau eu bod yn dal yn dynn. Ail-dynhau os oes angen.
- Lleoliad: Avoid placing the vanity in direct sunlight or near heat sources, which can cause fading or warping.
7. Datrys Problemau
Cyfeiriwch at y tabl isod am broblemau cyffredin a'u datrysiadau.
| Problem | Achos Posibl | Ateb |
|---|---|---|
| Nid yw goleuadau drych LED yn troi ymlaen. | Power cord is not plugged in or loose connection. Nid yw'r soced pŵer yn weithredol. Camweithrediad synhwyrydd cyffwrdd. | Ensure the power cord is securely plugged into both the vanity and a working wall outlet. Profwch y soced wal gyda dyfais arall. Gently clean the touch sensor area. If problem persists, contact customer support. |
| Nid yw'r socedi pŵer/porthladdoedd USB yn gweithio. | Vanity power cord is not plugged in. Device is not properly connected. Overload/Circuit breaker tripped. | Verify the vanity's main power cord is securely plugged in. Ensure devices are fully inserted into the outlets/ports. Unplug devices, wait a few minutes, and try again. Avoid plugging in high-power devices simultaneously. |
| Mae droriau'n stiff neu nid ydynt yn llithro'n esmwyth. | Drawer runners are misaligned or damaged. Drawers are overloaded. Rhwystr yn y trac drôr. | Check alignment of drawer runners and re-tighten screws if loose. Lleihau'r pwysau yn y drôr. Remove the drawer and inspect the track for any debris or obstructions. |
8. manylebau
Key technical specifications for the DWVO Makeup Vanity:
| Nodwedd | Manylyn |
|---|---|
| Rhif Model | MADWVraar3 |
| ASIN | B0FNMSYWS7 |
| UPC | 199449601791 |
| Dimensiynau Cynnyrch Cyffredinol (H x L x U) | 46" x 15.7" x 55.9" (117cm x 40cm x 142cm) |
| Mirror Dimensions (W x H) | 46" x 24.4" (117cm x 62cm) |
| Deunydd | Pren peirianyddol |
| Lliw | Gwyn Ifori |
| Pwysau Eitem | 121.8 pwys (55.25 kg) |
| Power Outlet Specifications | 2 x Allfa AC 125V/12A, 2 x Porthladd USB 5V/2A |
| Hyd y llinyn pŵer | 4.7 troedfedd |
| Cynulliad Angenrheidiol | Oes |
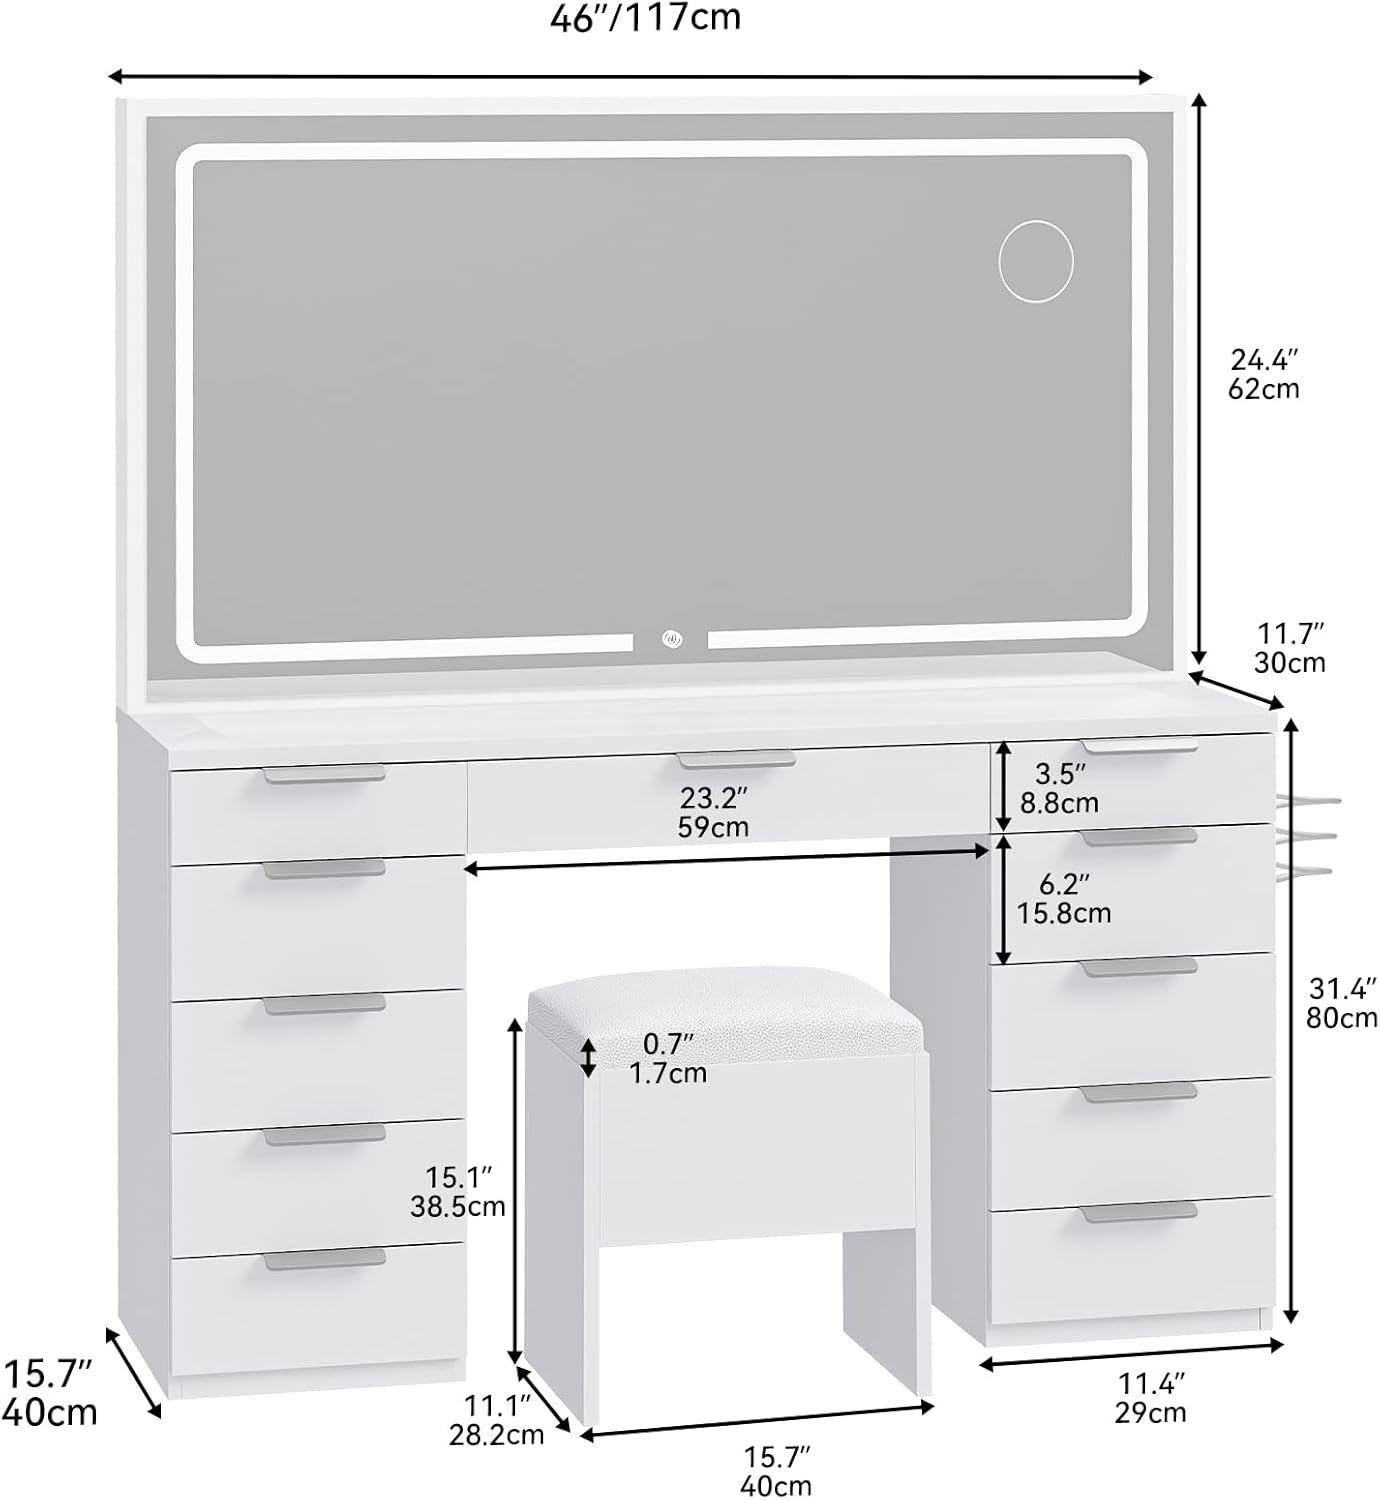
Image 8.1: Detailed diagram showing the dimensions of the DWVO Makeup Vanity, including the mirror, desk, and stool.
9. Gwarant a Chymorth i Gwsmeriaid
DWVO stands behind the quality of its products. For warranty information, technical assistance, or to report missing/damaged parts, please contact DWVO customer support through the retailer where the product was purchased or visit the official DWVO website. Please have your model number (MADWVraar3) and ASIN (B0FNMSYWS7) ready when contacting support.
Note: Warranty terms and conditions may vary. Refer to your purchase documentation for specific details.