Rhagymadrodd
Thank you for choosing the Mayfair Ashton Elongated Modern Slow Close Wood Toilet Seat. This manual provides comprehensive instructions for the proper installation, use, and care of your new toilet seat. Designed for durability, hygiene, and comfort, this seat features a Stay-Tite hinge to prevent loosening, a Clean Seal design for easy cleaning, and a slow-close mechanism for quiet operation. Please read this manual thoroughly before installation and retain it for future reference.
Nodweddion Allweddol
- Durable Single Hinge: Crafted from heavy-duty wood with a Stay-Tite hinge and super grip bumpers for stable, non-slip performance that never loosens.
- Clean Seal Design: Features a concealed hinge with a protective clean seal to prevent dirt and liquid from seeping underneath, ensuring easy and hygienic cleaning.
- Slow Close Mechanism: The seat and lid close slowly and quietly, preventing slamming and extending product life.
- Gosodiad Hawdd: User-friendly design with adjustable hinges for a perfect fit on nearly all elongated toilets, allowing for quick and straightforward setup.
- Esthetig modern: Complements sleek, minimalist bathroom decor.
Cynnwys Pecyn
Your Mayfair Ashton toilet seat package includes:
- 1 x Elongated Modern Slow Close Wood Toilet Seat
- 1 x Hardware Kit (bolts, nuts, and hinge covers)
Video: What's In The Box? This video demonstrates the contents of the Mayfair Ashton toilet seat package, including the seat and the hardware kit.
Gosod a Gosod
Follow these steps for quick and easy installation of your new toilet seat. A 5/8" (16mm) wrench may be required.
- Remove Old Seat: If replacing an existing seat, remove the old toilet seat by unscrewing the nuts from underneath the toilet bowl and lifting the seat off.
- Prepare New Seat: Lift the hinge covers on the new Mayfair Ashton toilet seat.
- Position Seat: Place the new toilet seat onto the toilet bowl, aligning the hinge posts with the bolt holes on the toilet.
- Mewnosod Bolltau: Insert the provided bolts (part A in the installation video) through the holes in the hinge and down into the toilet bowl holes.
- Attach Nuts: From underneath the toilet bowl, thread the nuts (part B in the installation video) onto the bolts. Lightly finger-tighten them.
- Addasu ar gyfer Ffit: Adjust the seat position to ensure a perfect fit and alignment on the toilet bowl.
- Tynhau'n Ddiogel: While holding the seat centered, use a 5/8" (16mm) wrench to tighten the nuts from underneath until the bottom nut snaps off. Discard the snapped-off portion. This unique design ensures a secure, non-loosening fit.
- Close Hinge Covers: Snap the hinge covers firmly back into place over the tightened bolts.
Video: Easy Installation. This video provides a visual guide to installing your Mayfair Ashton toilet seat, demonstrating each step from positioning to tightening.
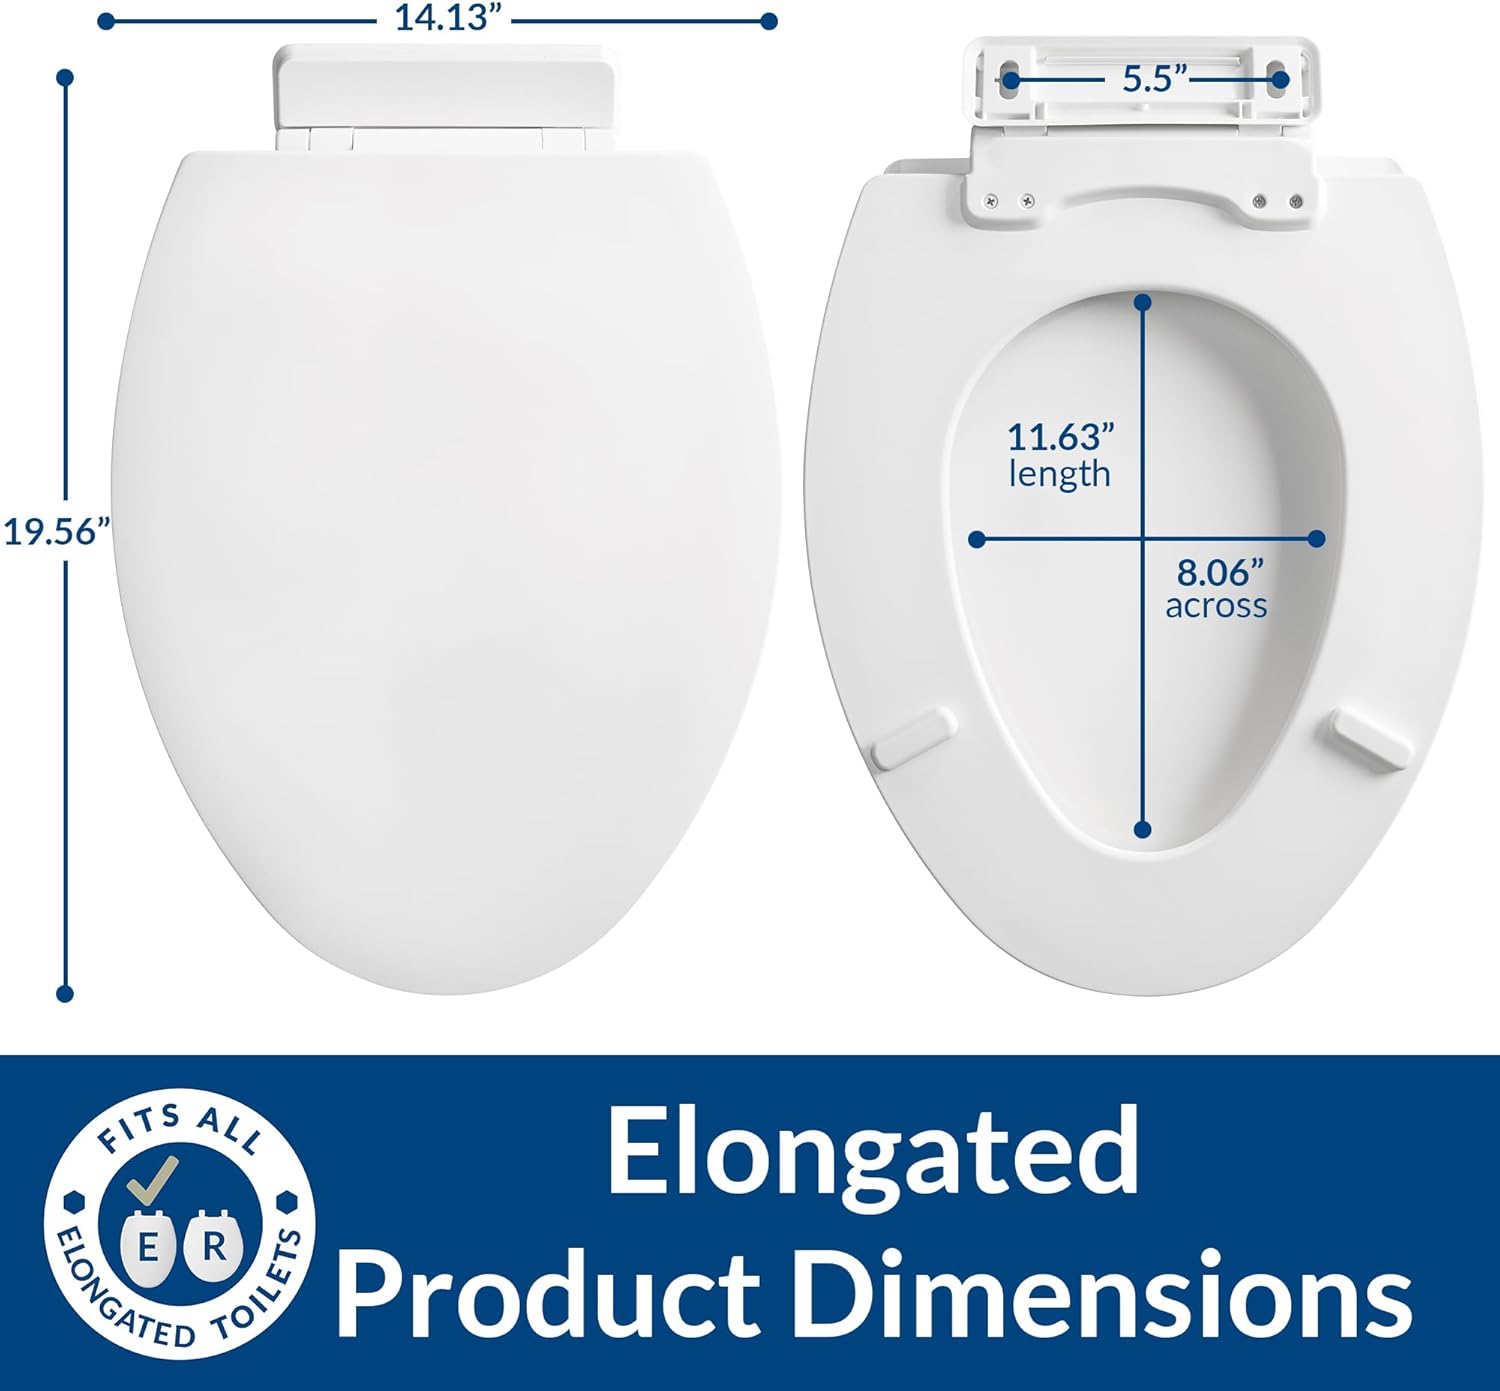
Image: Elongated Toilet Seat Product Dimensions. This image illustrates the dimensions of the elongated toilet seat, including its length and width, to ensure proper fit.

Image: Toilet Seat Size Guide. This image provides a size guide for elongated seats (18.5 inches) and an alternative measuring method using toilet paper for convenience.
Cyfarwyddiadau Gweithredu
The Mayfair Ashton toilet seat features a slow-close mechanism for both the lid and the seat ring. To operate, simply push the lid or seat down gently. The slow-close hinges will engage, allowing the seat and lid to lower quietly and smoothly without slamming. This feature helps prevent accidental damage and reduces noise in your bathroom.
Video: Modern Clean Seal Hinge - Keeps Grime Out. This video highlights the Clean Seal hinge design, which prevents dirt and grime accumulation for easier cleaning.
Cynnal a Chadw a Glanhau
To preserve the glossy finish and ensure the longevity of your Mayfair Ashton toilet seat, regular cleaning is recommended. The Clean Seal design makes cleaning simple and effective.
- Asiantau glanhau: Use mild soap and water, anti-bacterial wipes, or anti-bacterial hand soap.
- Cais: Apply the cleaning agent to a soft cloth or sponge and gently wipe down all surfaces of the toilet seat and lid.
- Rinsio: Rinsiwch yn drylwyr â dŵr glân a'i sychu â lliain meddal.
- Osgoi: Do NOT use bleach, harsh chemicals, abrasive cleaners, or scouring pads, as these can damage the finish and material of the seat.

Image: Slow Close Feature and Cleaning. This image provides visual instructions for cleaning your toilet seat and highlights the slow-close feature.
Datrys problemau
| Problem | Achos Posibl | Ateb |
|---|---|---|
| Seat loosens or shifts | Nuts not tightened sufficiently during installation. | Re-tighten the nuts from underneath the toilet bowl using a 5/8" (16mm) wrench until the bottom nut snaps off. Ensure hinge covers are securely in place. |
| Slow-close mechanism not working | Seat may not be installed correctly or hinges are obstructed. | Ensure the seat is properly installed and aligned. Check for any obstructions around the hinges. The slow-close mechanism functions only when the seat is installed on the toilet bowl. |
| Difficulty cleaning around hinges | Accumulation of dirt or liquid. | The Clean Seal design minimizes this. For thorough cleaning, lift the hinge covers and wipe down the area with mild soap and water or anti-bacterial wipes. |
Manylebau
| Priodoledd | Manylyn |
|---|---|
| Rhif Model | 1878SLW 000 |
| Lliw | Gwyn |
| Brand | Mayfair |
| Deunydd | Pren |
| Arddull | Modern Hinge |
| Siâp | Hirgrwn (Hirlun) |
| Dimensiynau Cynnyrch | 19.56"H x 14.13"L |
| Pwysau Eitem | 6.97 pwys |
| UPC | 073088165343 |
| Gwneuthurwr | Bemis |
Gwarant a Chefnogaeth
Am wybodaeth am warant neu gymorth technegol, cyfeiriwch at swyddfa’r gwneuthurwr websafle neu cysylltwch â'u gwasanaeth cwsmeriaid. Cadwch eich derbynneb prynu ar gyfer hawliadau gwarant.
Manufacturer: Bemis
Websafle: www.bemis.com