
Flylinktech BD10
FLYLINKTECH 5000A Jump Starter User Manual
Model: BD10 | Brand: Flylinktech
1. Rhagymadrodd
Thank you for choosing the FLYLINKTECH 5000A Jump Starter. This portable device is designed to provide instant power to jump-start 12V vehicles, charge electronic devices, and offer emergency lighting. Please read this manual thoroughly before use to ensure safe and optimal performance.
2. Gwybodaeth Bwysig am Ddiogelwch
- Always ensure the jump starter is fully charged before use.
- Peidiwch â cheisio cychwyn batri sydd wedi rhewi.
- Cysylltwch y clamps correctly: red to positive (+), black to negative (-). Reverse polarity can cause damage.
- Peidiwch â chysylltu'r cl coch a duamps gyda'i gilydd.
- Cadwch allan o gyrraedd plant.
- Defnyddiwch mewn man sydd wedi'i awyru'n dda.
- Osgoi amlygu'r ddyfais i dymereddau eithafol neu olau haul uniongyrchol am gyfnodau hir.
- If the device becomes excessively hot during use, disconnect it immediately.
- Cyfeiriwch at lawlyfr perchennog eich cerbyd am weithdrefnau cychwyn neidio penodol.
3. Cynnwys Pecyn
Gwiriwch fod yr holl eitemau yn bresennol yn eich pecyn:
- FLYLINKTECH 5000A Jump Starter (Model BD10)
- Ceblau Siwmper Clyfar
- Cebl Codi Tâl USB-C
- Achos Storio EVA
- Llawlyfr Defnyddiwr

Image: Contents of the FLYLINKTECH 5000A Jump Starter package, including the jump starter unit, smart jumper cables, USB-C charging cable, and EVA storage case.
4. Cynnyrch Drosview
Familiarize yourself with the components and ports of your jump starter:
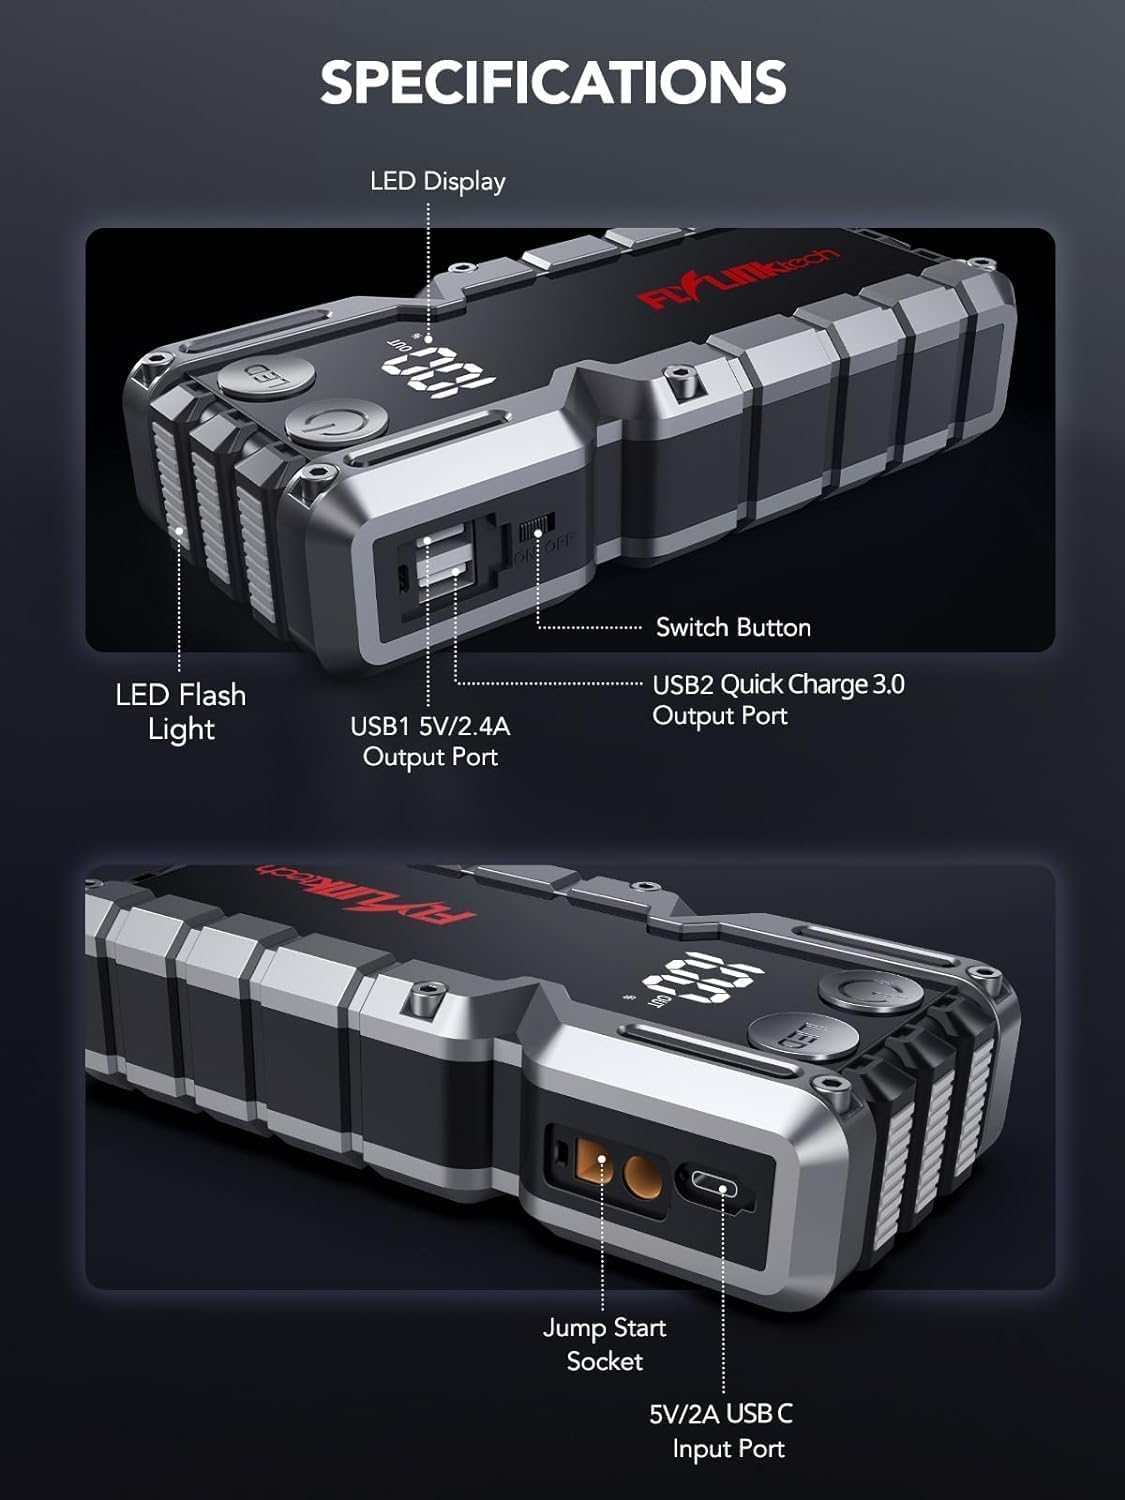
Delwedd: Manwl view of the jump starter showing the LED display, LED flashlight, power button, switch button, USB1 5V/2.4A output port, USB2 Quick Charge 3.0 output port, Jump Start Socket, and 5V/2A USB-C input port.
- Arddangosfa LED: Yn dangos percen batritage.
- Flashlight LED: Yn darparu goleuo gyda sawl modd.
- Botwm Pŵer: Activates the device and controls flashlight modes.
- Botwm Newid: Prif reolaeth pŵer.
- Allbwn USB1 (5V/2.4A): Standard USB charging port.
- USB2 Output (QC3.0): Quick Charge 3.0 port for faster charging.
- Soced Cychwyn Neidio: Connects to the smart jumper cables.
- USB-C Input (5V/2A): Used to recharge the jump starter.
5. Gwefru'r Cychwynnydd Neidio
Before first use, fully charge the jump starter. It is recommended to recharge the unit every 3-6 months to maintain battery health.
- Connect the provided USB-C charging cable to the USB-C input port on the jump starter.
- Connect the other end of the USB-C cable to a 5V/2A USB wall adapter (not included) or a car charger.
- The LED display will show the charging progress. The unit is fully charged when the display shows 100%.

Image: The jump starter connected via USB to charge a smartphone and a tablet, demonstrating its power bank functionality.
6. Jump Starting Your Vehicle
Follow these steps carefully to safely jump-start your 12V vehicle:
- Prepare the Jump Starter: Ensure the jump starter is at least 50% charged. Turn off your vehicle's ignition and all accessories (headlights, radio, etc.).
- Connect Smart Jumper Cables: Insert the blue plug of the smart jumper cables into the Jump Start Socket on the jump starter. Ensure a firm connection. The indicator light on the smart clamp will flash red and green.
- Cysylltu â Batri Cerbyd:
- Atodwch y coch (+) clamp to the positive terminal of your vehicle's battery.
- Atodwch y du (-) clamp i derfynell negyddol batri eich cerbyd.
Ar ôl ei gysylltu'n gywir, bydd y golau dangosydd ar y clyfar yn gorffen.amp bydd yn troi'n wyrdd solet.
- Cychwyn y cerbyd: Go into your vehicle and start the engine. If the vehicle does not start immediately, wait 30 seconds and try again. If it still doesn't start, press the "BOOST" button on the smart clamp for 3 seconds until the green light turns solid, then try starting the car again within 30 seconds.
- Remove Cables: Unwaith y bydd y injan yn cychwyn, tynnwch y ceblau neidio clyfar o fatri'r cerbyd ar unwaith, yna datgysylltwch nhw o'r cychwynnydd neidio.

Image: Visual guide for jump-starting: 1. Insert jump clamp into booster. 2. Connect clamps to car battery. 3. Start your car. 4. Remove clamps.

Image: The smart clamps connected to the jump starter, illustrating the 10-layer safety protections including short circuit, reverse charge, over charge, reverse polarity, over discharge, over current, reverse connection, and high temperature protection.
7. Defnyddio fel Banc Pŵer
The jump starter can also be used to charge your electronic devices.
- Connect your device's USB charging cable to either the USB1 (5V/2.4A) or USB2 (QC3.0) output port on the jump starter.
- Bydd y cychwynnydd neidio yn dechrau gwefru'ch dyfais yn awtomatig.
- The LED display will show the remaining battery capacity of the jump starter.

Image: The jump starter functioning as a portable power bank, with two USB output ports (5V/2.4A and Quick Charge 3.0) actively charging a smartphone and a tablet.
8. Defnyddio'r Fflacholau LED
The built-in 600-lumen LED flashlight has three modes for various situations:
- I Droi Ymlaen / Diffodd: Press and hold the LED button for 3 seconds.
- I Feicio Moddau: Once the light is on, short press the LED button to switch between:
- Cyson Ar: Ar gyfer goleuo cyffredinol.
- Modd SOS: Flashes the international SOS signal for emergencies.
- Modd Strobe: Rapid flashing for warning or signaling.

Image: The jump starter with its LED flashlight active, illustrating the three available modes: standard flashlight, SOS signal, and strobe light for emergencies.
9. cynnal
- Glanhau: Sychwch yr uned gyda lliain meddal, sych. Peidiwch â defnyddio cemegau llym na deunyddiau sgraffiniol.
- Storio: Store the jump starter in its EVA case in a cool, dry place away from direct sunlight. Ensure it is charged to at least 50% before storing for extended periods. Recharge every 3-6 months.
- Gofal Batri: The internal lithium-ion battery is designed for long life. Avoid fully discharging the unit frequently.

Water-resistant design.

Rugged ABS shell for drop resistance.

Operates in extreme temperatures (-4°F to 140°F).
10. Datrys Problemau
| Problem | Achos Posibl | Ateb |
|---|---|---|
| Vehicle won't start after connecting. | Jump starter battery too low; incorrect clamp connection; vehicle battery completely dead. | Ensure jump starter is fully charged. Check clamp connections (red to +, black to -). Press the "BOOST" button on the smart clamp for 3 seconds and try again. |
| Cl smartamp indicator light is red/flashing. | Reverse polarity; short circuit; over-temperature. | Datgysylltu clamps and re-connect correctly. Check for any short circuits. Allow unit to cool down if overheated. |
| Nid yw'r cychwynnydd neidio yn gwefru. | Faulty charging cable or adapter; loose connection. | Ensure USB-C cable and adapter are working and connected securely. Try a different cable or adapter. |
| Nid yw'r fflachlamp LED yn gweithio. | Not activated correctly; low battery. | Press and hold the LED button for 3 seconds to activate. Ensure the jump starter has sufficient charge. |
11. manylebau
| Nodwedd | Manylyn |
|---|---|
| Cyfredol Uchaf | 5000A |
| Gallu Batri | 18000mAh (66.6Wh) |
| Dechreuwch Voltage | 12V |
| Cydweddoldeb Engine | Hyd at 9.0L Petrol / 8.0L Diesel |
| Allbwn USB 1 | 5V/2.4A |
| Allbwn USB 2 | QC3.0 |
| Mewnbwn USB-C | 5V/2A |
| Flashlight LED | 600-Lumen (Constant, SOS, Strobe) |
| Tymheredd Gweithredu | -4°F i 140°F (-20°C i 60°C) |
| Dimensiynau | 4.2 x 9 x 19 cm |
| Pwysau | 540 g (1.19 pwys) |
| Amddiffyniadau Diogelwch | 10-Layer (Short Circuit, Reverse Polarity, Over-Current, etc.) |
12. Gwarant a Chefnogaeth
The FLYLINKTECH 5000A Jump Starter comes with an industry-leading Gwarant 3 mlynedd o ddyddiad y pryniant. Mae'r warant hon yn cwmpasu diffygion gweithgynhyrchu ac yn sicrhau perfformiad dibynadwy.
For technical support, warranty claims, or any questions regarding your product, please contact FLYLINKTECH customer service through the retailer's platform or visit our official websafle.
Cadwch eich prawf prynu i ddilysu'r warant.
Ask a question about this manual
Ask about setup, troubleshooting, compatibility, parts, safety, or missing instructions. Manuals+ will review the question and use this page’s manual context to help answer it.