1. Rhagymadrodd
This manual provides essential information for the safe and effective use of your VEVOR Telescoping A-Frame Ladder. This versatile ladder is designed for various tasks, offering both A-frame and straight extension configurations. It features a robust aluminum alloy construction, a 330 lb load capacity, and integrated wheels for easy portability. Please read this manual thoroughly before initial use and retain it for future reference.

Figure 1: VEVOR Telescoping A-Frame Ladder (19 FT model shown).
2. Canllawiau Diogelwch
RHYBUDD: Gall methu â dilyn y cyfarwyddiadau diogelwch hyn arwain at anaf difrifol neu farwolaeth.
- Always inspect the ladder before each use. Ensure all locking mechanisms are fully engaged and secure. Do not use if any part is damaged or missing.
- Ensure the ladder is placed on a firm, level, and non-slip surface. Avoid soft ground, uneven surfaces, or slippery floors.
- Do not exceed the maximum load capacity of 330 lbs (149.7 kg). This includes the user and any tools or materials.
- Maintain three points of contact (two hands and one foot, or two feet and one hand) when climbing or descending.
- Do not overreach. Keep your body centered between the side rails.
- Do not use the ladder during strong winds, storms, or on icy surfaces.
- Keep children and pets away from the ladder during use.
- Ensure the area around the base of the ladder is clear of obstructions.
- When using as an extension ladder, ensure the top support points are secure and stable. The ladder should extend at least 3 feet (0.9 m) above the landing point.
- Do not stand on the top two steps of an A-frame ladder or the top three steps of an extension ladder.
- Avoid using the ladder near electrical wires or equipment. Aluminum conducts electricity.
- Always face the ladder when climbing or descending.
3. Cydrannau
The VEVOR Telescoping Ladder consists of several key components designed for safety and functionality:
- Ffrâm aloi alwminiwm: Lightweight yet durable structure.
- Telescoping Rungs: Individual steps that extend and retract.
- Mecanweithiau Cloi: Securely hold extended rungs in place. These are typically red/orange tabs or buttons on each rung.
- Adjustable Locking Key/Hinge: Allows the ladder to switch between A-frame and straight extension modes, and adjust angles.
- Anti-Slip Foot Pads: Rubberized feet at the base for stability and floor protection.
- Integrated Wheels: Located at the base for easy transportation when folded.
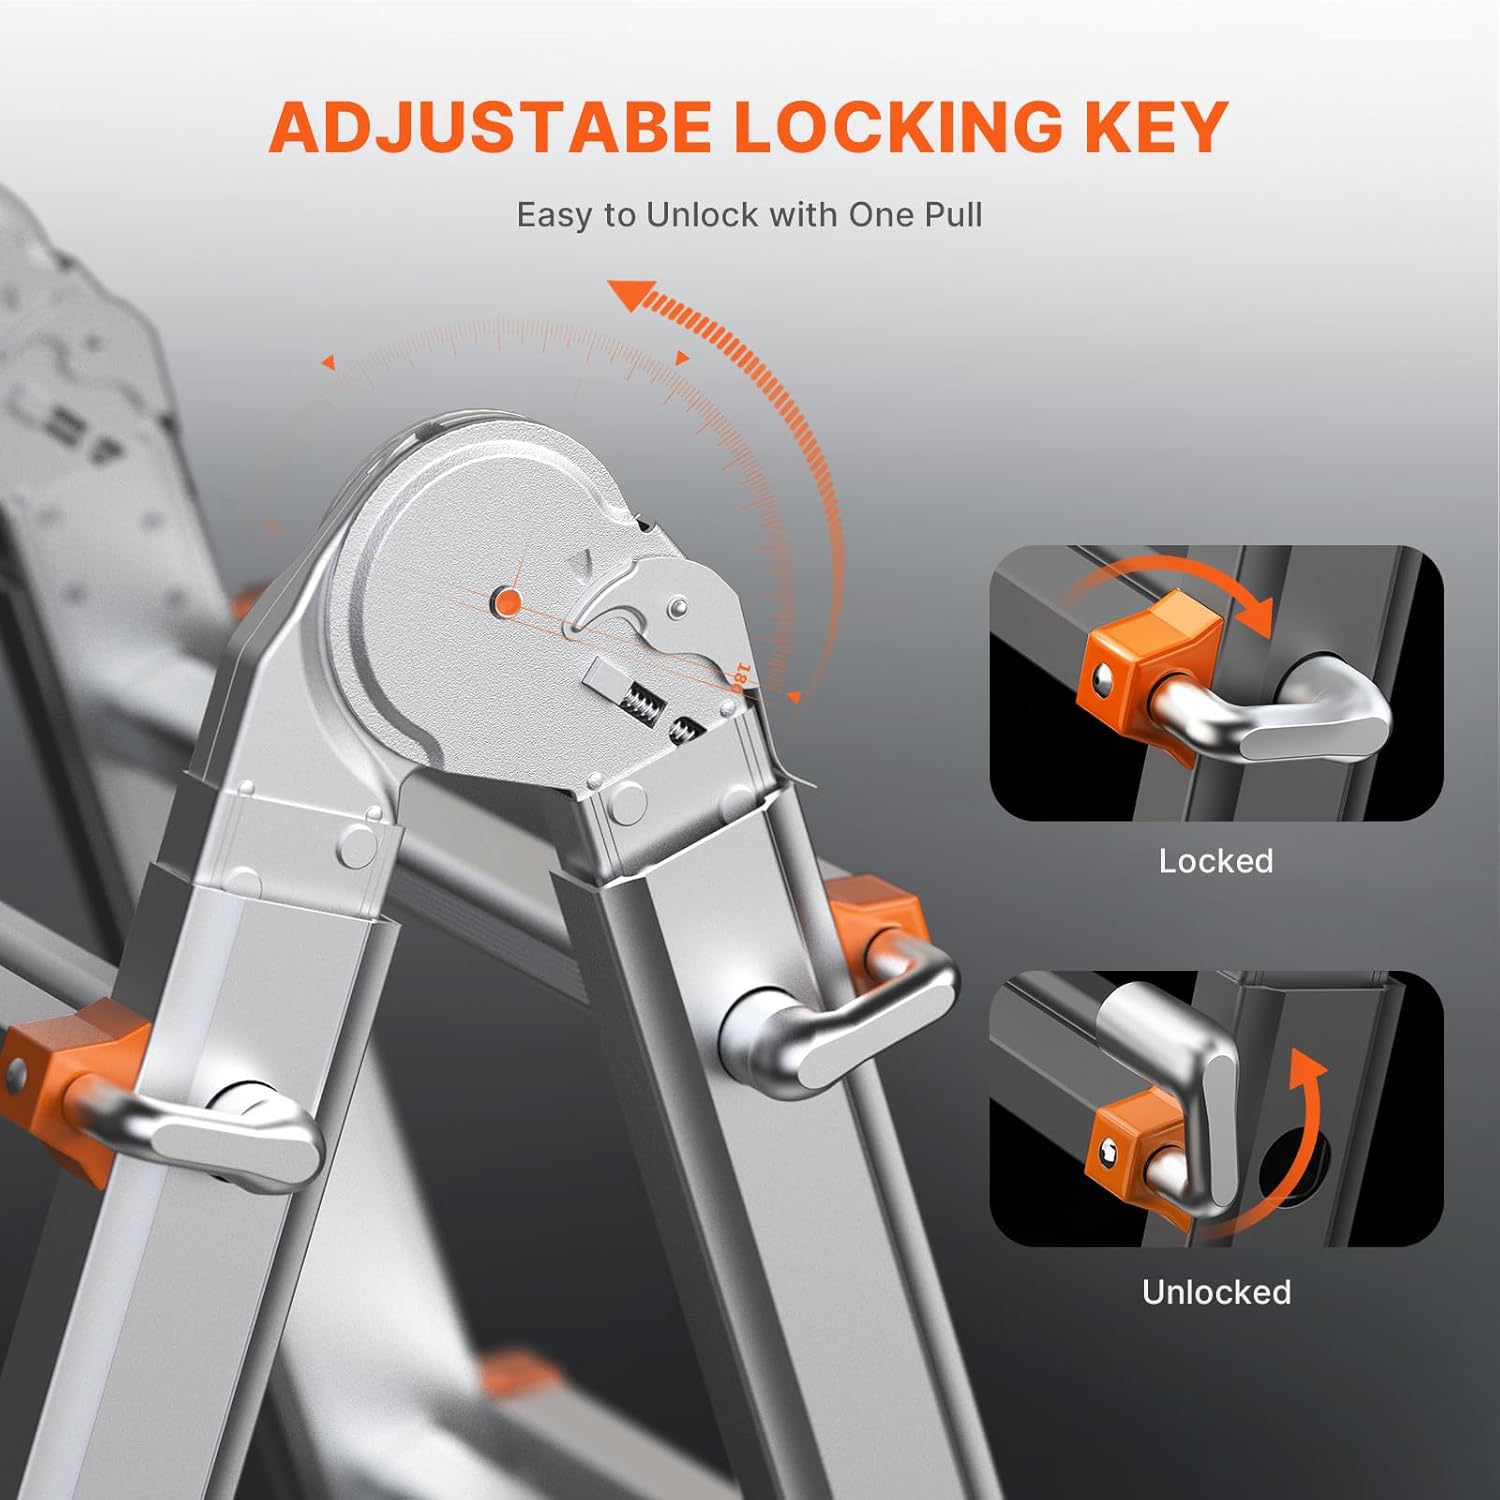
Figure 2: Adjustable Locking Key for mode changes.
4. Gosod ac Archwiliad Cychwynnol
- Dad-bocsio: Carefully remove the ladder from its packaging. Retain packaging for potential future storage or transport.
- Archwiliad gweledol: Before first use, and before every subsequent use, thoroughly inspect the entire ladder. Check for any signs of damage, such as dents, cracks, bends, or loose components. Ensure all rivets, bolts, and rungs are secure.
- Locking Mechanism Check: Verify that all rung locking mechanisms and the main hinge locking key operate smoothly and engage fully. They should click into place when extended.
- Foot Pad Stability: Ensure the anti-slip foot pads are clean, intact, and provide good grip on the intended surface.
5. Cyfarwyddiadau Gweithredu
5.1. Extending the Ladder
To extend the ladder, always start from the bottom rung and work your way up. Ensure each section locks securely into place before extending the next.
- Rhowch yr ysgol ar arwyneb gwastad, sefydlog.
- Grasp the lowest rung section and pull it upwards. The locking pins on the side rails will automatically engage as the section extends.
- Listen for a distinct "click" sound, indicating that the locking pins are fully engaged. Visually confirm that the pins are protruding through the holes on both sides of the ladder.
- Repeat this process for each subsequent rung section until the desired height is reached.
- For A-frame use, extend both sides equally. For straight extension, extend one side fully, then adjust the hinge.

Figure 3: Extending the ladder sections.
5.2. Retracting the Ladder
To retract the ladder, always start from the top rung and work your way down. Ensure your hands and fingers are clear of the collapsing sections to prevent pinching.
- Ensure the ladder is on a stable surface and no one is on it.
- Locate the release buttons/levers on the side of the top rung section.
- Press both release buttons simultaneously to disengage the locking pins.
- Gently lower the section. It will retract into the section below it.
- Repeat this process for each subsequent rung section until the ladder is fully retracted.
5.3. Using as an A-Frame Ladder
The A-frame configuration provides a stable, self-supporting structure suitable for various tasks.
- Place the ladder on a firm, level surface.
- Unlock the main hinge by pulling the adjustable locking key.
- Open the ladder into an 'A' shape, ensuring both sides are extended equally.
- Adjust the angle of the A-frame using the locking key. The ladder supports angles up to 180 degrees (straight extension) and can be set at various intermediate angles (e.g., 35°, 107°).
- Ensure the main hinge locking key is fully engaged and secure before climbing.
- Verify that all rung locking mechanisms are engaged on both sides.
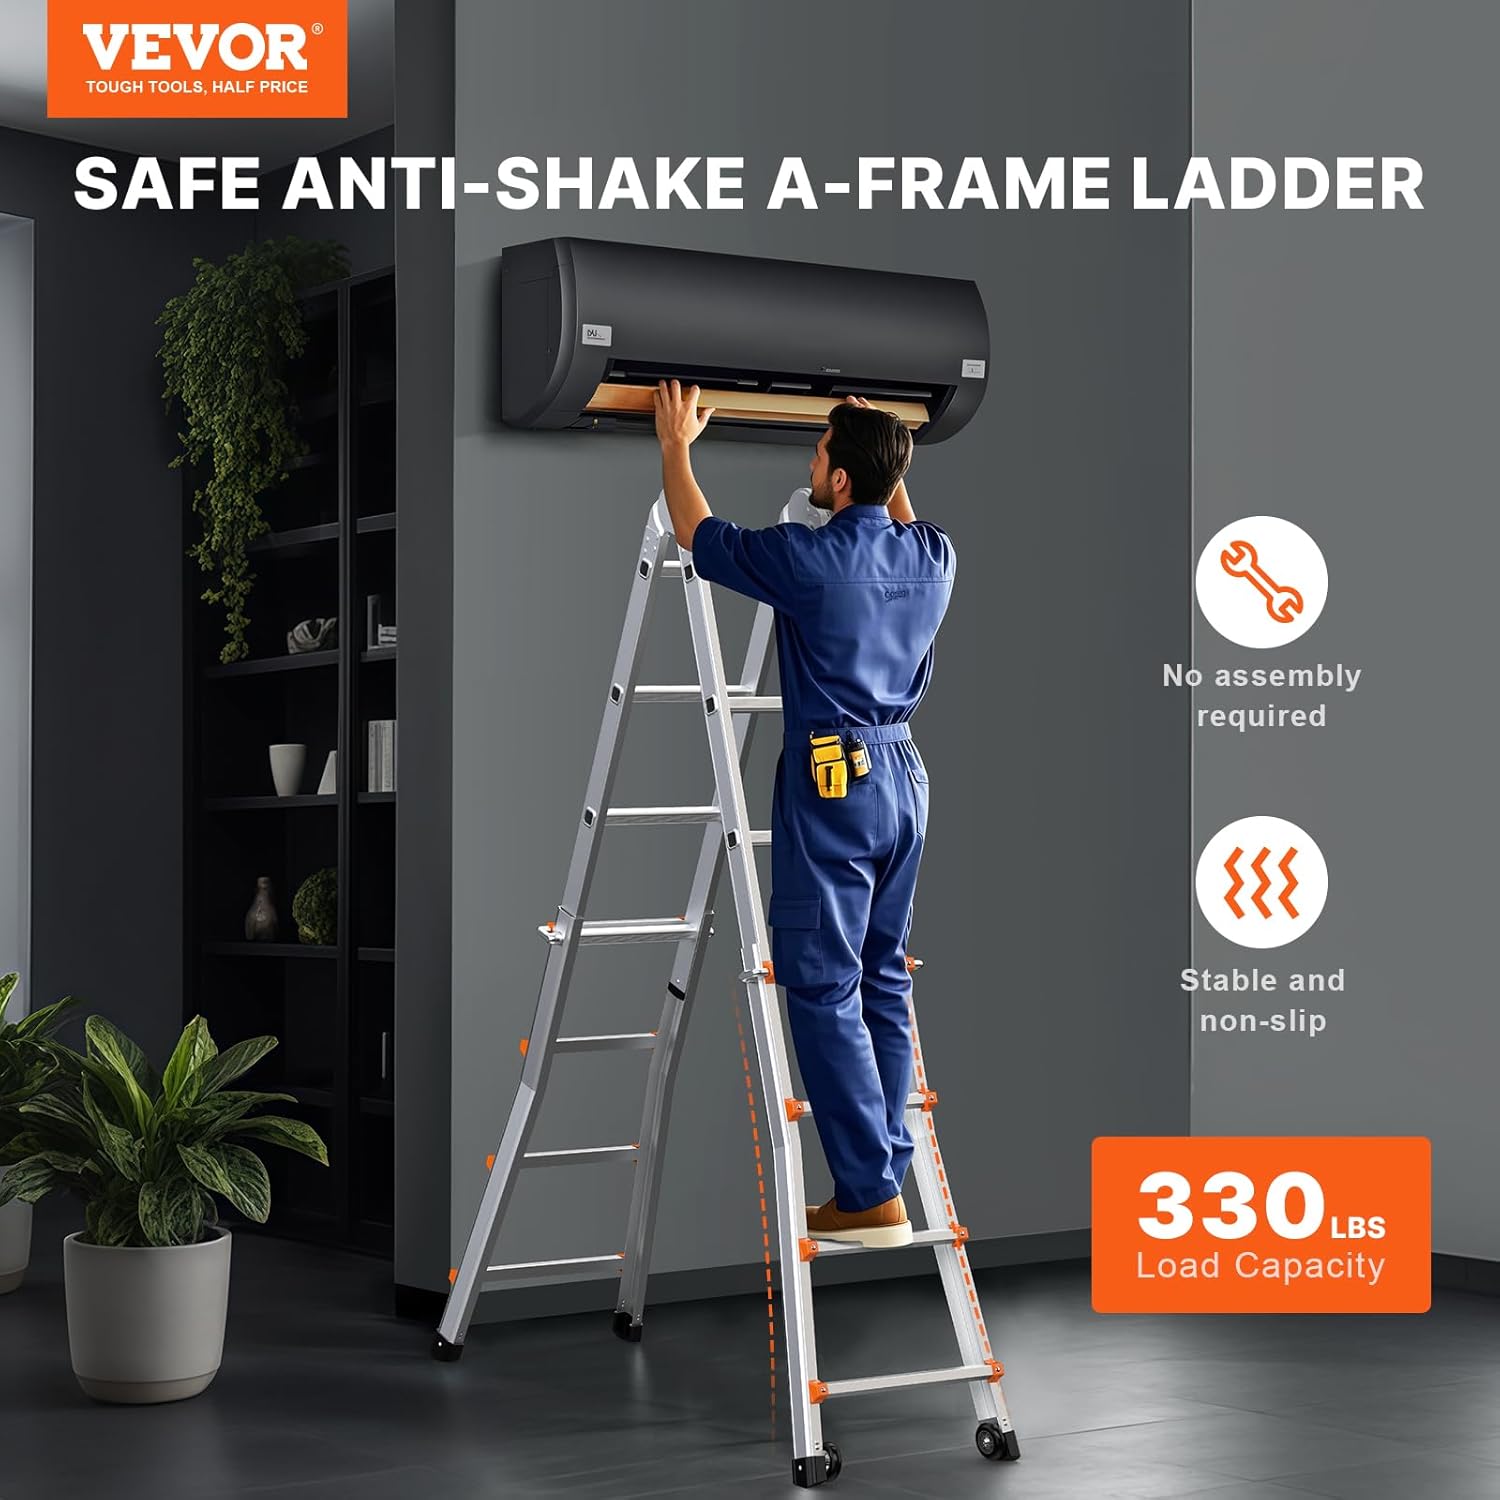
Figure 4: Using the ladder in A-frame mode.

Ffigur 5: Examples of 3 levels of adjustment (35°, 107°, 180°).
5.4. Using as a Straight Extension Ladder
For maximum reach, the ladder can be fully extended into a straight configuration.
- Unlock the main hinge and fully extend the ladder to 180 degrees, forming a straight line. Ensure the hinge locks securely in this position.
- Extend all rung sections to the desired height, ensuring all locking pins are engaged.
- Lean the ladder against a stable, secure surface at an approximate 75-degree angle (for every 4 feet of height, the base should be 1 foot away from the wall).
- Ensure the top of the ladder extends at least 3 feet (0.9 m) above the landing point.
- Verify the anti-slip foot pads are firmly planted on the ground.
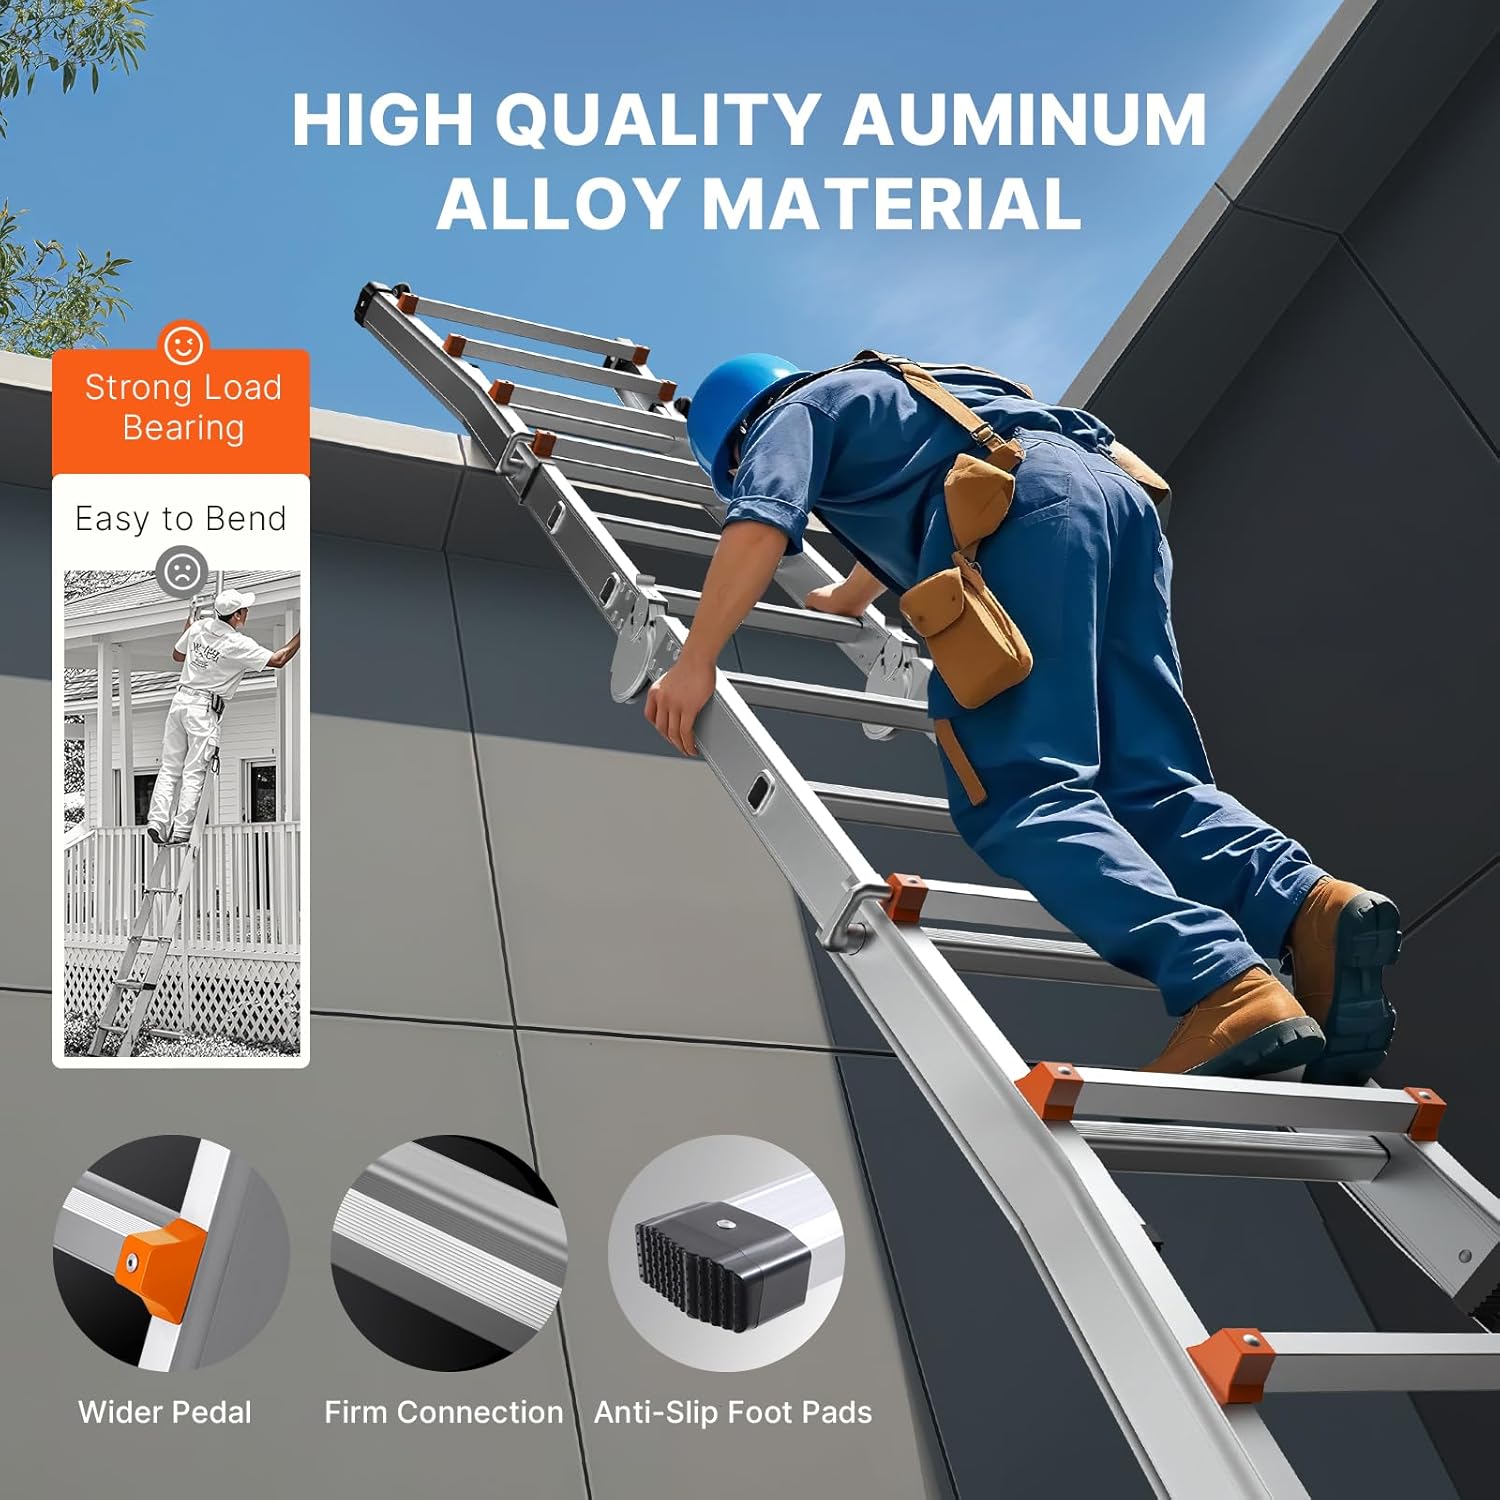
Figure 6: Ladder in straight extension mode, highlighting anti-slip foot pads.
5.5. Transporting the Ladder
The integrated wheels make transporting the folded ladder convenient.
- Fully retract the ladder to its most compact form.
- Ensure the main hinge is locked in the folded position.
- Tilt the ladder slightly to engage the wheels at the base.
- Roll the ladder to your desired location.
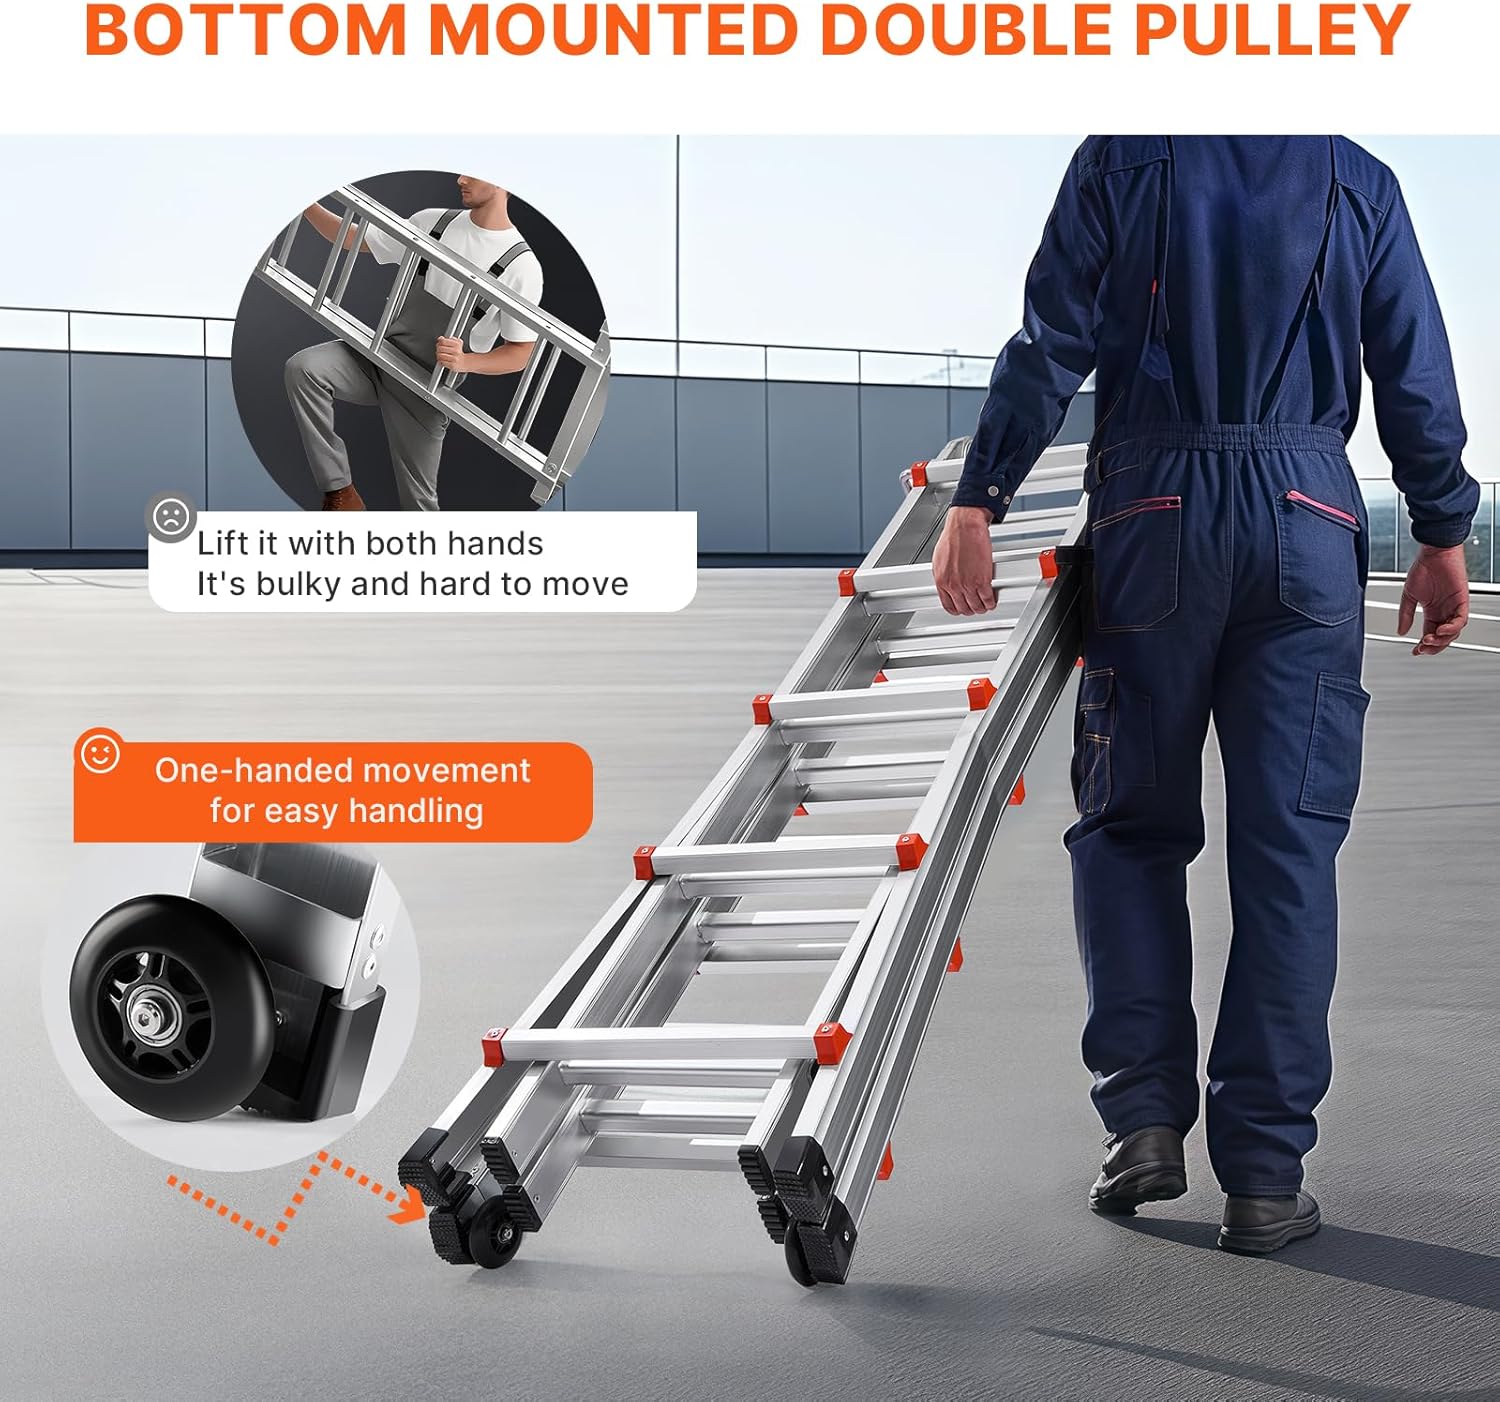
Figure 7: Integrated wheels for easy transport.
6. cynnal
- Glanhau: Clean the ladder regularly with a damp cloth to remove dirt, grease, or debris. Do not use abrasive cleaners or solvents that could damage the aluminum or plastic components.
- Iro: Periodically apply a silicone-based lubricant to the locking mechanisms and hinge to ensure smooth operation. Avoid oil-based lubricants that can attract dirt.
- Storio: Store the ladder in a dry, clean place, away from direct sunlight and extreme temperatures. Store it in its fully retracted position to protect the telescoping mechanisms.
- Arolygiad: Conduct a thorough inspection before each use, as detailed in Section 4. Pay close attention to the condition of the rungs, side rails, locking pins, hinge, and foot pads.
7. Datrys Problemau
| Problem | Achos Posibl | Ateb |
|---|---|---|
| Ladder sections do not extend or retract smoothly. | Dirt/debris in mechanisms; lack of lubrication; bent section. | Clean mechanisms thoroughly. Apply silicone lubricant. If bent, do not use and contact support. |
| Locking pins do not engage fully. | Obstruction; damaged pin/spring; not fully extended. | Ensure section is fully extended. Clear any debris. If damaged, do not use and contact support. |
| Ladder feels unstable during use. | Uneven surface; locking mechanisms not engaged; exceeding load capacity. | Relocate to a firm, level surface. Verify all locks are engaged. Reduce load. |
| Hinge mechanism is stiff or difficult to adjust. | Diffyg iro; cronni baw. | Clean hinge area. Apply silicone lubricant. |
8. Manylebau Technegol
| Nodwedd | Manyleb |
|---|---|
| Rhif Model | KMP405D |
| Deunydd | Aloi Alwminiwm |
| Cynhwysedd Llwyth Uchaf | 330 pwys (149.7 kg) |
| Fully Extended Height (19 FT model) | 19 ft / 5990 mm (approx. 236 inches) |
| Dimensiynau Cynnyrch (Plygu) | 20.28"L x 7.87"D x 67.72"U (515 x 200 x 1720 mm) |
| Pwysau Net | 28.2 pwys (12.8 kg) |
| Number of Steps (Fully Extended) | 20 |
| Step Distance | 13 modfedd (330 mm) |
| Nodweddion Arbennig | Extendable, Integrated Wheels, Multi-function (A-frame, Straight) |
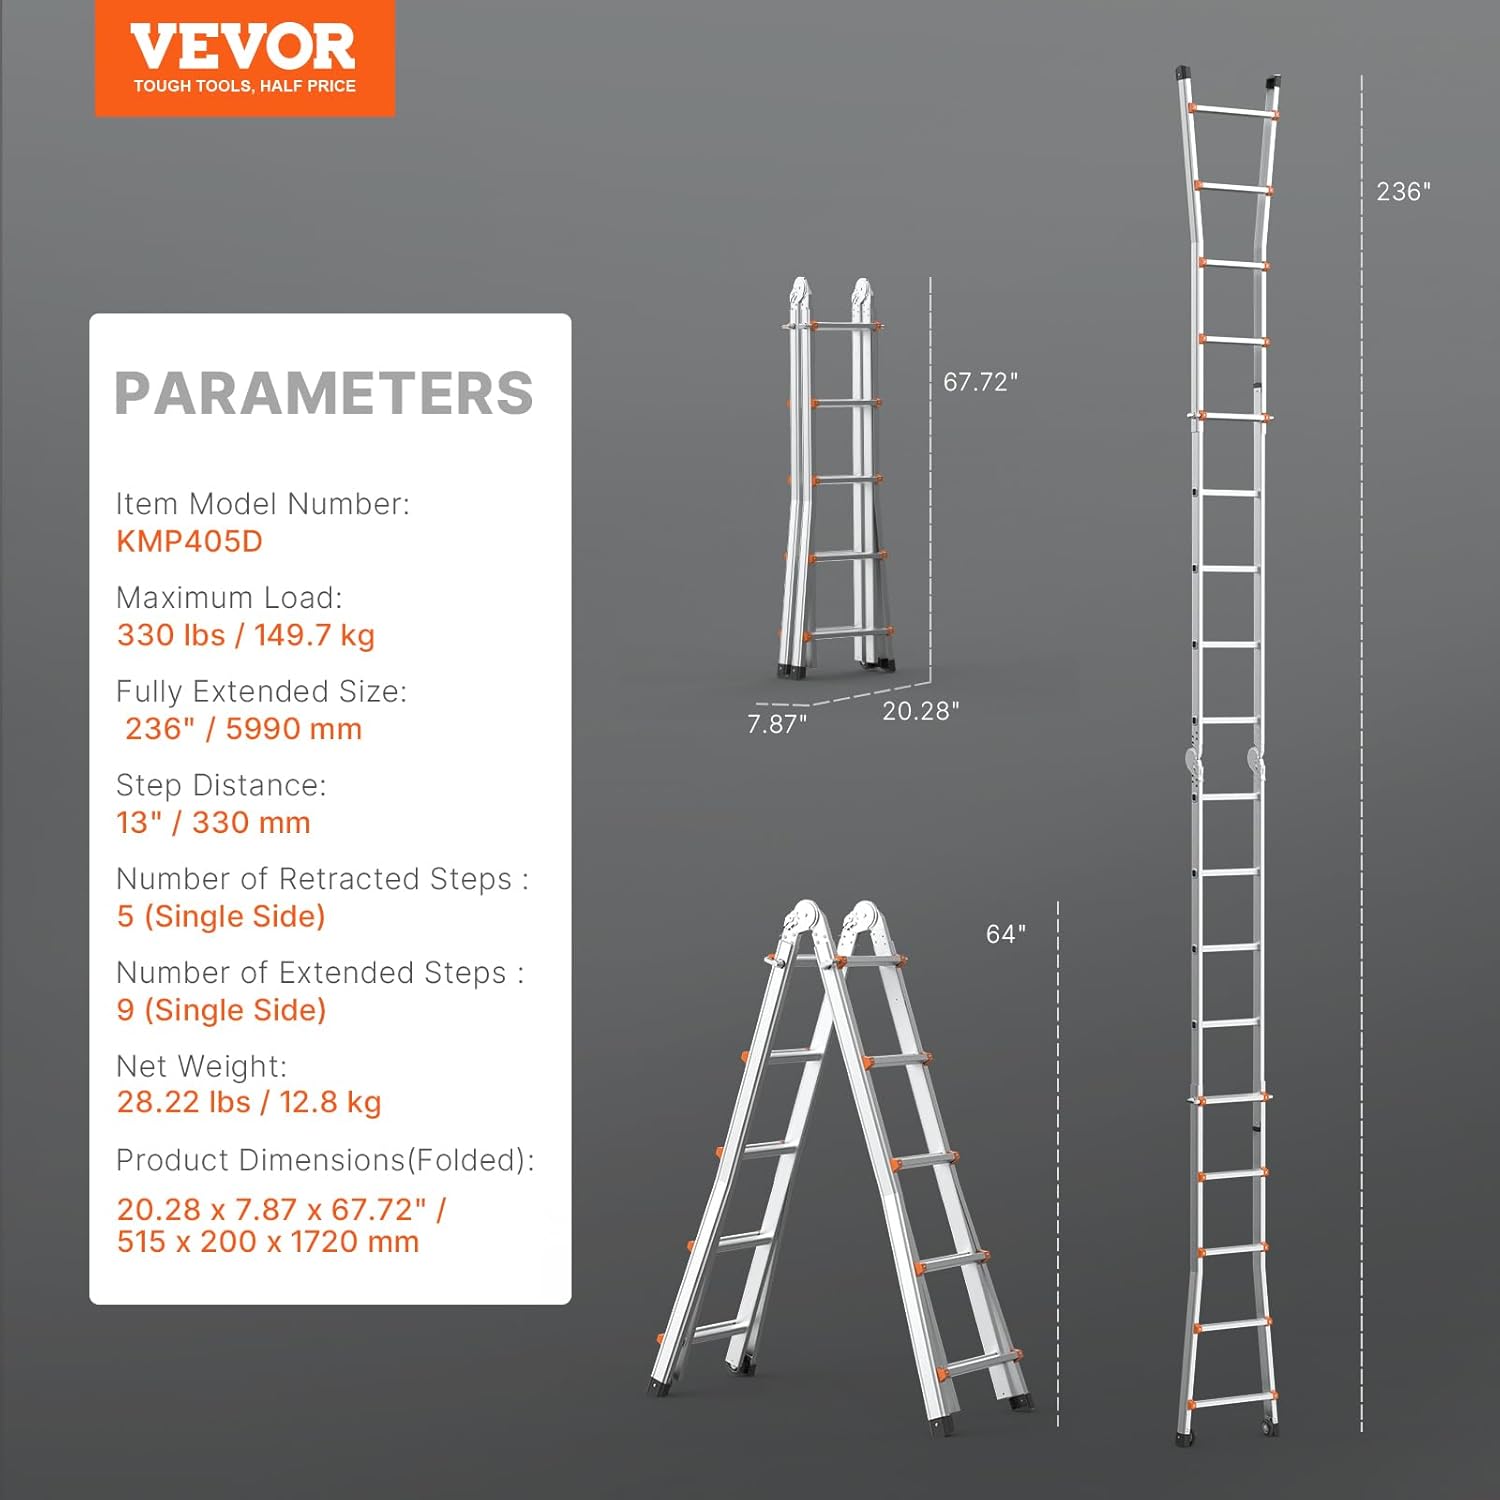
Figure 8: Technical Parameters of the VEVOR Telescoping Ladder.
9. Gwarant a Chefnogaeth
Mae cynhyrchion VEVOR wedi'u cynllunio ar gyfer gwydnwch a pherfformiad. Am wybodaeth benodol am y warant, cyfeiriwch at y cerdyn gwarant sydd wedi'i gynnwys gyda'ch cynnyrch neu ewch i wefan swyddogol VEVOR. website. If you encounter any issues or require technical assistance, please contact VEVOR customer support.
Gallwch ddod o hyd i ragor o wybodaeth ac adnoddau cymorth ar dudalen swyddogol siop VEVOR: Siop Swyddogol VEVOR.
10. Fideos Cynnyrch
Ni chanfuwyd bod unrhyw fideos cynnyrch swyddogol gan y gwerthwr yn berthnasol i'w cynnwys yn y llawlyfr cyfarwyddiadau hwn.