1. Rhagymadrodd
Thank you for choosing the VEVOR 25L Reptile Incubator. This scientific lab incubator is designed to provide a precise and stable temperature-controlled environment for incubating reptile eggs, as well as for other scientific and breeding applications. It features both cooling and heating capabilities, maintaining temperatures from 5 °C to 42 °C (41 °F to 107.6 °F). With its user-friendly LED display, large capacity, and dual power options (12V DC for car use and 110V AC for home use), this incubator offers versatility and convenience for various breeding needs, including turtles, lizards, geckos, and even poultry.
2. Cyfarwyddiadau Diogelwch
Please read and understand all safety instructions before operating the incubator. Failure to follow these instructions may result in electric shock, fire, or serious injury.
- Always connect the incubator to a grounded power outlet.
- Do not operate the incubator with a damaged power cord or plug.
- Keep the incubator away from water or other liquids. Do not immerse the unit in water.
- Ensure adequate ventilation around the incubator. Do not block the air vents.
- Place the incubator on a stable, level surface to prevent tipping.
- Unplug the incubator from the power source before cleaning or performing any maintenance.
- Do not attempt to repair or modify the incubator yourself. Contact qualified service personnel for repairs.
- Cadwch allan o gyrraedd plant ac anifeiliaid anwes.
- When using the 12V DC car adapter, ensure your vehicle's power outlet can support the incubator's power requirements.
3. Cynnwys Pecyn
Dadbacio'r blwch yn ofalus a sicrhau bod yr holl eitemau yn bresennol ac yn ddi-fwlch.
- 1 x VEVOR Reptile Incubator
- 1 x 110V AC Power Cord
- 1 x 12V DC Power Cord (for car use)
- 2 x Removable Shelves
- 1 x Water Tray
- 1 x English Manual (this document)
4. Cynnyrch Drosview
Familiarize yourself with the components of your VEVOR Reptile Incubator.
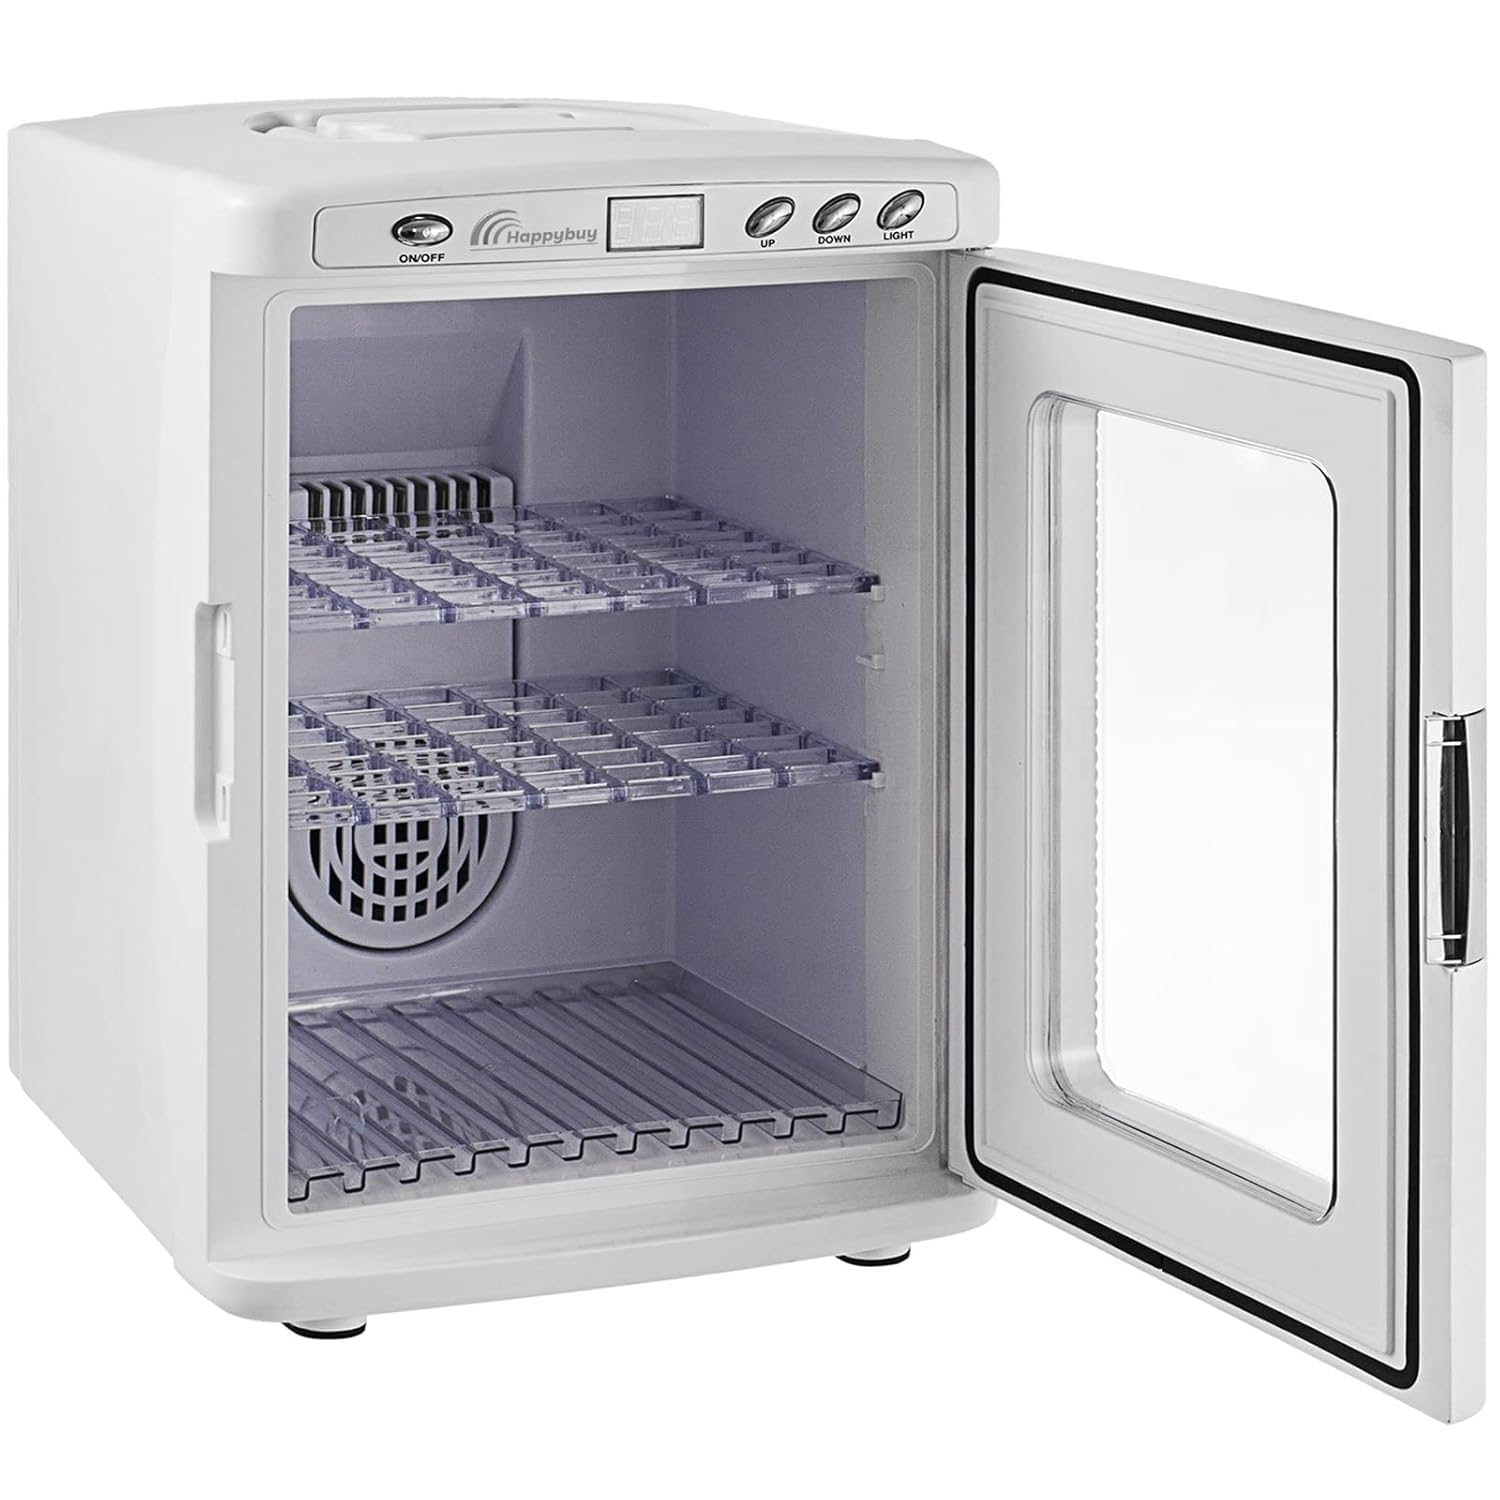
Ffigur 4.1: Blaen view of the VEVOR Reptile Incubator with the door open, revealing the spacious interior and two removable shelves.

Ffigur 4.2: Demonstrates the portable handle on top for easy transport and the transparent PVC door allowing observation without opening.
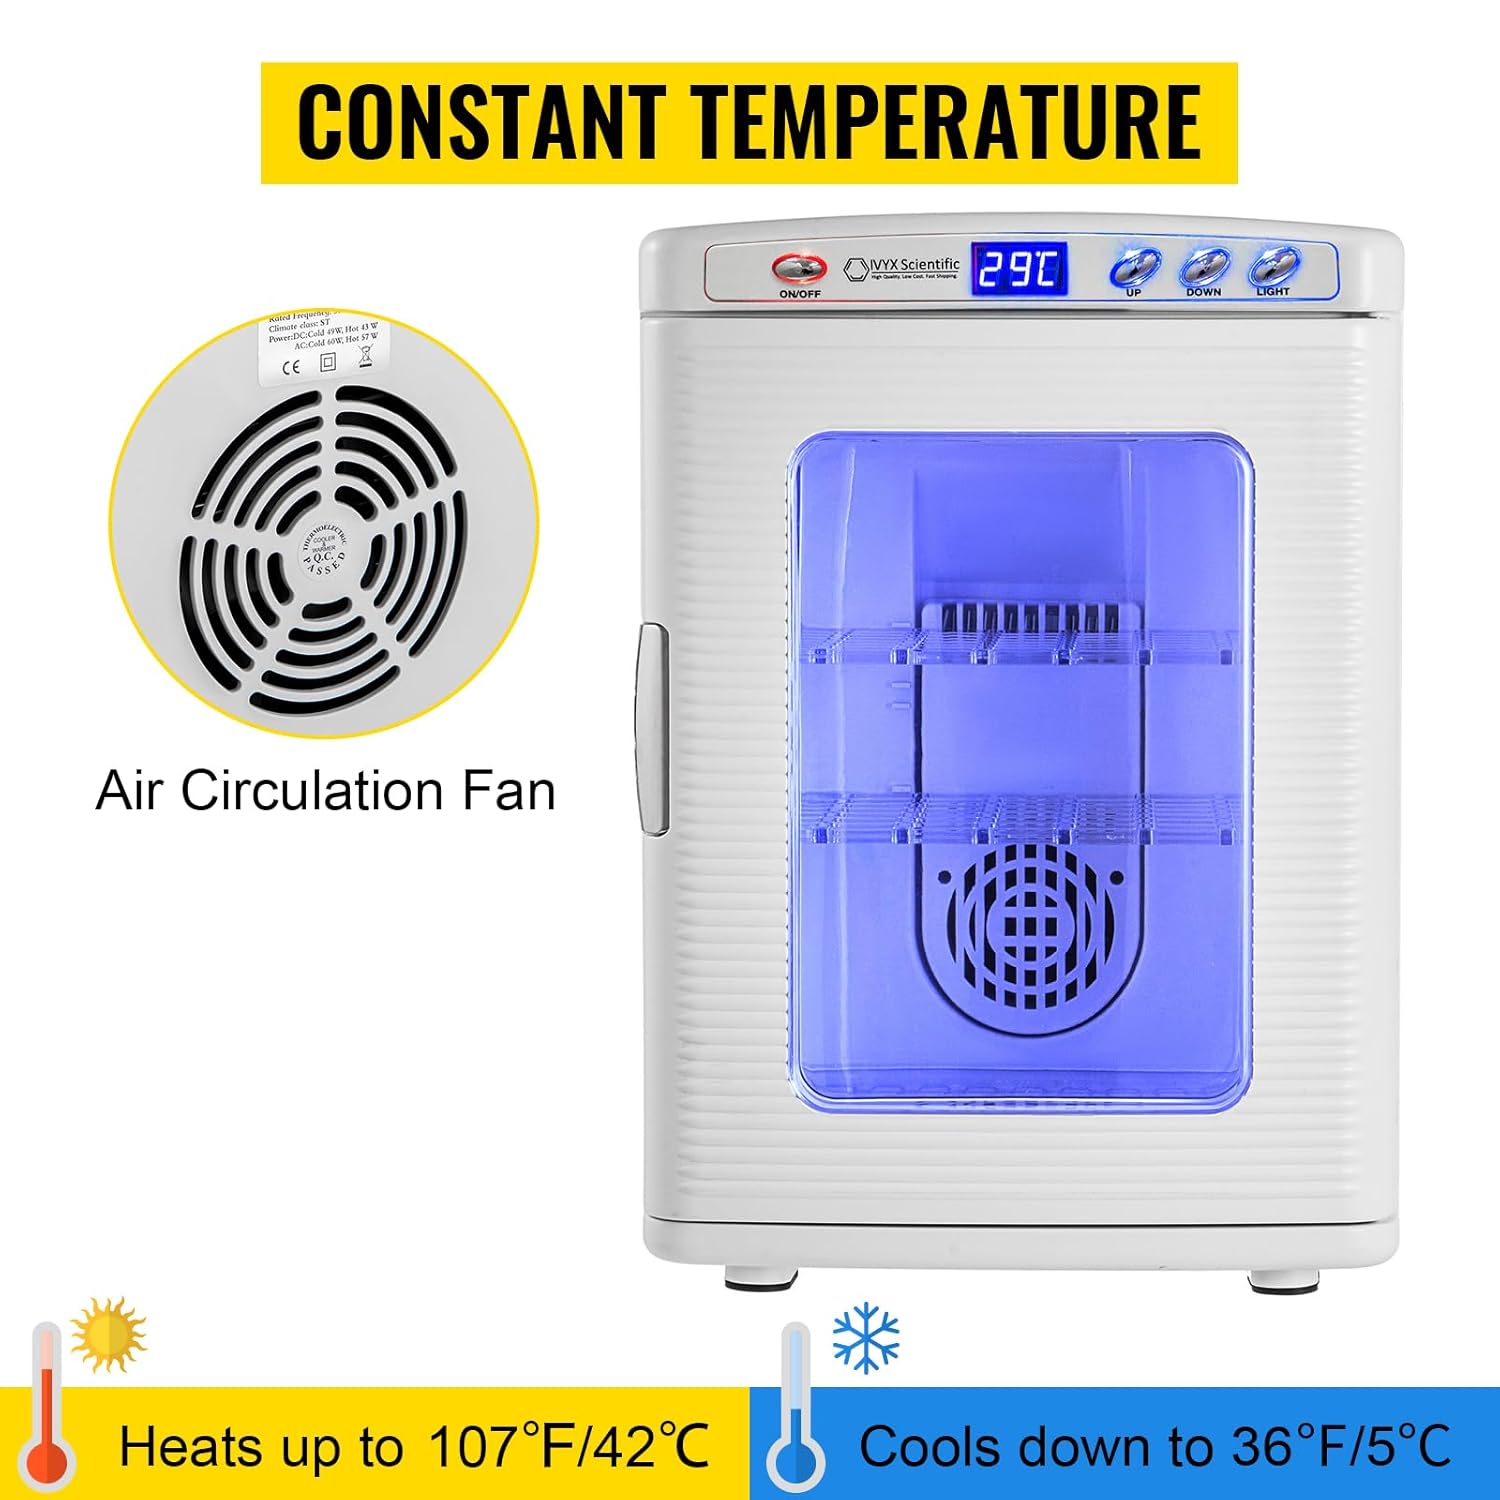
Ffigur 4.3: Highlights the control panel with LED display and buttons, along with the internal air circulation fan for consistent temperature. The image also indicates the heating and cooling capabilities.
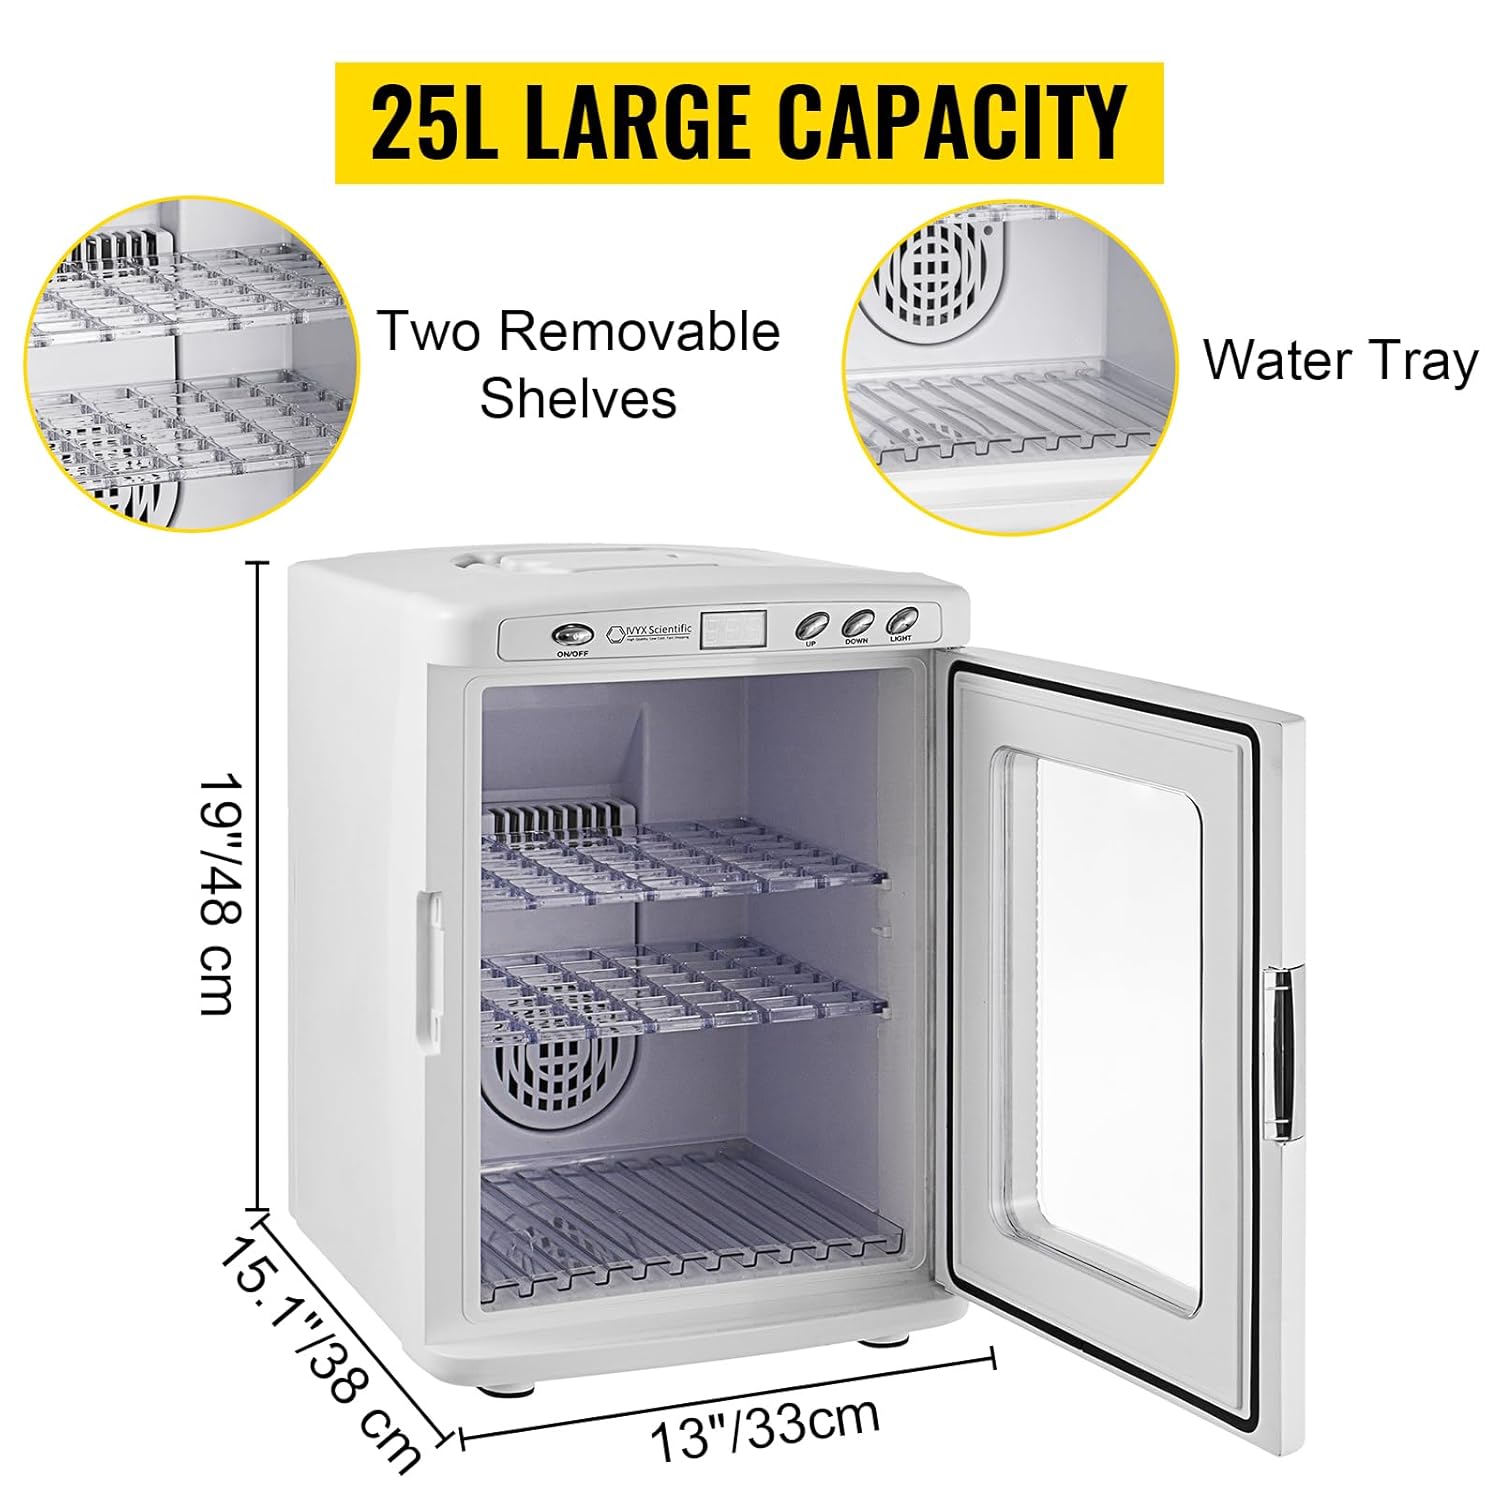
Ffigur 4.4: Illustrates the 25L large capacity, showing the two removable shelves and the water tray for humidity control, along with external dimensions.
5. Gosod
- Unpack the Incubator: Remove the incubator and all accessories from the packaging. Inspect for any damage.
- Lleoliad: Place the incubator on a firm, level, and stable surface. Ensure there is sufficient space around the unit for proper air circulation (at least 10 cm or 4 inches on all sides). Avoid direct sunlight or areas with extreme temperature fluctuations.
- Install Shelves and Water Tray: Insert the two removable shelves into the desired positions within the incubator. Place the water tray at the bottom of the incubator if humidity control is required.
- Cysylltiad Pwer:
- For Home Use (110V AC): Connect the 110V AC power cord to the incubator's power input, then plug it into a standard grounded wall outlet.
- For Car Use (12V DC): Connect the 12V DC power cord to the incubator's power input, then insert the cigarette lighter plug into your vehicle's 12V DC outlet.

Ffigur 5.1: Illustration of connecting the incubator for 12V DC car use via cigarette lighter and 110V AC home use via wall socket.
6. Cyfarwyddiadau Gweithredu
- Pŵer ymlaen / i ffwrdd: Gwasgwch y YMLAEN / I FFWRDD button on the control panel to turn the incubator on or off. The LED display will illuminate when the unit is powered on.
- Tymheredd Gosod:
- The current temperature inside the chamber will be displayed on the LED screen.
- To adjust the target temperature, press the UP or I LAWR buttons. Each press will adjust the temperature by 1 °C (or 34 °F).
- Bydd y deorydd yn dechrau gwresogi neu oeri yn awtomatig i gyrraedd a chynnal y tymheredd gosodedig.
- The temperature range is 5 °C to 42 °C (41 °F to 107.6 °F).
- Humidity Control (Optional):
- To increase humidity, add a small amount of water to the water tray located at the bottom of the incubator.
- Monitor humidity levels with an external hygrometer (not included) if precise humidity is required for your application.
- Golau Mewnol: Gwasgwch y GOLAU button to turn the internal LED light on or off, allowing you to view contents without opening the door.
- Loading Eggs/Samples: Carefully place eggs or samples onto the removable shelves. Ensure adequate spacing for air circulation. The visible PVC door allows observation without disturbing the incubation process.
- Incubation Guidelines:
- Optimal incubation temperatures vary by species. Consult specific guidelines for the type of eggs you are incubating.
- For poultry eggs, a suggested incubation period is 21 days at 35-38 °C (95-100 °F).
- The incubator is suitable for various reptiles and poultry, including turtles, lizards, geckos, chickens, ducks, and quails.

Ffigur 6.1: Examples of various uses for the incubator, including hatching reptile eggs and incubating poultry.
7. cynnal
Regular cleaning and maintenance will ensure the longevity and optimal performance of your incubator.
- Glanhau'r Tu:
- Datgysylltwch y deorydd bob amser cyn glanhau.
- Remove the shelves and water tray. Wash them with mild soap and water, then rinse thoroughly and dry completely.
- Sychwch yr arwynebau mewnol gyda hysbysebamp cloth and a mild, non-abrasive disinfectant suitable for surfaces that will be in contact with eggs/samples.
- Ensure the interior is completely dry before reassembling and powering on.
- Glanhau'r tu allan:
- Sychwch yr arwynebau allanol gyda meddal, damp brethyn.
- Peidiwch â defnyddio cemegolion llym na glanhawyr sgraffiniol.
- Air Circulation Fan: Periodically check the air circulation fan (located inside) for any dust or debris buildup. Gently clean with a soft brush or compressed air if necessary, ensuring the unit is unplugged.
- Storio: If storing the incubator for an extended period, ensure it is clean and dry. Store in a cool, dry place away from direct sunlight and extreme temperatures.
8. Datrys Problemau
If you encounter issues with your incubator, refer to the following common problems and solutions.
| Problem | Achos Posibl | Ateb |
|---|---|---|
| Nid yw'r deorydd yn troi ymlaen. | Dim cyflenwad pŵer; cysylltiad rhydd; llinyn pŵer diffygiol. | Check if the power cord is securely plugged into both the incubator and the outlet. Try a different outlet. Ensure the ON/OFF button is pressed. |
| Nid yw'r tymheredd yn cyrraedd y pwynt gosod. | Ambient temperature too extreme; blocked air vents; door not sealed properly. | Move incubator to a room with a more stable ambient temperature. Ensure vents are clear. Check door seal and latch. Allow sufficient time for temperature stabilization. |
| Mae'r tymheredd yn amrywio'n sylweddol. | Frequent door opening; unstable ambient temperature; fan malfunction. | Minimize door openings. Ensure stable room temperature. Listen for the fan; if it's not running, contact support. |
| Sŵn gormodol. | Fan obstruction; unit not level. | Check for any obstructions near the fan. Ensure the incubator is on a level surface. |
Os yw'r broblem yn parhau ar ôl rhoi cynnig ar yr atebion hyn, cysylltwch â chymorth cwsmeriaid VEVOR i gael rhagor o gymorth.
9. manylebau
Technical specifications for the VEVOR 25L Reptile Incubator.
| Nodwedd | Manyleb |
|---|---|
| Model | VEVOR 25L Reptile Incubator |
| Cyftage | 110V AC, 12V DC |
| Pŵer Oeri | 48W (DC), 56W (AC) |
| Pŵer Gwresogi | 40W (DC), 52W (AC) |
| Amrediad Tymheredd | 5 °C i 42 °C (41 °F i 107.6 °F) |
| Internal Size (L x W x H) | 11" x 9.8" x 14" (28 x 25 x 36 cm) |
| External Size (L x W x H) | 13" x 15.1" x 19" (33 x 38 x 48 cm) |
| Pwysau Net | 13.2 pwys (6 kg) |
| Pwysau Crynswth | 15.4 pwys (7 kg) |
| Gallu | 25 litr |

Ffigur 9.1: Detailed external dimensions of the VEVOR Reptile Incubator.
10. Gwarant a Chefnogaeth
Am wybodaeth ynghylch gwarant, ffurflenni dychwelyd, neu gymorth technegol, cyfeiriwch at y cerdyn gwarant sydd wedi'i gynnwys gyda'ch cynnyrch neu ewch i wefan swyddogol VEVOR. websafle.
Gallwch hefyd ymweld â'r Siop VEVOR ar Amazon am ragor o wybodaeth am gynhyrchion ac adnoddau cymorth.