1. Rhagymadrodd
Thank you for choosing the EROMMY 11' x 13' Louvered Pergola. This product is designed to enhance your outdoor living space with its adjustable louvered roof, durable aluminum frame, and integrated curtains and netting. This manual provides essential information for safe assembly, proper operation, and effective maintenance to ensure long-lasting enjoyment of your pergola. Please read all instructions carefully before beginning assembly or use.

Image 1.1: EROMMY 11' x 13' Louvered Pergola in an outdoor setting.
2. Gwybodaeth Diogelwch
Mae eich diogelwch yn hollbwysig. Dilynwch y canllawiau canlynol:
- Ensure the pergola is securely assembled and anchored to a stable foundation.
- Regularly inspect for any damage or wear to components.
- Do not exceed the weight limit for any attached accessories or decorations.
- Cadwch blant ac anifeiliaid anwes i ffwrdd o'r ardal ymgynnull yn ystod y gosodiad.
- Exercise caution when adjusting the louvered roof to prevent pinching.
- In extreme weather conditions (e.g., heavy snow, strong winds), it is recommended to open the louvers to prevent accumulation and reduce wind resistance.
3. Cynnwys Pecyn
The EROMMY Louvered Pergola is shipped in multiple boxes. Please verify that all components are present and undamaged before beginning assembly. Refer to the packing list provided in Box A for a complete inventory.

Image 3.1: The pergola is typically shipped in 6 separate boxes.
If any parts are missing or damaged, please contact EROMMY customer service immediately for assistance.
4. Cyfarwyddiadau Cymanfa
Assembly typically requires 3-4 people and takes approximately 2-3 hours. Follow the detailed steps in the included assembly manual. Ensure you have adequate space and the necessary tools before starting.
4.1. Paratoi
- Cliriwch unrhyw rwystrau o'r ardal ymgynnull.
- Lay out all parts and hardware, matching them against the packing list.
- Gather necessary tools (e.g., wrenches, screwdrivers, ladder).
4.2. Cynulliad ffrâm
- Assemble the main support posts and crossbeams according to the diagrams.
- Ensure all connections are secure but do not fully tighten bolts until the entire frame is upright.
- Carefully raise the frame and position it in the desired location.
- Anchor the base stands to a stable surface using the provided expansion screws.

Image 4.1: Details of the stable structure and durable anchor frame.
4.3. Louvered Roof Installation
- Install the louvered roof panels onto the frame, ensuring proper alignment.
- Connect the operating mechanism for the louvers.
- Apply sealant to all joints as instructed to ensure waterproofing, especially in areas prone to rain.
4.4. Curtains and Netting Attachment
- Attach the curtains and netting to the designated tracks on the pergola frame.
- Ensure the humanized straps are used to secure the curtains and netting when not in use, preventing flapping in windy conditions.
5. Cyfarwyddiadau Gweithredu
5.1. Adjusting the Louvered Roof
The pergola features an adjustable louvered roof, allowing you to control sunlight and shade. The roof is typically divided into sections that can be operated independently using a handle mechanism.
- I agored the louvers: Turn the handle to rotate the slats, allowing sunlight and ventilation.
- I cau the louvers: Turn the handle in the opposite direction to fully close the slats, providing shade and rain protection.

Image 5.1: Adjusting the louvered roof for desired light and shade.
5.2. Using Curtains and Netting
The included curtains and netting provide privacy, sun protection, and insect deterrence.
- I defnyddio: Unfasten the straps and slide the curtains/netting along their tracks.
- I tynnu'n ôl: Gather the curtains/netting and secure them to the posts using the humanized straps.
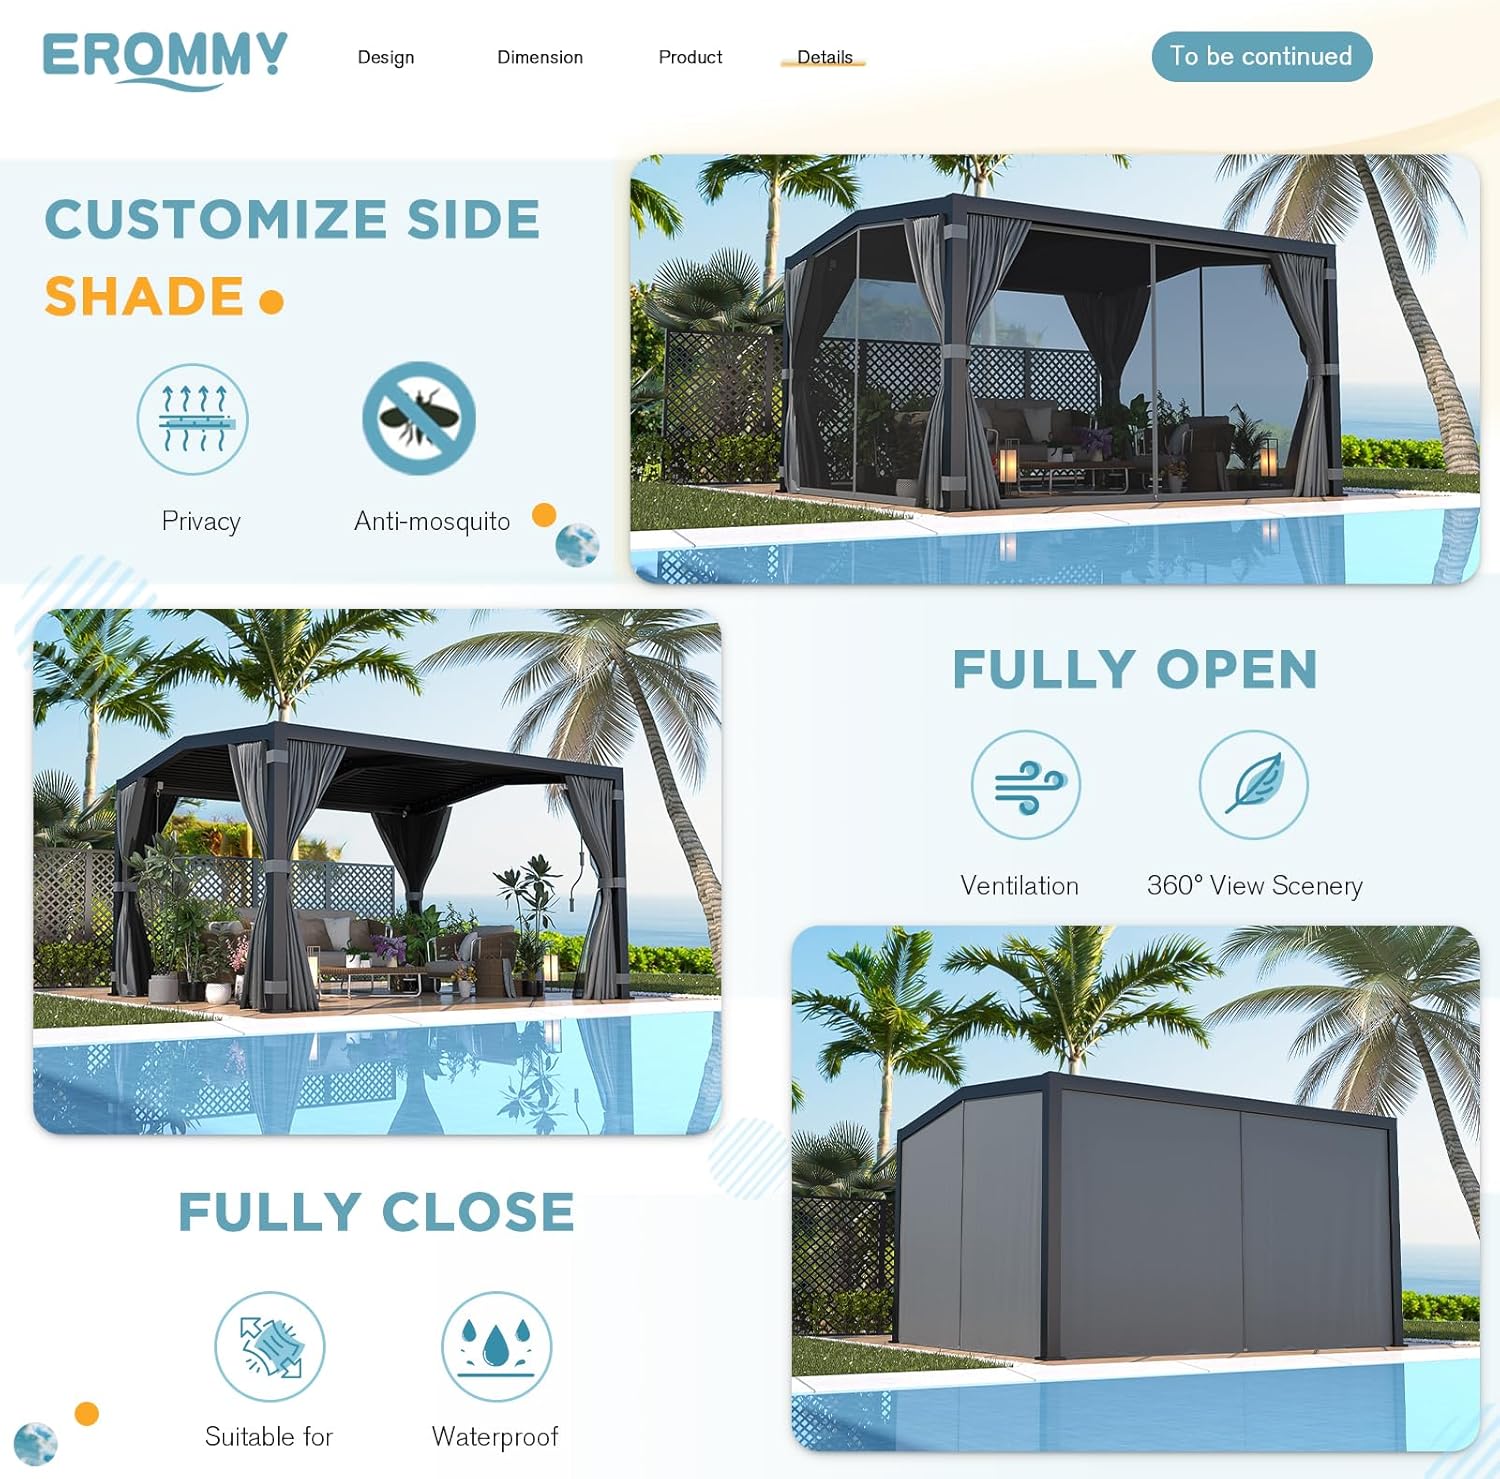
Image 5.2: The curtains and netting offer customizable privacy and protection.
6. cynnal
Regular maintenance will extend the lifespan and preserve the appearance of your EROMMY pergola.
- Glanhau'r Ffrâm: Sychwch y ffrâm alwminiwm gyda lliain meddal a sebon ysgafn a dŵr. Rinsiwch yn drylwyr a sychwch i atal smotiau dŵr. Osgowch lanhawyr sgraffiniol.
- Louver Care: Periodically clean the louver slats to remove debris such as leaves or dirt, which can impede their movement or drainage.
- System Gwteri: Ensure the integrated gutter system and drainage channels in the posts are free of blockages to prevent water accumulation.
- Llenni a Rhwydi: These polyester components can be spot cleaned with mild soap and water. For deeper cleaning, follow care instructions on the fabric tags. Ensure they are dry before storing or retracting for extended periods to prevent mildew.
- Archwiliad Caledwedd: Annually check all bolts and screws for tightness. Re-tighten as necessary. Inspect for any signs of corrosion or wear.
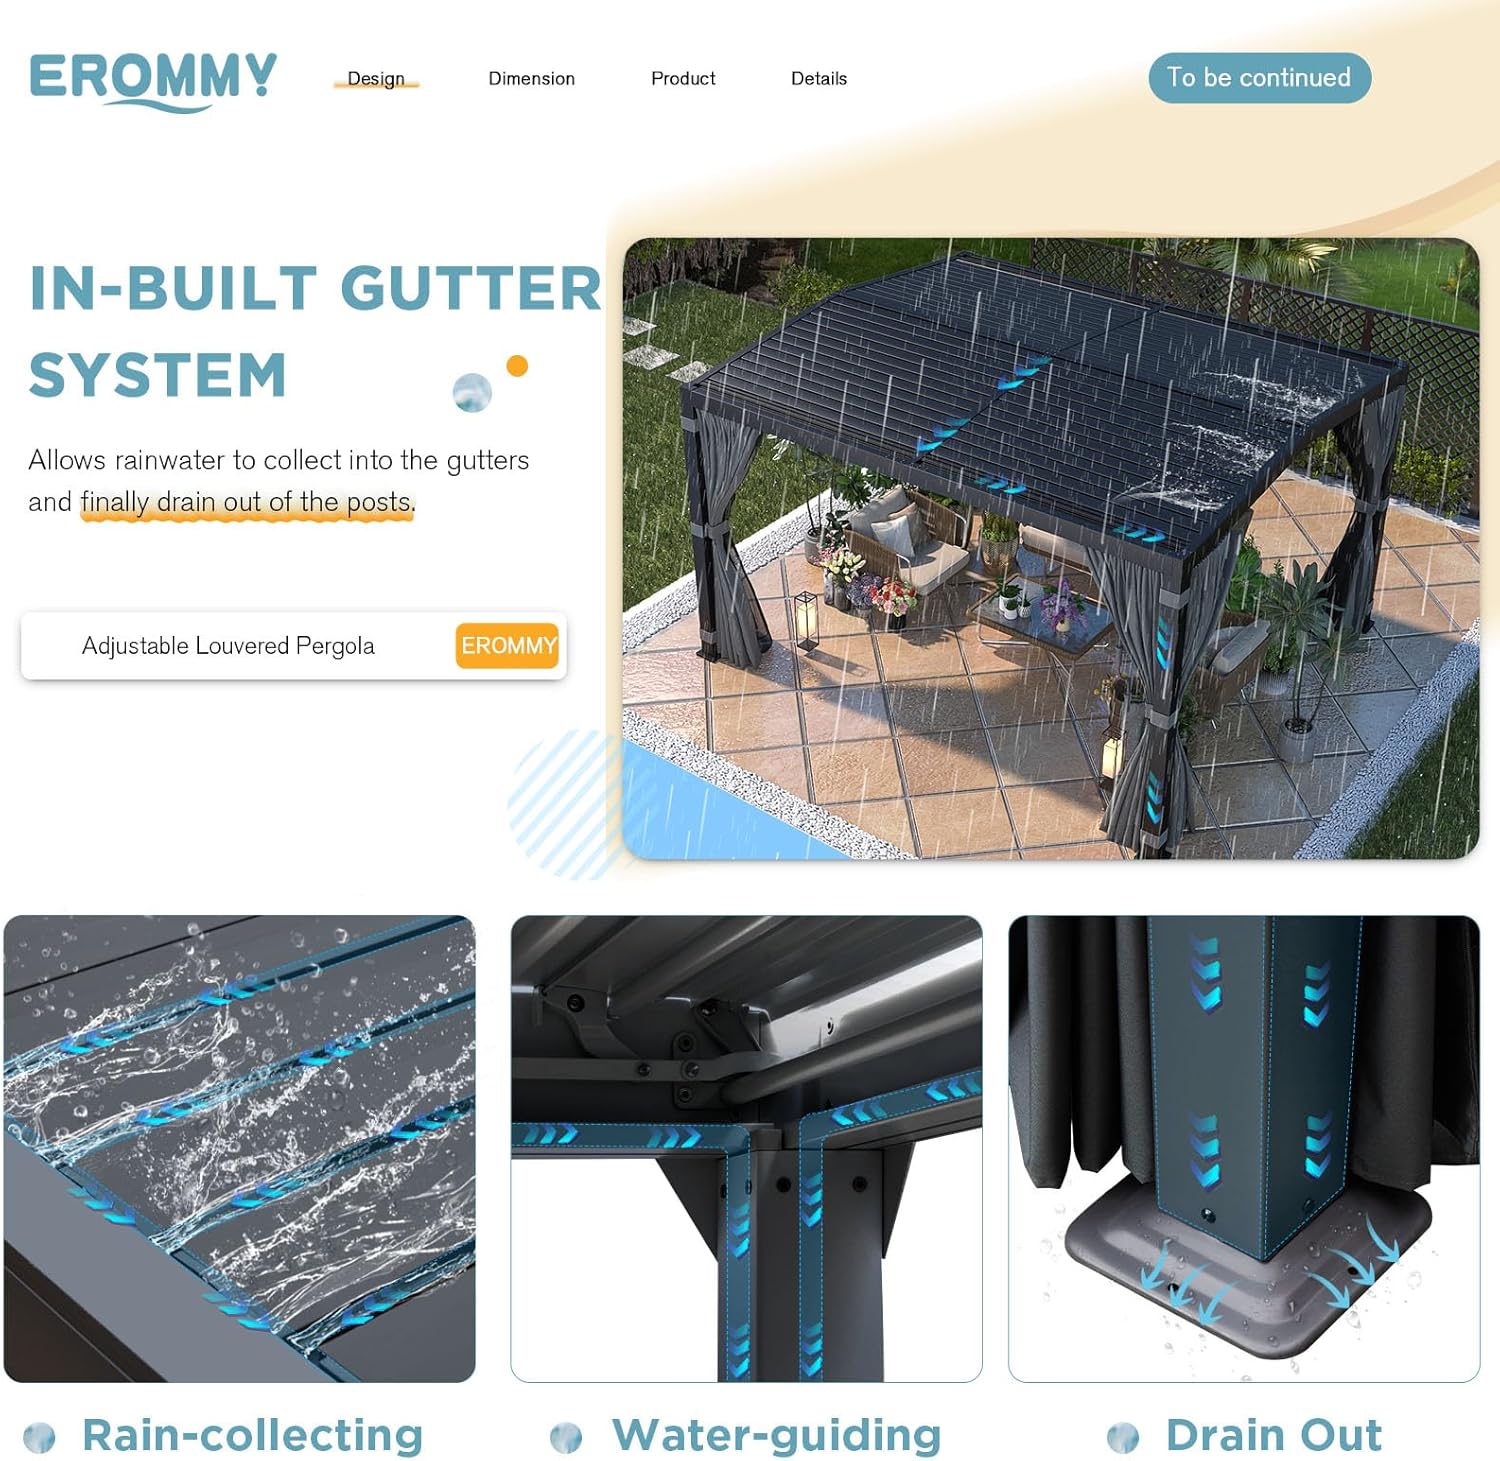
Image 6.1: The integrated gutter system requires periodic cleaning to ensure proper drainage.
7. Datrys Problemau
Mae'r adran hon yn mynd i'r afael â phroblemau cyffredin y gallech ddod ar eu traws.
| Problem | Achos Posibl | Ateb |
|---|---|---|
| Louvers not adjusting smoothly | Debris in mechanism, loose connections, or lack of lubrication. | Clean slats and mechanism. Check and tighten connections. Apply a silicone-based lubricant if necessary. |
| Gollyngiad dŵr o'r to | Sealant not properly applied, gutter blockage, or extreme rainfall. | Inspect sealant application and reapply if needed. Clear gutters. Ensure louvers are fully closed during rain. |
| Curtains/Netting snagging or difficult to move | Debris in tracks, bent hooks, or fabric obstruction. | Clean tracks. Straighten or replace bent hooks. Ensure fabric is not caught. |
| Pergola feels unstable | Anchoring not secure, loose frame connections. | Verify base stands are securely anchored to the ground. Check and tighten all frame bolts. |
8. manylebau
Detailed specifications for the EROMMY 11' x 13' Louvered Pergola:
- Brand: EROMMY
- Model: 11x13 Louvered Pergola
- Dimensiynau Cynnyrch: 153.6"H x 133"L x 88.98"U (11' x 13' nominal)
- Deunydd: Aluminum (Frame and Louvered Roof), Polyester (Curtains and Netting)
- Lliw: Gray-Black, with Curtain and Netting
- Pwysau Eitem: 315 Bunt
- Lefel ymwrthedd dŵr: Water Resistant (when louvers are closed)
- Amddiffyniad Golau Ultrafioled: 99%
- Cynulliad Angenrheidiol: Oes
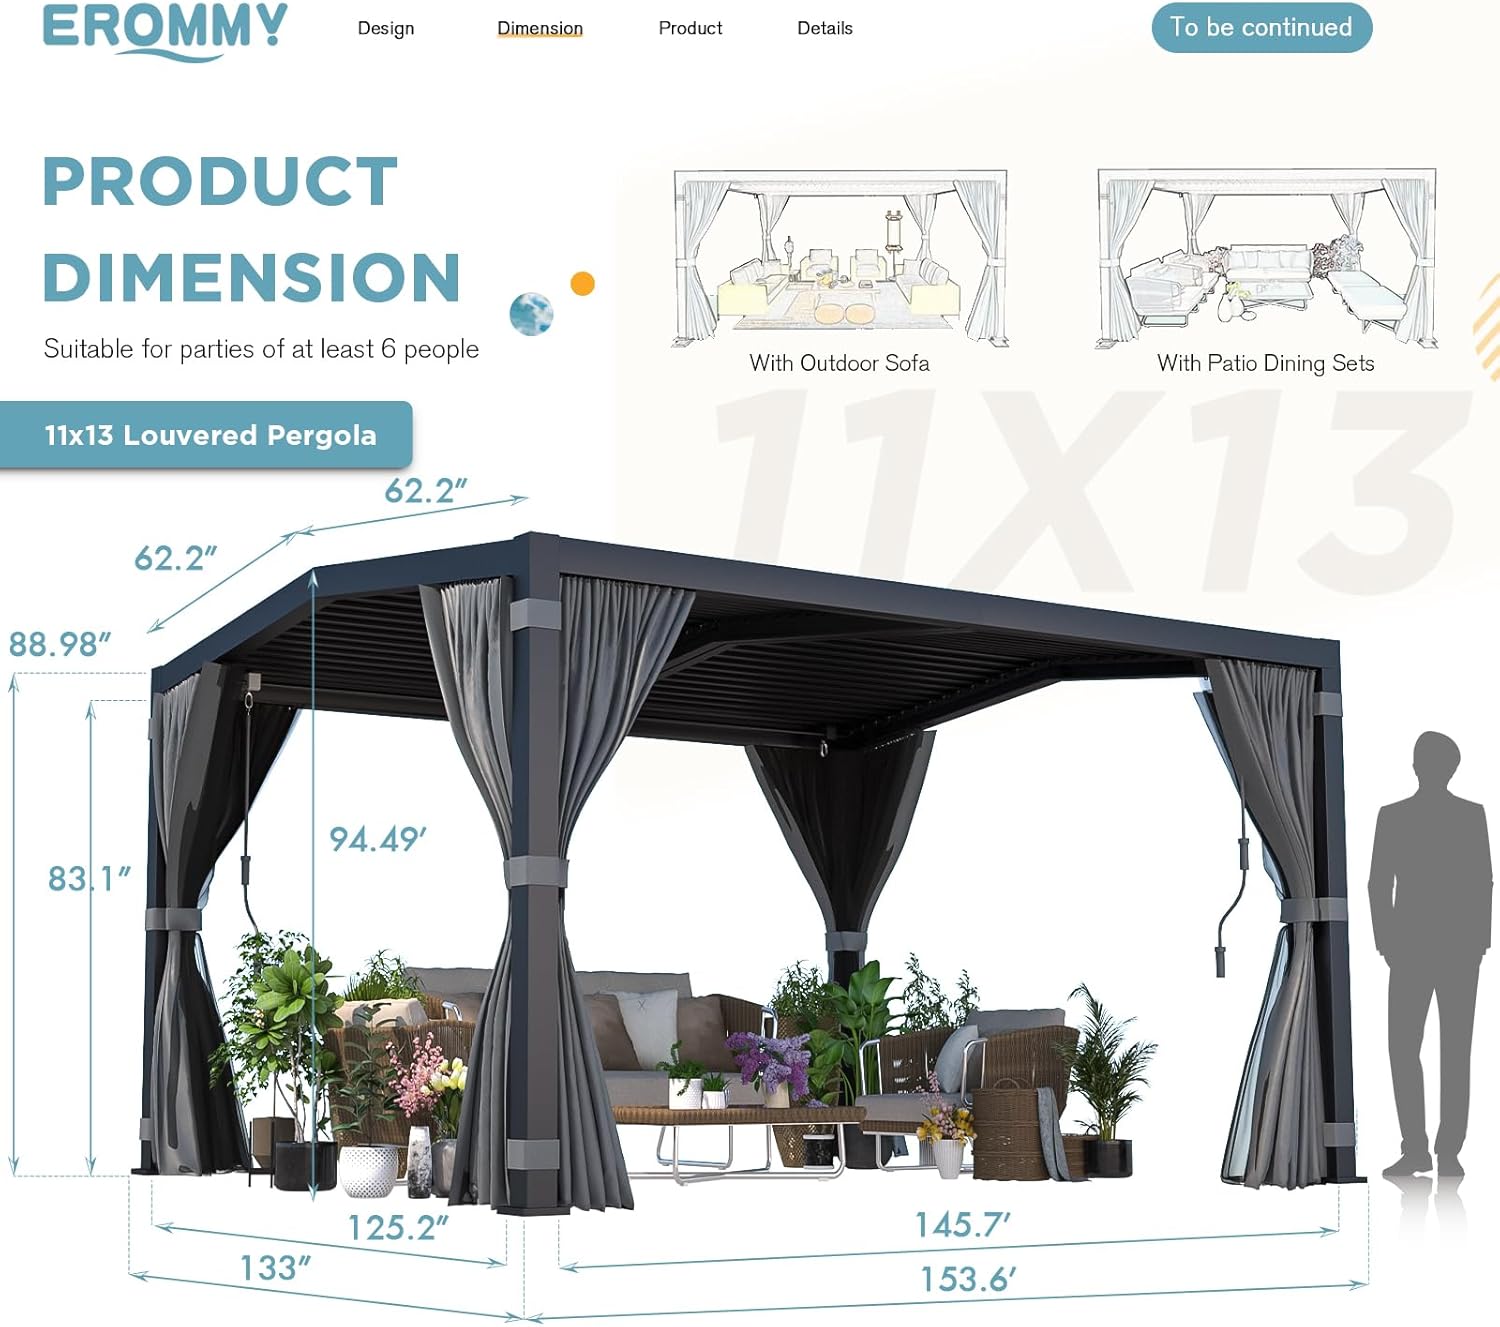
Delwedd 8.1: Dros dimensiwnview of the EROMMY 11' x 13' Louvered Pergola.
9. Gwarant a Chefnogaeth
EROMMY is committed to providing high-quality products and customer satisfaction. While specific warranty details are provided with your purchase documentation, our service team is available to assist with any issues or questions you may have regarding your pergola.
For support, please contact EROMMY customer service through the retailer where you purchased the product or visit the official EROMMY website for contact information. Please have your model number (11x13 Louvered Pergola) and purchase date ready when contacting support.


