
1. Rhagymadrodd
This manual provides detailed instructions for the assembly, operation, maintenance, and troubleshooting of your Joyside 11'x11' Pop Up Gazebo. Please read this manual thoroughly before attempting to set up or use the product. Retain this manual for future reference.

A beige Joyside 11x11 pop-up gazebo with brown mesh sidewalls tied back, set up outdoors.
2. Gwybodaeth Diogelwch
To ensure safe use and prevent damage, observe the following safety guidelines:
- Ensure the shelter is securely anchored to the ground using the provided stakes and ropes to prevent wind damage.
- Be aware of weight limits for any items hung from the frame.
- Exercise caution during assembly and disassembly to avoid pinching fingers or damaging components.
- Handle all components with care to prevent bending or breaking.
- Do not use the gazebo in extreme weather conditions such as heavy winds, storms, or snow. Disassemble and store the gazebo during such conditions.
- Cadwch bob ffynhonnell fflam a gwres i ffwrdd o ffabrig y gazebo.
3. Cynnwys Pecyn
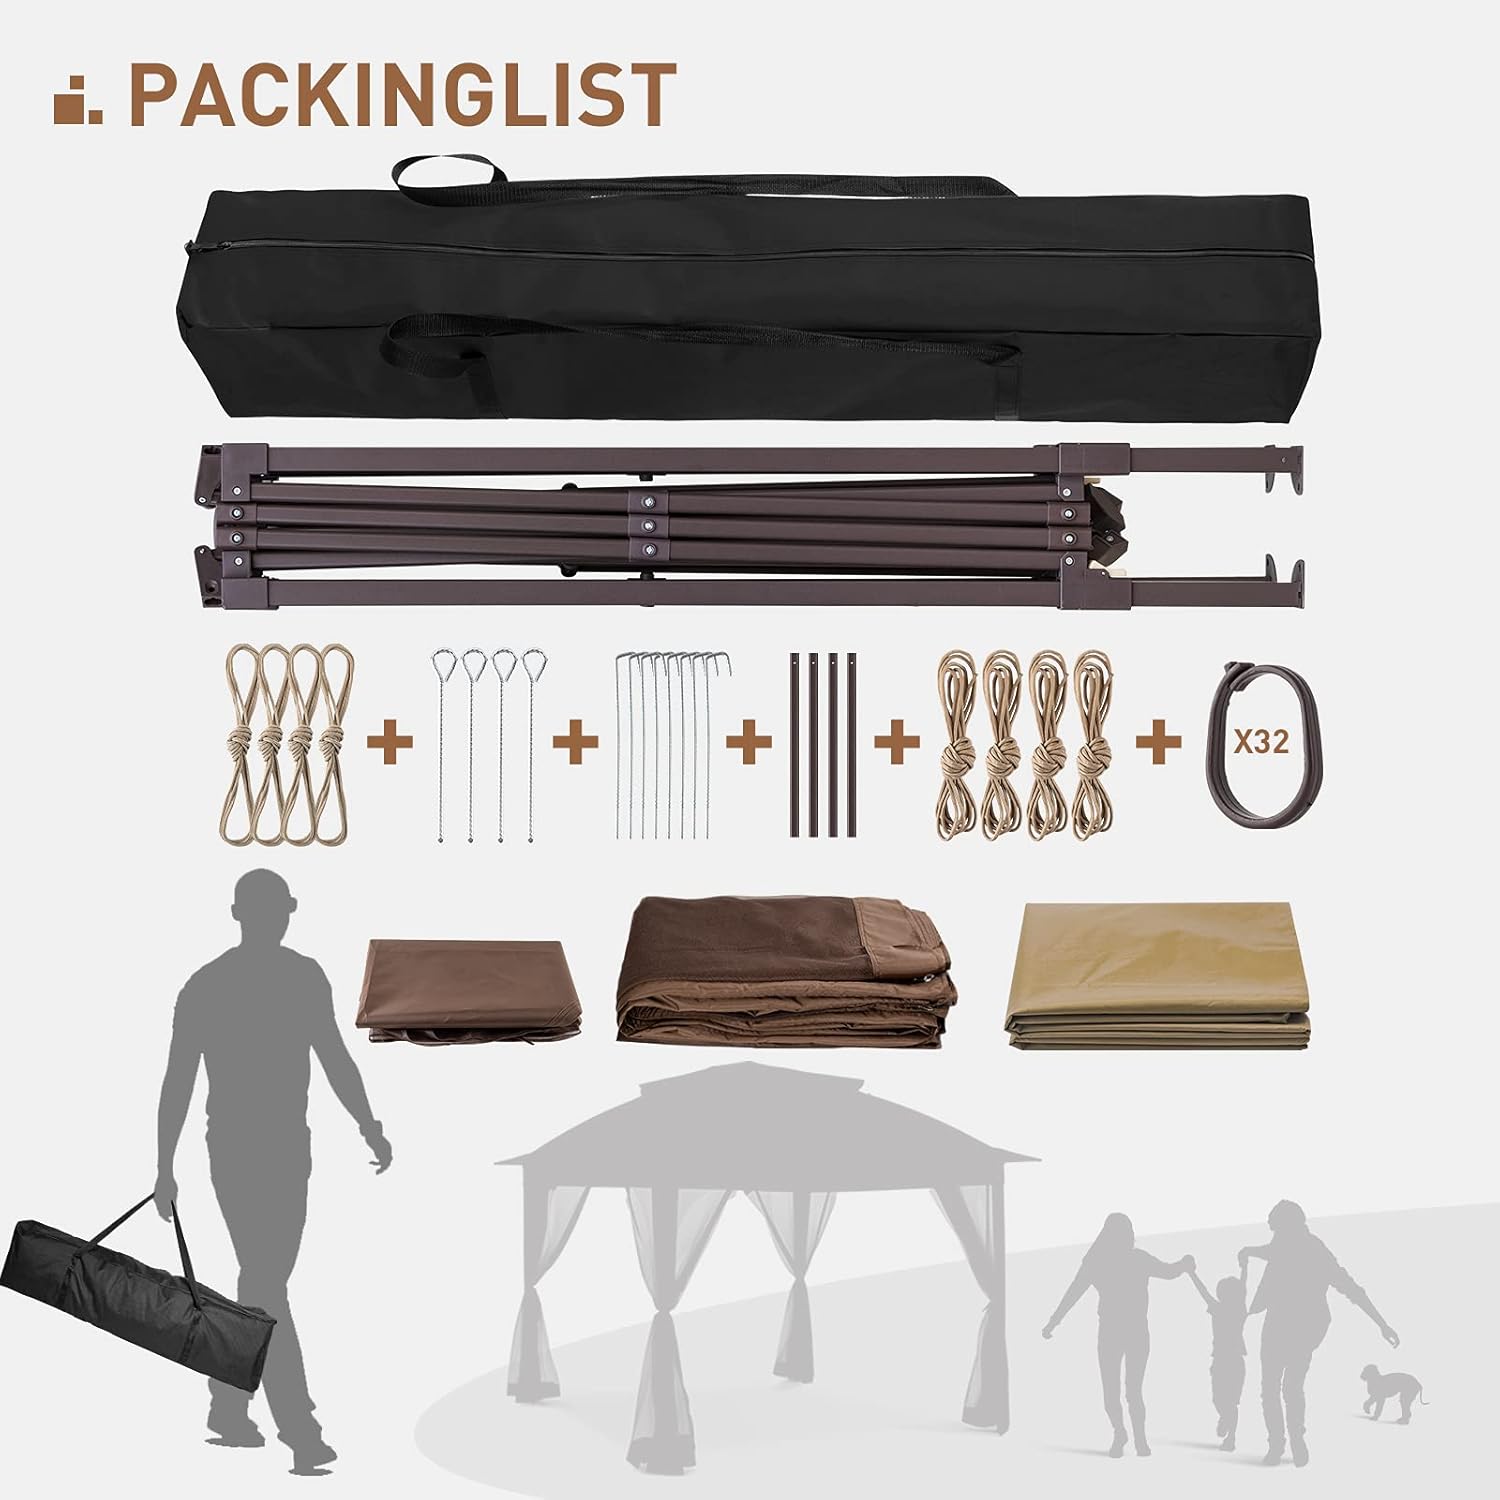
Verify that all components listed below are present in your package before beginning assembly:

An illustration detailing the contents of the package, including the frame, canopy, mosquito netting, ropes, stakes, and carry bag.
- Pop Up Gazebo Frame (1)
- Canopy Top Cover (1)
- Mosquito Netting Sidewalls (4)
- Ground Stakes (X32)
- Guy Ropes (8)
- Cario Bag (1)
4. Cyfarwyddiadau Gosod
Follow these steps for proper assembly of your Joyside Pop Up Gazebo. It is recommended to have at least two people for easier setup.
Canllaw Gosod Gweledol

A three-step visual guide demonstrating how one person can set up the gazebo: pulling the frame open, attaching the top and netting, and securing the canopy.
Cynulliad Cam-wrth-Gam
- Step 1: Open the Gazebo Frame
Place the folded frame in the desired location. With a person on each side, gently pull the outer legs of the frame outwards until it begins to expand. Do not force the frame.
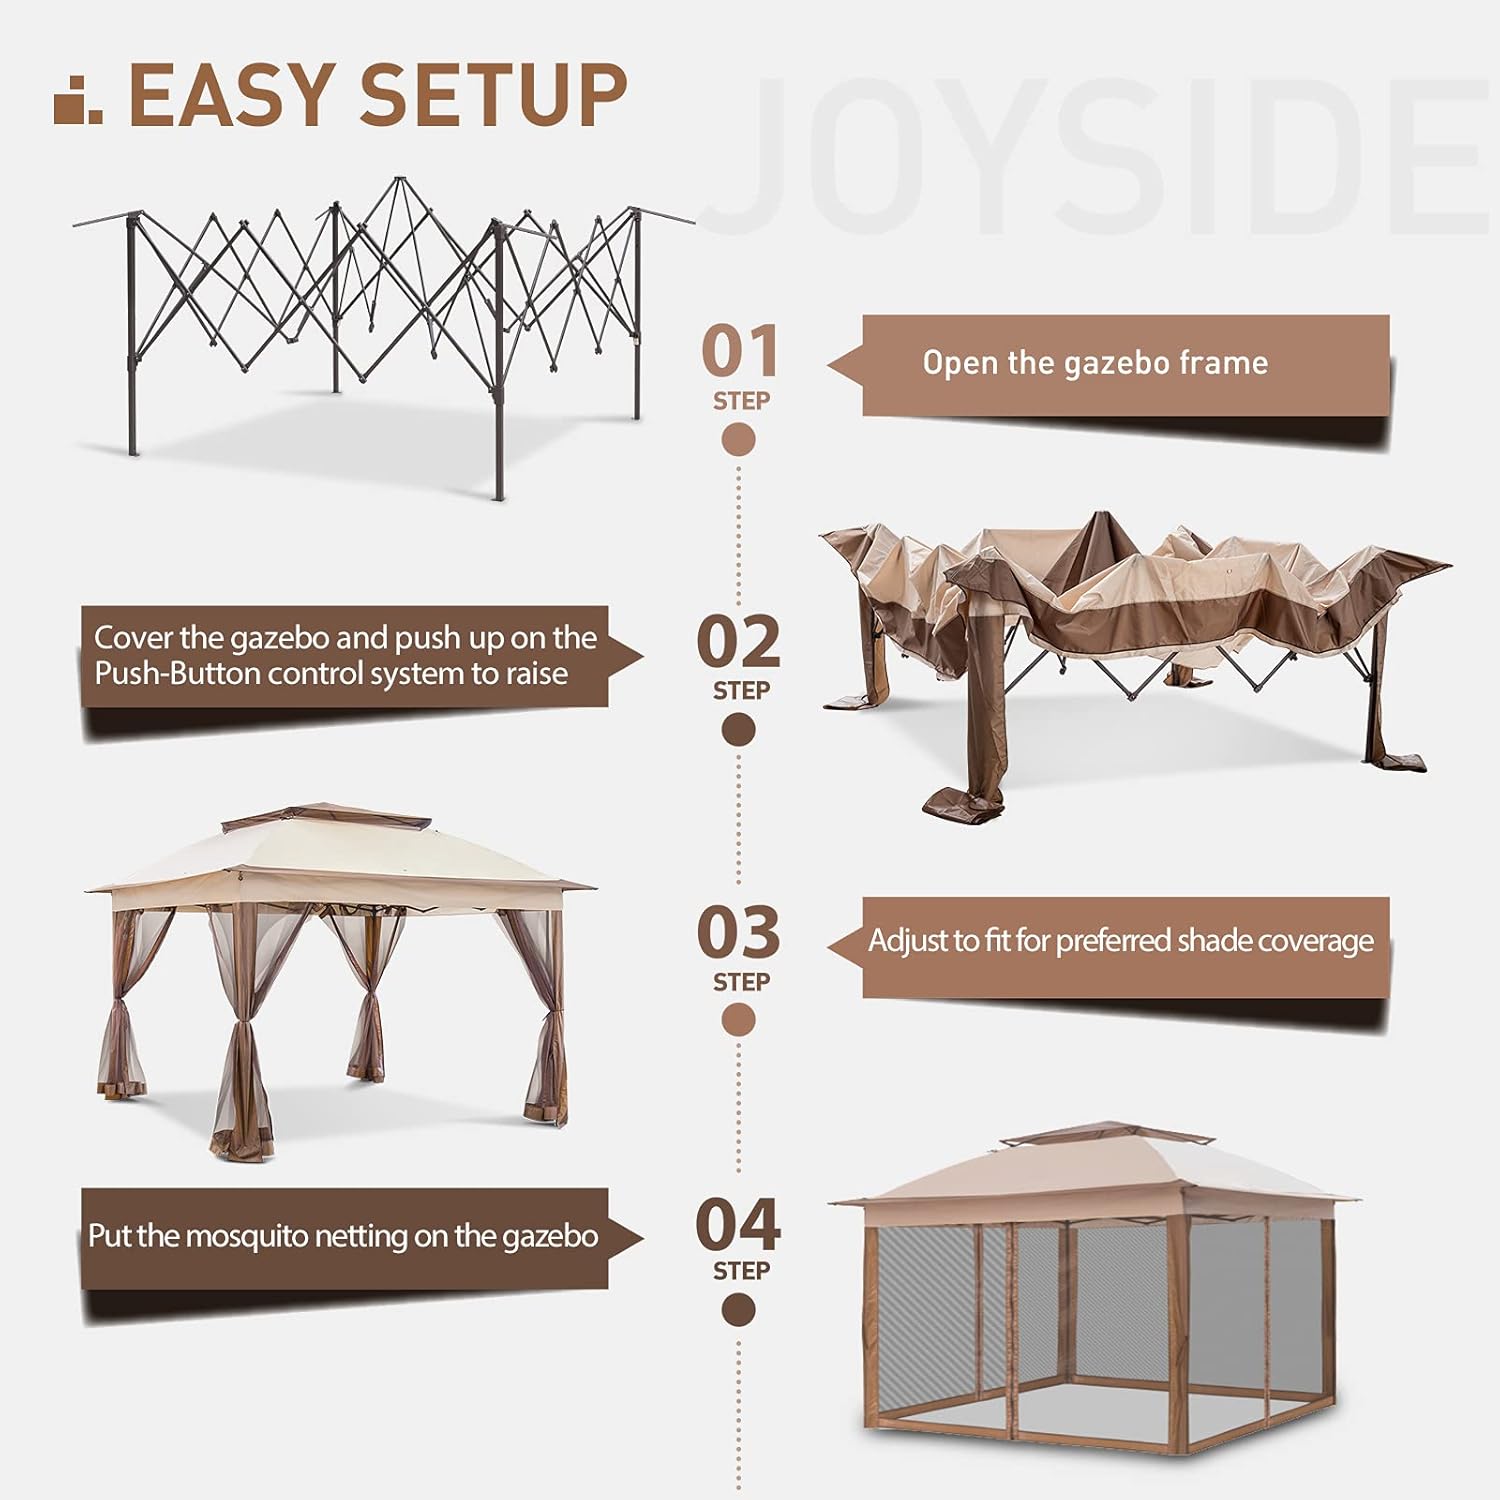
Step 1 of setup: The collapsed gazebo frame is shown, indicating the first action to open it.
- Step 2: Attach the Canopy Top
Drape the canopy top over the partially opened frame. Ensure the corners of the canopy align with the corners of the frame. Secure the canopy to the frame using any attached fasteners (e.g., Velcro straps).

Step 2 of setup: The canopy is draped over the partially opened frame, and the push-button system is used to extend the frame upwards.
- Step 3: Extend and Lock the Frame
From underneath the canopy, push up on the central hub of the frame until it fully extends and locks into place. You may hear a click. Extend each leg to its desired height and lock it using the push-button control system.
Step 3 of setup: The gazebo is fully extended, and the canopy is adjusted to provide optimal shade.
- Step 4: Attach Mosquito Netting Sidewalls
Attach the mosquito netting sidewalls to the gazebo frame. The netting typically attaches via hooks or Velcro at the top corners and zips together at the vertical seams. Ensure all zippers are functional and the netting is securely fastened.
Step 4 of setup: The mosquito netting is attached around the perimeter of the gazebo, enclosing the space.
- Cam 5: Sicrhewch y Gazebo
Use the provided ground stakes and guy ropes to anchor the gazebo securely to the ground. Attach ropes to the canopy corners and stake them into the ground at an angle, ensuring tension. This step is crucial for stability, especially in windy conditions.
This video demonstrates the setup process of the Joyside Pop Up Gazebo, including extending the frame, attaching the canopy, and securing the mosquito netting. It also shows the gazebo in various outdoor settings.
5. Cyfarwyddiadau Gweithredu
Using the Mosquito Netting
The gazebo includes mosquito netting sidewalls to provide an enclosed, insect-free space. The netting features zippered openings for easy entry and exit. To secure the netting at the bottom and prevent it from blowing open, ensure the bottom edges are weighted or secured to the ground if possible. The netting can be tied back to the legs when not in use.
A manwl view of the zippered opening on the mosquito netting, allowing for easy entry and exit.
Adjusting Shade and Ventilation
The gazebo features a double-top design that allows for improved airflow and ventilation, helping to regulate temperature and reduce wind pressure. The canopy can be adjusted to provide optimal shade coverage depending on the sun's position.

A manwl view of the gazebo's double-top roof, highlighting the mesh ventilation for improved airflow and stability.
6. cynnal
Regular maintenance will extend the life of your gazebo.
- Glanhau: Glanhewch y canopi a'r rhwyd gyda sebon ysgafn a dŵr. Peidiwch â defnyddio cemegau llym na glanhawyr sgraffiniol. Rinsiwch yn drylwyr a gadewch iddynt sychu'n llwyr yn yr awyr cyn eu storio.
- Gofal Ffrâm: Inspect the metal frame periodically for any signs of rust or damage. Clean any dirt or debris from the frame.
- Storio: When not in use for extended periods or during inclement weather, disassemble the gazebo and store all components in the provided carry bag in a dry, cool place.
- Arolygiad: Before each use, inspect all parts for wear, tear, or damage. Replace any damaged components immediately.
7. Datrys Problemau
Dyma atebion i broblemau cyffredin y gallech ddod ar eu traws:
- Gazebo is unstable or sways in wind: Ensure all legs are fully extended and locked. Verify that all ground stakes are firmly inserted and guy ropes are taut and properly anchored. Consider using additional weights on the legs for extra stability in moderate wind conditions.
- Gollyngiad dŵr: Check that the canopy is correctly installed and stretched taut over the frame. Ensure there are no tears or punctures in the fabric. While the canopy is water repellent, heavy or prolonged rain may cause some seepage.
- Mosgitos yn dod i mewn: Ensure all mosquito netting zippers are fully closed and the bottom edges are secured to the ground. Check for any small gaps or tears in the netting.
- Anhawster gyda chydosod/dadosod: Ensure you are following the instructions carefully. Sometimes, the frame may require gentle wiggling or two people to fully extend or collapse. Do not apply excessive force.
8. manylebau
| Brand | Joyside |
| Model | 11x11 Pop Up Gazebo |
| Deunydd | Alloy Steel, Metal (Frame), Fabric (Canopy, Netting) |
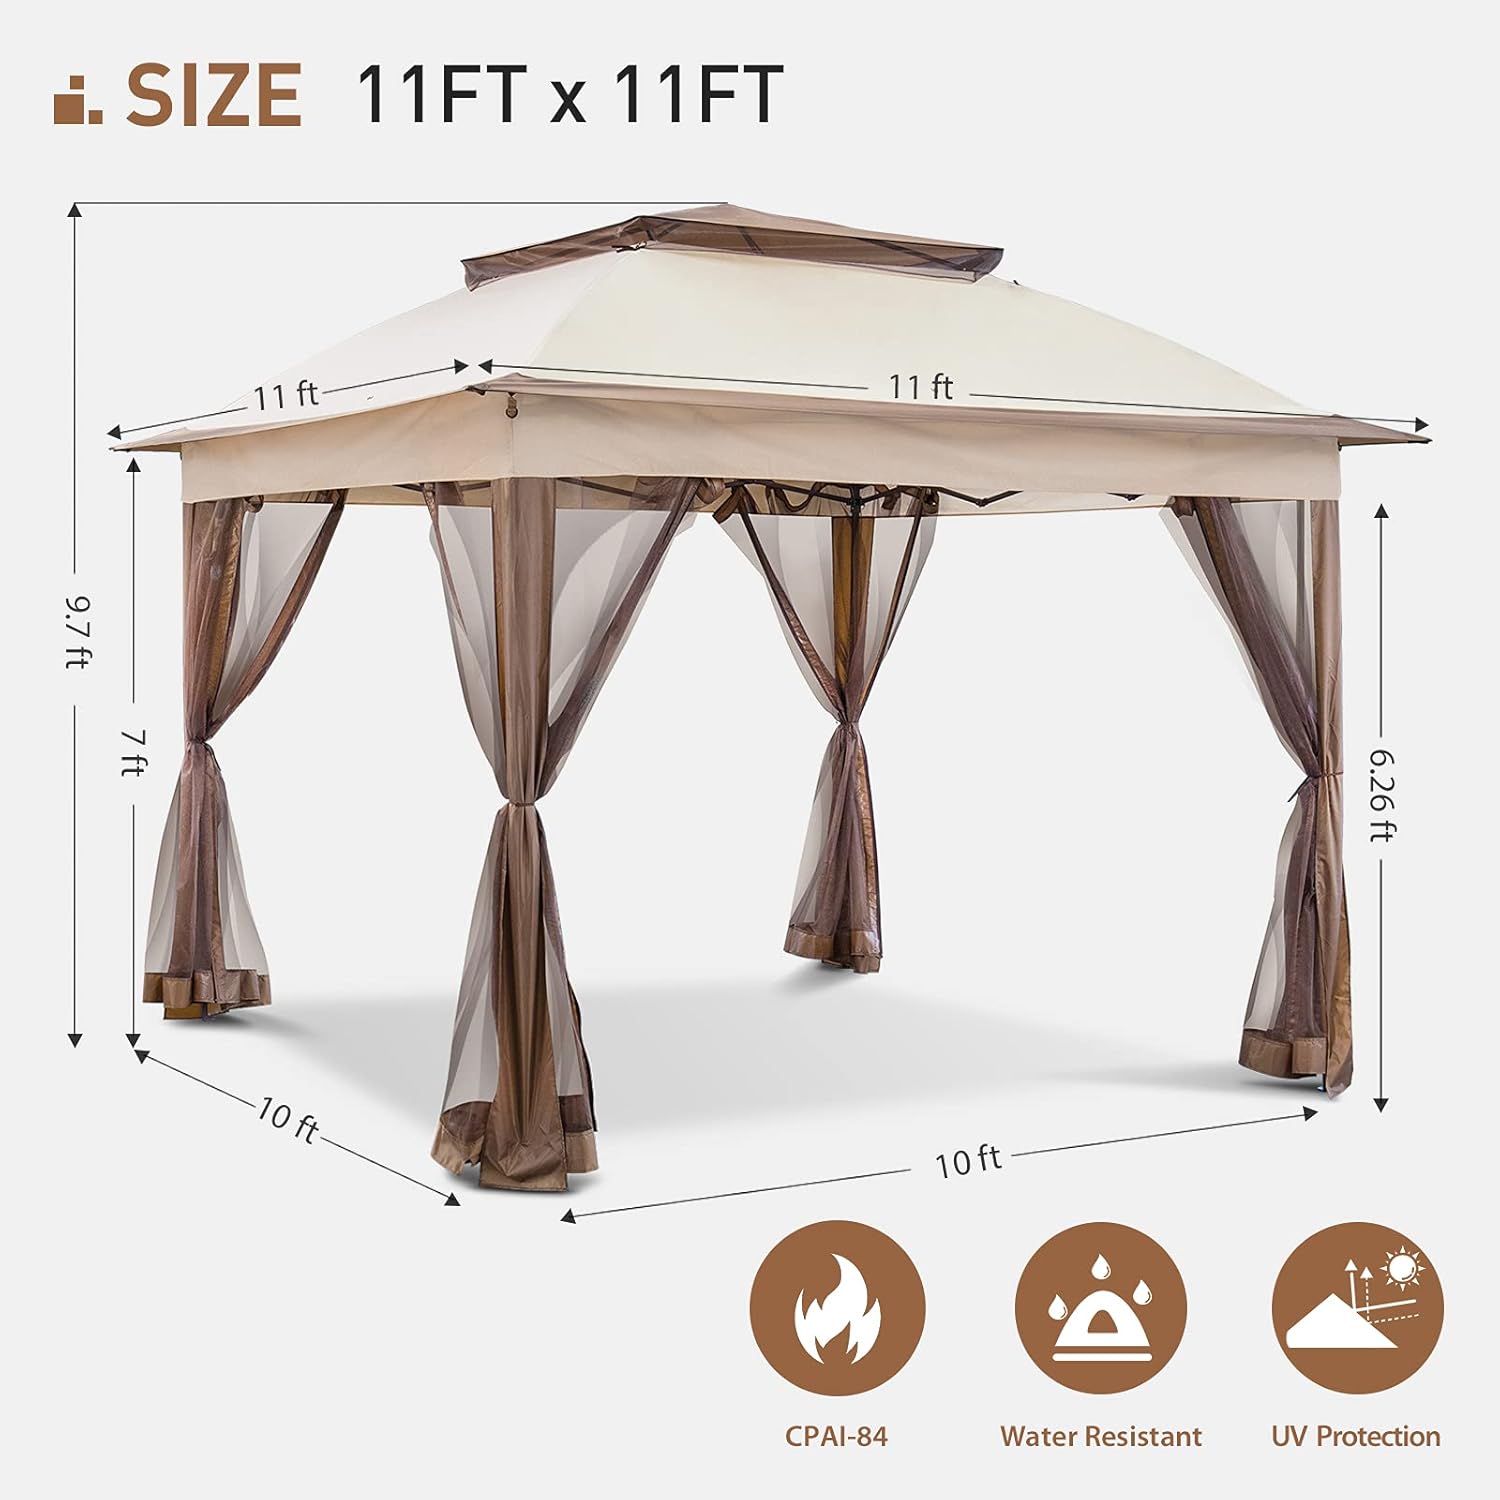
| Dimensiynau Cynnyrch (L x W x H) | 132"H x 132"L x 116.4"U (11'H x 11'L x 9.7'U) |
| Siâp | Sgwâr |
| Lefel Gwrthsefyll Dŵr | Ymlid dwr |
| Amddiffyniad rhag golau uwchfioled | Oes |
| Cynulliad Angenrheidiol | Oes |
| Deiliadaeth | 6 o bobl |
| UPC | 724164015532 |
| ASIN | B0C6LPJ5XJ |

A detailed diagram showing the length, width, and height measurements of the 11x11 foot gazebo, along with icons for CPAI-84 fire resistance, water resistance, and UV protection.
9. Additional Product Videos
This video showcases the Joyside Pop Up Gazebo in different colors and outdoor environments, highlighting its aesthetic appeal and versatility.
Mae'r fideo hwn yn rhoi drosview of the Joyside Pop Up Gazebo, demonstrating its features and showing it in various outdoor settings, including quick glimpses of the setup.
10. Gwarant a Chefnogaeth
For warranty information or technical support, please refer to the product packaging or contact Joyside customer service directly. Contact details can typically be found on the manufacturer's websafle neu drwy eich manwerthwr.