
1. Rhagymadrodd
This manual provides detailed instructions for the safe and proper use of your GEEKVAPE L200 Classic Kit. Please read this manual thoroughly before operating the device to ensure optimal performance and safety. The GEEKVAPE L200 Classic is a robust box mod kit featuring an IP68 rating for water and dust resistance, shock resistance, and a maximum output of 200W. It is designed for use with dual 21700 or 18650 external batteries (not included) and includes the Geekvape Z Max Tank.

Delwedd 1.1: Drosoddview of GEEKVAPE L200 Classic Kit key features.
2. Cynnwys Pecyn
Gwiriwch fod yr holl eitemau a restrir isod yn bresennol yn eich pecyn:
- 1x GEEKVAPE L200 Classic Mod
- 1x Geekvape Z Max Atomizer (6.0ml)
- 1x Coil Tool
- 1x Spare Parts Pack
- 1x Spare Glass Tube (4.0ml)
- 1x USB Cable (Type-C)
- 1x Pre-installed Geekvape M Series Coil (0.14Ω, 60-80W)
- 1x Spare Geekvape M Series Coil (0.2Ω, 70-85W)
- 2x 18650 Battery Adapter
Note: Batteries (21700 or 18650) are not included and must be purchased separately.
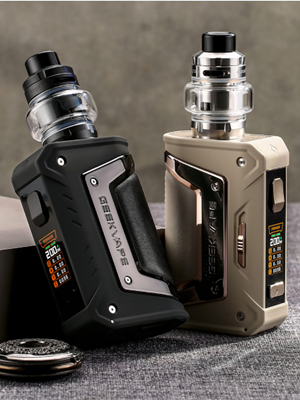
Image 2.1: Standard Edition Package Contents.
3. Gosod
3.1 Gosod Batri
- Open the battery compartment cover located at the bottom of the device.
- Insert two 21700 batteries according to the polarity markings (+/-). If using 18650 batteries, first insert them into the provided 18650 battery adapters, then insert the adapters with batteries into the device.
- Caewch y clawr adran batri yn ddiogel.

Image 3.1: Battery installation in the L200 Classic Mod.
3.2 Coil Installation and Tank Assembly (Geekvape Z Max Tank)
- Disassemble the Z Max Tank by unscrewing the base.
- Push the desired M Series coil into the tank base until it is firmly seated.
- Reassemble the tank components, ensuring all parts are securely tightened.
Video 3.2: Official introduction to the Geekvape Z Max Tank's leakproof system, demonstrating assembly and coil installation.
3.3 Llenwi'r Tanc
- Locate the top cap of the Z Max Tank.
- Twist or slide the top cap to reveal the filling ports.
- Carefully fill the tank with e-liquid through the filling ports. Avoid overfilling the tank or getting e-liquid into the central airflow tube.
- Caewch y cap uchaf yn ddiogel.
- After filling a new coil, allow the e-liquid to soak into the coil for at least 5-10 minutes before first use to prevent dry hits.
4. Cyfarwyddiadau Gweithredu
4.1 Pŵer Ymlaen/Diffodd
- To power on the device, press the fire button 5 times rapidly.
- To power off the device, press the fire button 5 times rapidly until the screen indicates power off.
4.2 Addasu Gosodiadau
- Use the '+' and '-' buttons to adjust the wattage or temperature settings.
- To enter the menu and change modes (e.g., Power, TC, TCR, Bypass), press the fire button 3 times rapidly. Navigate using the '+' and '-' buttons and confirm with the fire button.
4.3 A-Lock Function
The A-Lock (Accidental Press Protection Lock) switch is located on the side of the device. Slide the switch up to lock the device, preventing accidental button presses that could lead to overheating or unintended firing. Slide it down to unlock.
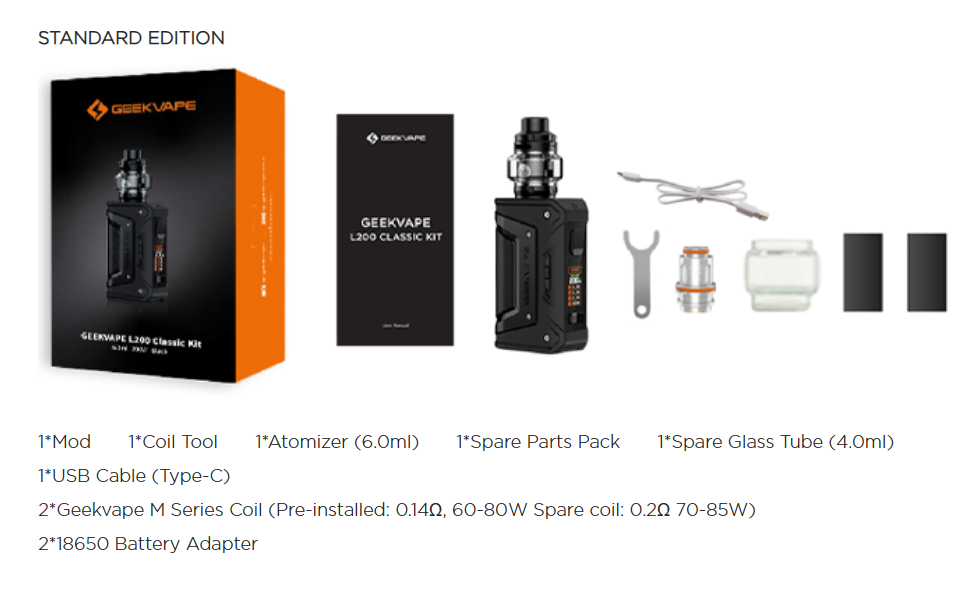
Image 4.1: A-Lock switch for accidental press protection.
4.4 Hwb Modd
Boost Mode automatically selects the maximum output for increased vapor production. This mode can be activated through the device menu.

Image 4.2: Boost Mode and 1.08-inch Full Screen Display.
4.5 Gwybodaeth Arddangos
The 1.08-inch full screen displays essential vaping information, including battery level, atomizer resistance, current wattage, and puff count.
Video 4.3: A showcase of the GEEKVAPE Aegis Legend 5 Mod kit, demonstrating its design, screen, and overall appearance, which is similar to the L200 Classic.
5. cynnal
5.1 Glanhau
- Regularly clean the 510 connection and battery contacts with a dry cloth to ensure good conductivity.
- Clean the tank and mouthpiece with warm water. Ensure all parts are completely dry before reassembly.
5.2 Coil Replacement
Coils should be replaced when you notice a burnt taste, reduced vapor production, or diminished flavor. Follow the coil installation steps in Section 3.2 to replace the coil.
6. Datrys Problemau
- Device Not Firing: Check if the device is powered on (5 clicks of the fire button). Ensure the A-Lock switch is in the unlocked position. Verify that the battery is charged and correctly installed. Check if the atomizer is properly connected and the coil is seated correctly.
- "No Atomizer" Message: This indicates the device is not detecting the tank. Ensure the tank is screwed on tightly and the coil is correctly installed. Clean the 510 connection on both the mod and the tank.
- "Low Battery" Message: Ailwefru neu ailosod y batris.
- Leaking Tank: Ensure all tank components are securely tightened, especially the coil and glass sections. Check O-rings for damage and replace if necessary. Avoid overfilling the tank.
- Blas wedi'i losgi: This usually means the coil needs to be replaced or was not properly primed. Ensure the e-liquid has fully saturated the coil before use.
7. manylebau
| Nodwedd | Manyleb |
|---|---|
| Brand | GEEKVAPE |
| Model | Clasur L200 |
| Allbwn Wattage | Hyd at 200W |
| Cydnawsedd Batri | Dual 21700 or 18650 (with adapter, not included) |
| Cynhwysedd Tanc | 6.0ml (Standard), 4.0ml (Spare Glass Tube) |
| Sgrin Arddangos | 1.08-inch Full Screen |
| Graddfa Diogelu | IP68 Water & Dust Resistance, Shock Resistance |
| Dimensiynau | 13.5 x 8.3 x 7.9 cm |
| Pwysau | 470 gram |
8. Gwybodaeth Diogelwch
- This product is intended for adults over the age of 21 only.
- Cadwch allan o gyrraedd plant ac anifeiliaid anwes.
- Do not use if you are pregnant or breastfeeding, have heart conditions, high blood pressure, diabetes, or are taking medication for depression or asthma.
- Use only original GEEKVAPE coils and accessories.
- Peidiwch â gwneud y ddyfais yn agored i dymheredd eithafol neu olau haul uniongyrchol.
- Peidiwch â dadosod nac addasu'r ddyfais.
- Always use external battery chargers for optimal battery life and safety.
- Dispose of batteries and the device responsibly according to local regulations.
9. Gwarant a Chefnogaeth
GEEKVAPE products are manufactured to high-quality standards. For warranty information, please refer to the warranty card included in your product packaging or visit the official GEEKVAPE website. For technical support or service inquiries, please contact your retailer or GEEKVAPE customer service directly.