
Rhagymadrodd
This manual provides detailed instructions for the setup, operation, and maintenance of your HUNSN RJ03 Micro Firewall Appliance. The RJ03 is a compact, fanless mini PC designed for network security applications, including use as a firewall, VPN router, or other network appliance. It features an Intel Celeron N5105 processor and multiple 2.5GbE LAN ports.
Darllenwch y llawlyfr hwn yn drylwyr cyn defnyddio'r ddyfais i sicrhau ei bod wedi'i gosod yn iawn a'i bod yn perfformio'n orau.
Gwybodaeth Diogelwch
- Ensure the device is placed on a stable, flat surface with adequate ventilation.
- Use only the provided power supply. Using an incorrect power supply may damage the device and void the warranty.
- Peidiwch ag amlygu'r ddyfais i ddŵr, lleithder, na thymheredd eithafol.
- Avoid opening the chassis unless performing authorized upgrades (RAM, SSD/HDD, WiFi module). Disconnecting internal components improperly can cause damage.
- In case of malfunction, disconnect the power supply and contact support. Do not attempt repairs yourself.
Cynnwys Pecyn
Gwiriwch fod yr holl eitemau yn bresennol yn y pecyn:
- HUNSN RJ03 Firewall Appliance
- Power Supply (DC12V3A)
- Cord Pŵer
- Cerdyn Gwarant
Cynnyrch Drosview
The HUNSN RJ03 is a compact, fanless mini PC designed for robust network applications. Its aluminum chassis acts as a heatsink, ensuring silent operation.
Panel blaen

Ffigur 1: Cynllun Panel Blaen
The front panel provides essential user interfaces:
- Botwm Pwer AR / ODDI: Used to power the device on or off.
- CLR CMOS Button: A small button to clear CMOS settings, often requiring a pin to press.
- Porthladdoedd USB 3.0 (2x): For connecting high-speed USB devices.
- Porthladd Math-C: Supports display output and USB connectivity.
- Slot Cerdyn TF: For TransFlash (MicroSD) memory cards.
- Antenna Connectors (2x): For optional WiFi antennas.
Panel Cefn
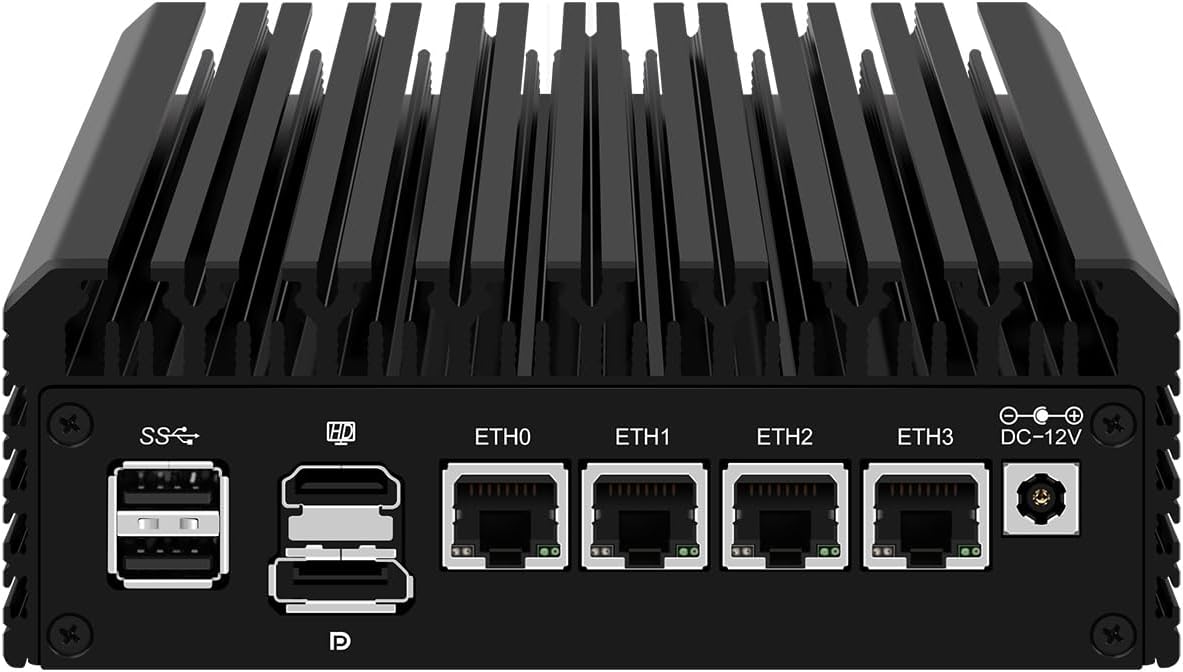
Ffigur 2: Cynllun Panel Cefn
The rear panel houses the primary connectivity options:
- Porthladdoedd USB 2.0 (2x): Ar gyfer cysylltu dyfeisiau USB safonol.
- Porthladd HDMI: Ar gyfer cysylltu ag arddangosfa.
- DisplayPort (DP): Ar gyfer cysylltu ag arddangosfa.
- LAN Ports (4x 2.5GbE I226-V): Four 2.5 Gigabit Ethernet ports for network connections (ETH0, ETH1, ETH2, ETH3).
- DC_IN Port: For connecting the 12V power adapter.
Cyfarwyddiadau Gosod
1. Hardware Installation (Optional)
If you purchased a barebones unit or wish to upgrade, follow these steps to install RAM, SSD/HDD, or a WiFi module. Ensure the device is powered off and disconnected from the power source before proceeding.
- Agorwch y Siasi: Carefully remove the screws securing the bottom panel of the appliance.
- Gosod RAM: The device supports 2 x SODIMM DDR4 2933MHz, up to 32GB. Insert the RAM modules into the SODIMM slots, ensuring they are seated correctly and the clips lock them in place.
- Gosod Storio:
- M.2 NVMe SSD: Insert the M.2 2280 PCIe 3.0 x1 NVMe SSD into its dedicated slot and secure it with the provided screw.
- 2.5 Inch SATA SSD/HDD: Connect a 2.5-inch SATA SSD or HDD using the internal SATA data and power cables (if included). Secure the drive within the chassis.
- Install M.2 WiFi Module (Optional): If installing a WiFi 6 module, insert it into the M.2 WiFi slot and connect the antenna cables.
- Cau'r Siasi: Replace the bottom panel and secure it with the screws.
2. Cysylltu Perifferolion
- Cysylltiad Pwer: Connect the provided power adapter to the DC_IN port on the rear panel, then plug the power cord into an electrical outlet.
- Cysylltiad Rhwydwaith: Connect your network cables to the 2.5GbE LAN ports (ETH0-ETH3) as required for your network configuration (e.g., WAN, LAN, DMZ).
- Display and Input (Optional): For initial setup or direct interaction, connect a monitor via HDMI or DisplayPort, and a keyboard/mouse to the USB ports.
3. Initial Boot
Press the Power ON/OFF button on the front panel. The device should power on. If a display is connected, you will see the boot sequence.
Gosod System Weithredu
The HUNSN RJ03 supports a variety of operating systems and network appliance software. It supports UEFI boot only.
- Systemau Cydnaws: 5.10.x and above core-based FreeBSD router systems, Linux distributions, or Windows operating systems.
- Firewall Software: Compatible with popular open-source solutions such as pfSense and OPNsense.
- Proses Gosod:
- Prepare a bootable USB drive with your chosen operating system or firewall software.
- Connect the USB drive to a USB port on the RJ03.
- Power on the device and enter the BIOS/UEFI setup (usually by pressing DEL or F2 during boot) to configure the boot order, prioritizing the USB drive.
- Dilynwch y cyfarwyddiadau ar y sgrin i osod y system weithredu.
- Network Driver Considerations: The Intel I226-V 2.5GbE LAN ports may require specific drivers or a newer kernel version for optimal performance, especially with certain older operating systems or firewall distributions (e.g., older pfSense versions). Ensure your chosen OS version supports these NICs or be prepared to install necessary drivers.
Gweithrediad
Once the operating system is installed and configured, the HUNSN RJ03 functions as a reliable network appliance. Specific operation details will depend on the software installed (e.g., OPNsense, pfSense).
- Rheoli Pwer: The device supports hardware auto power-on (enabled by default), network wake-up (Wake-on-LAN), and system power management features. These can typically be configured in the BIOS/UEFI settings.
- Dyluniad heb gefnogwr: The fanless design ensures silent operation (0.00dB noise). The aluminum chassis acts as a large heatsink, dissipating heat efficiently.
- Rheoli Tymheredd: The device is designed to operate within a temperature range of 0°C to 70°C. While the chassis may feel warm to the touch, this is normal for fanless systems and indicates effective heat dissipation.
Cynnal a chadw
- Glanhau: Periodically clean the exterior of the device with a soft, dry cloth. Do not use liquid cleaners or aerosols. Ensure ventilation fins are free from dust accumulation to maintain optimal cooling.
- Oeri: Although fanless, ensure the device has adequate airflow around its chassis. Avoid placing it in enclosed spaces without ventilation. If operating in consistently high ambient temperatures or under heavy load, consider adding an external USB fan for additional cooling, especially if system temperatures are a concern.
- Diweddariadau Cadarnwedd: Check the HUNSN support website or contact customer service for any available BIOS/UEFI firmware updates, which may improve compatibility or performance.
Datrys problemau
| Problem | Achos Posibl | Ateb |
|---|---|---|
| Nid yw'r ddyfais yn pweru ymlaen. | No power, faulty power supply, or internal connection issue. |
|
| Dim allbwn arddangos. | Incorrect display connection, monitor input, or BIOS settings. |
|
| Network interfaces (LAN ports) not working or slow. | Missing or incorrect network drivers, incompatible OS kernel. |
|
| Device runs very warm. | Normal operation for fanless design, or insufficient ventilation. |
|
Manylebau
| Rhif Model | HUNSN RJ03 |
| Siasi | Aluminum, Fanless Design |
| Prosesydd | Intel Celeron N5105 (4M Cache, up to 2.90 GHz) |
| AES-NI Support | Oes |
| Cof | 2 x SODIMM DDR4 2933MHz, max. 32GB (4GB installed in base model) |
| Storio | 1 x M.2 2280 PCIe 3.0 x1 NVMe SSD, 1 x 2.5 Inch SATA SSD/HDD (128GB SSD installed in base model) |
| Cerdyn Rhwydwaith | 4 x 2.5GbE Intel I226-V LAN |
| Rhyngwyneb I/O | Power ON/OFF, CLR CMOS, 2 x USB 3.0, Type-C (Display/USB), TF Card Slot, 2 x USB 2.0, HDMI, DisplayPort, 4 x LAN, DC_IN |
| Ehangu | 1 x M.2 WiFi 6 slot |
| Grym | DC100-240V AC/50-60Hz input, 12V3A output |
| Tymheredd Gweithredu | 0 ° C ~ 70 ° C |
| Tymheredd Storio | -20 ° C ~ 80 ° C |
| Lleithder Cymharol | 10% ~ 90% heb fod yn gyddwyso |
| TDP | 10W |
| System Oeri | Fanless, supports optional 12V 4-pin 8010 fan |
| Dimensiynau | 145.6 x 135.6 x 53.6mm |
| Pwysau | 1.5 kg (tua 3.3 pwys) |
| Cydweddoldeb System | FreeBSD router systems (5.10.x+), Linux distros, Windows OS (UEFI support only) |
| Nodweddion Arbennig | Hardware auto power on (default), network wake-up, system power management, temperature management |
Gwarant a Chefnogaeth
Your HUNSN RJ03 appliance comes with a warranty. Please refer to the included warranty card for specific terms and conditions. For technical support, troubleshooting assistance, or inquiries regarding parts and upgrades, please contact HUNSN customer service through the retailer where you purchased the product or visit the official HUNSN store online.
Am adnoddau ychwanegol a gwybodaeth am gynhyrchion, gallwch ymweld â'r HUNSN Store on Amazon.