Rhagymadrodd
Thank you for choosing the JOUNJIP Mechanical Keyless Combination Lever Handle Door Lock. This manual provides detailed instructions for the proper installation, operation, and maintenance of your new lock. Designed for durability and convenience, this mechanical lock requires no batteries or external power, making it ideal for various indoor and outdoor applications, including doors, gates, and fences.
Cynnyrch Drosview a Chydrannau
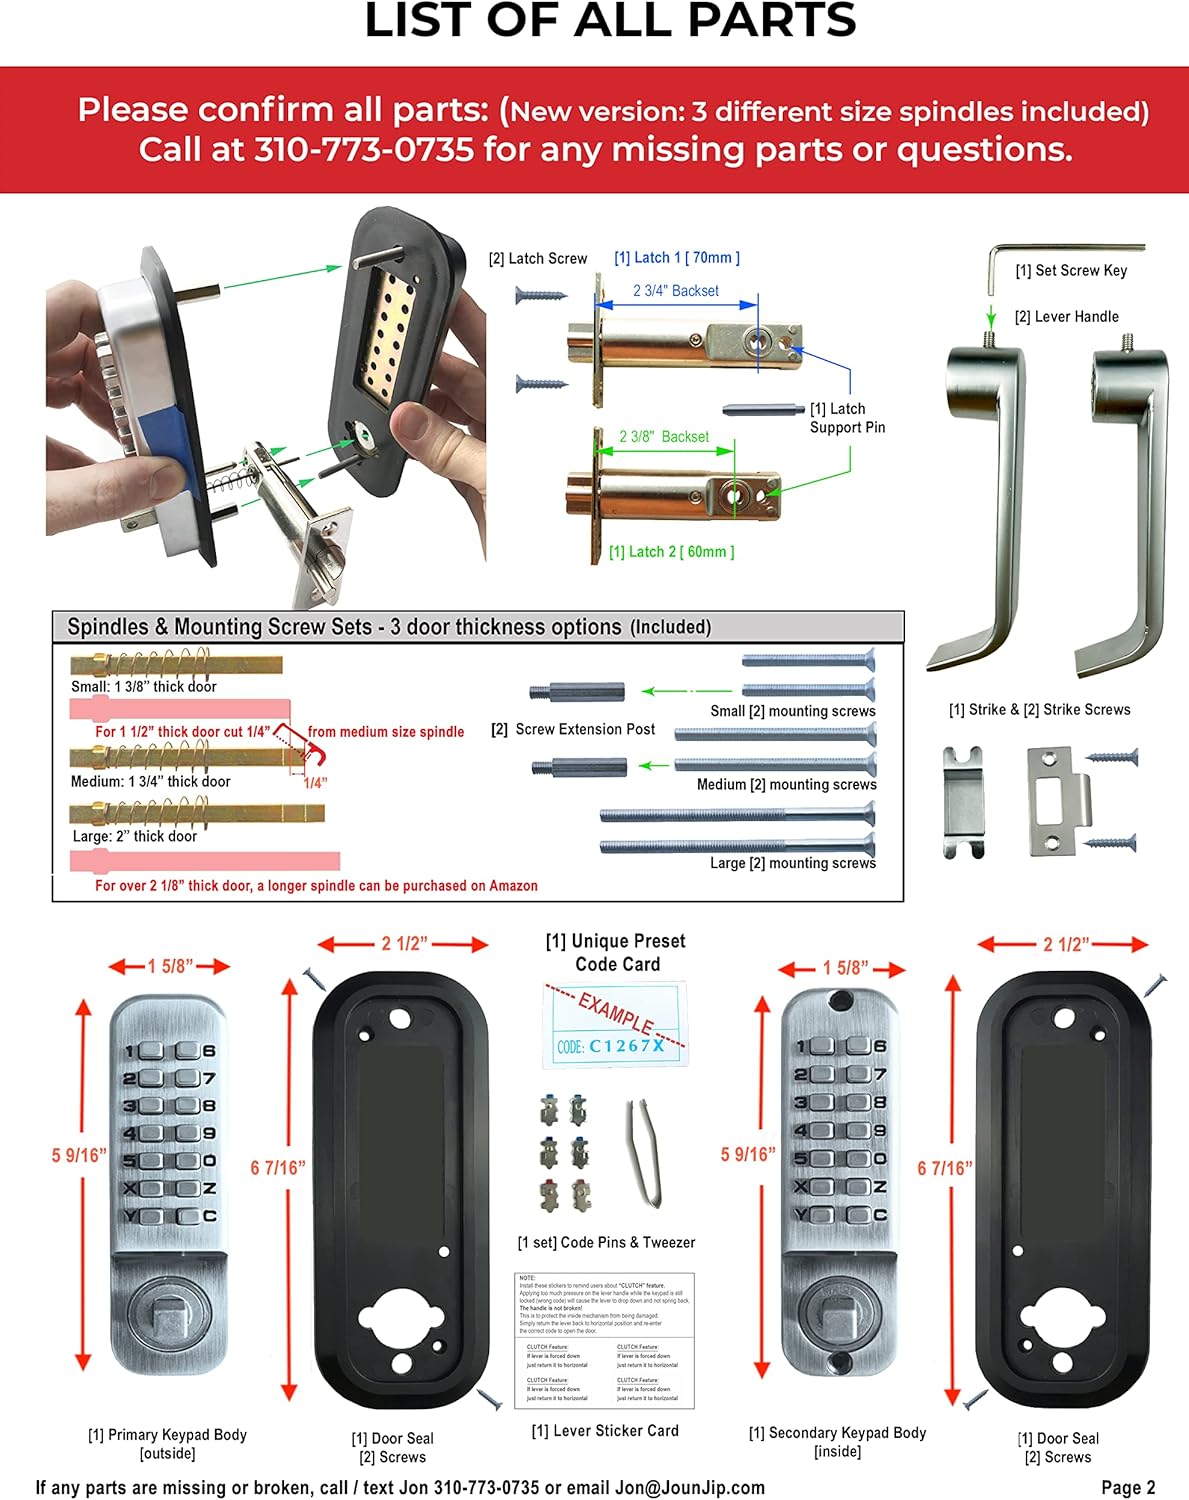
Before beginning installation, please ensure all components are present and undamaged. The package includes the following items:
- 2 Keypads (Primary and Secondary)
- 2 Seliau Drws
- 2 Latch Bolts
- 2 Screw Extension Posts
- 1 Latch Post
- 1 Strike Plate Set
- 2 Screws for Strike Plate
- 6 Mounting Screws (various sizes)
- 2 Latch Screws
- 3 Spindle Sizes (pre-cut for 35mm-51mm door thickness)
- 1 Paper Template
- Llawlyfr Cyfarwyddiadau
- 1 Unique Preset Code Card
- 1 Set of Code Pins & Tweezers
Gosod a Gosod
Proper installation is crucial for the optimal performance and security of your lock. Follow these steps carefully. An official installation video is provided below for visual guidance.
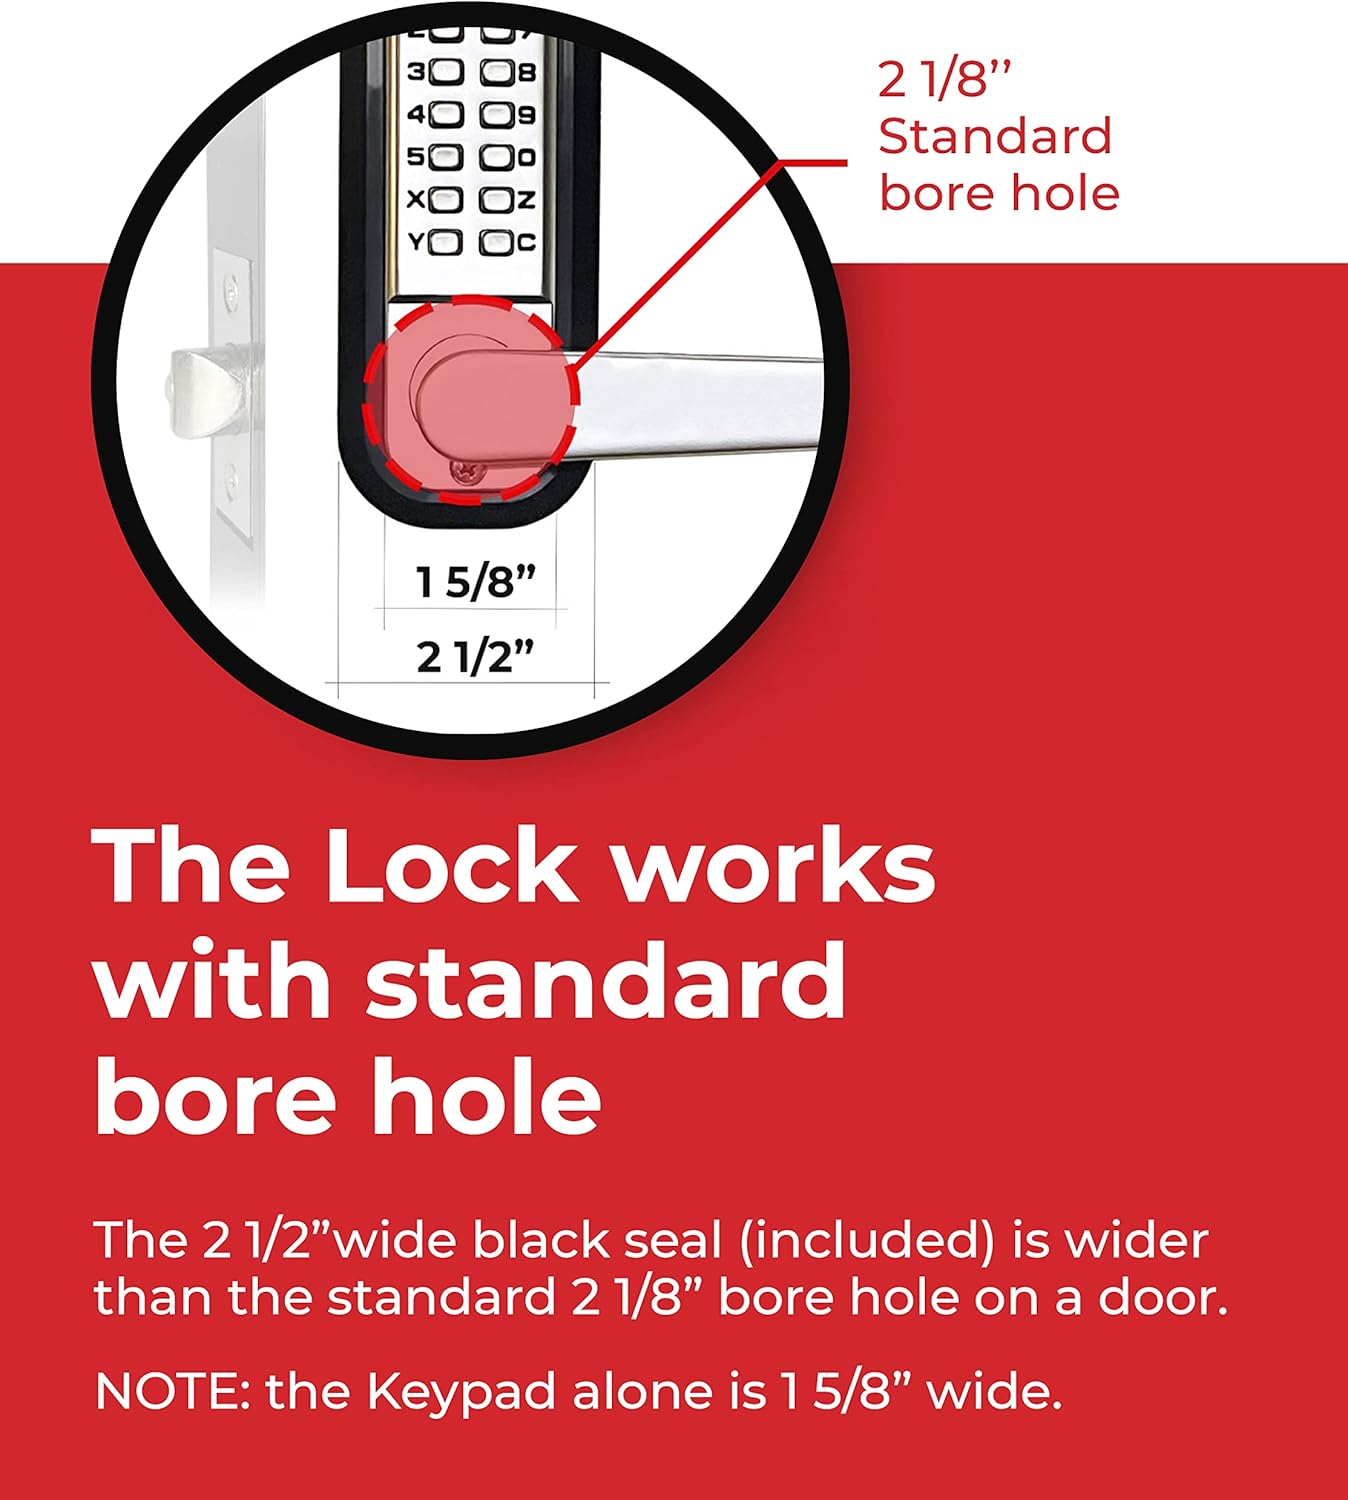
- Paratowch y Drws: Ensure your door has a standard 2 1/8" bore hole. Measure the backset (distance from the door edge to the center of the bore hole).
- Defnyddiwch y Templed: Find the correct backset line on the provided paper template and fold it along the designated line. Align the center line of the template with the center of the latch hole on your door. Secure the template with painter's tape.
- Tyllau Dril: Drill the necessary holes as indicated on the template. Use the door seal to verify correct hole placement before proceeding.
- Gosod y Latch: Insert the latch into the door edge and secure it with the provided screws.
- Install Mounting Posts: Screw the mounting posts into the primary keypad.
- Insert Latch Post: The latch post goes into the hole farthest away from the door edge on the primary keypad.
- Prepare Keypads: Attach the back seal to the primary keypad. Temporarily tape the primary and secondary keypads together with painter's tape to maintain alignment during installation.
- Select Spindle: Measure your door thickness. Choose the correct spindle length from the three pre-cut sizes provided (1 3/8", 1 3/4", 2"). For 1 1/2" thick doors, cut 1/4" from the medium spindle. For doors over 2 1/8" thick, a longer spindle may be required (available separately).
- Insert Spindle: Insert the selected spindle into the primary keypad, ensuring the spring is correctly positioned. Then, insert the spindle through the latch hole in the door. The spindle should extend approximately 1/4" past the door surface on the other side.
- Attach Secondary Keypad: Place the secondary keypad onto the extended spindle, ensuring both keypads are perfectly lined up with each other.
- Secure Keypads: Use the correct length mounting screws for your door thickness to secure the keypads together.
- Attach Lever Handles: Attach the lever handles to both keypads and tighten the set screws to secure them.
- Ymarferoldeb Prawf: Test the keypad function by entering the code and operating the lever.


Canllaw Fideo Gosod
Video 1: Detailed guide on how to install the JOUNJIP Double Sided Keypad Lever Lock. This video covers measuring, drilling, assembling components, and final testing.
Cyfarwyddiadau Gweithredu
Entering Your Code
To unlock the door, always press the 'C' button first to clear any previous entries. Then, enter your unique combination code. Once the correct code is entered, the lever will engage, allowing you to open the door.

Modd Passage
The lock features a passage mode option, allowing you to temporarily deactivate the code for free passing without needing to change the passcode. This is useful for periods of high traffic or events. Consult the detailed instructions for activating and deactivating passage mode.
Automatic Latching
The latch automatically locks doors every time they close, ensuring continuous security. There is no need to manually turn a knob to secure the door once it's shut.

Cynnal a chadw
As a mechanical lock, the JOUNJIP Keyless Lock requires minimal maintenance. Keep the keypad and moving parts clean from dirt and debris. Avoid using harsh chemical cleaners that could damage the finish or internal mechanisms. Periodically check that all screws are tight and that the lock operates smoothly. Lubrication with a graphite-based lubricant can be applied to the internal mechanisms if needed, but avoid oil-based lubricants which can attract dust.
Datrys problemau
- Cod Ddim yn Gweithio: Ensure you press the 'C' button before entering your code. Verify that the correct code pins are set according to your unique preset code card. If changing the code, ensure the 'C' button is held down while inserting or removing pins.
- Lever Not Engaging/Stuck: This can often be caused by an incorrect spindle length or improper alignment during installation. Re-check your door thickness and ensure the spindle extends approximately 1/4" past the door surface. Ensure the keypads are perfectly aligned and not overtightened, which can cause binding.
- Latch Not Locking Automatically: Inspect the latch mechanism for any obstructions or debris. Verify that the strike plate is correctly aligned with the latch bolt. Ensure the lock is installed squarely and not at an angle that would impede the latch's movement.

Manylebau
| Nodwedd | Manylyn |
|---|---|
| Brand | JOUNJIP |
| Rhif Model | 5060928560005 |
| Math Clo | Keypad, Mechanical Combination |
| Nodwedd Arbennig | Keyless, No Batteries, No Power Needed |
| Deunydd | Satin Chrome |
| Dimensiynau Eitem (L x W x H) | 6.5 x 2.5 x 2.13 modfedd |
| Pwysau Eitem | 4 Bunt |
| Math o Reolwr | 100% Mechanical |
| Defnyddiau a Argymhellir | Securing doors, gates, and other similar openings, particularly in outdoor settings where weather resistance is important. |
Gwarant a Chefnogaeth
Gwybodaeth Gwarant
This JOUNJIP Mechanical Keyless Combination Lever Handle Door Lock comes with a 1-Year Manufacturer Warranty from the date of purchase. This warranty covers defects in materials and workmanship under normal use. Please retain your proof of purchase for warranty claims.

Cefnogaeth i Gwsmeriaid
For technical assistance, troubleshooting, or any questions regarding your JOUNJIP lock, please contact our support team:
- E-bost: Jon@JounJip.com
- Ffôn: 310-773-0735
Our dedicated support team is available to assist you.