
1. Rhagymadrodd
Thank you for choosing the Graef SKS 110 Twin Electric Slicer. This manual provides essential information for the safe and efficient operation, maintenance, and care of your new appliance. Please read these instructions thoroughly before first use and keep them for future reference.
The Graef SKS 110 Twin is a compact and modern electric food slicer designed for precision slicing of various foods. It features an energy-saving Eco Power motor and comes with both a serrated and a smooth blade for versatile use.
2. Cyfarwyddiadau Diogelwch
RHYBUDD: Failure to follow these safety instructions may result in electric shock, fire, and/or serious injury.
- Datgysylltwch yr offer o'r cyflenwad pŵer bob amser cyn ei gydosod, ei ddadosod neu ei lanhau.
- Keep hands and utensils away from the moving blade during operation.
- Nid yw'r teclyn hwn wedi'i fwriadu i'w ddefnyddio gan bersonau (gan gynnwys plant) sydd â galluoedd corfforol, synhwyraidd neu feddyliol llai, neu ddiffyg profiad a gwybodaeth, oni bai eu bod wedi cael goruchwyliaeth neu gyfarwyddyd ynghylch defnyddio'r offer gan berson sy'n gyfrifol am eu diogelwch.
- Dylid goruchwylio plant i sicrhau nad ydynt yn chwarae gyda'r teclyn.
- Do not operate the slicer with a damaged cord or plug, or after the appliance malfunctions or has been damaged in any manner.
- Use only original Graef accessories and spare parts.
- Ensure the appliance is placed on a stable, flat, and dry surface during operation.
- The appliance is equipped with overload protection. If the motor stops, switch off the appliance, unplug it, and allow it to cool down before resuming operation.
- Peidiwch byth â throchi'r uned modur mewn dŵr neu hylifau eraill.
- Exercise extreme caution when handling the blades, as they are very sharp.
3. Cynnwys Pecyn
Please check that all items are present and undamaged:
- Graef SKS 110 Twin Electric Slicer unit
- 1 x Serrated blade (pre-installed or separate)
- 1 x Smooth blade
- Food holder/pusher
- Llawlyfr Cyfarwyddiadau (y ddogfen hon)
4. Cydrannau Drosview
Familiarize yourself with the parts of your Graef SKS 110 Twin Electric Slicer:
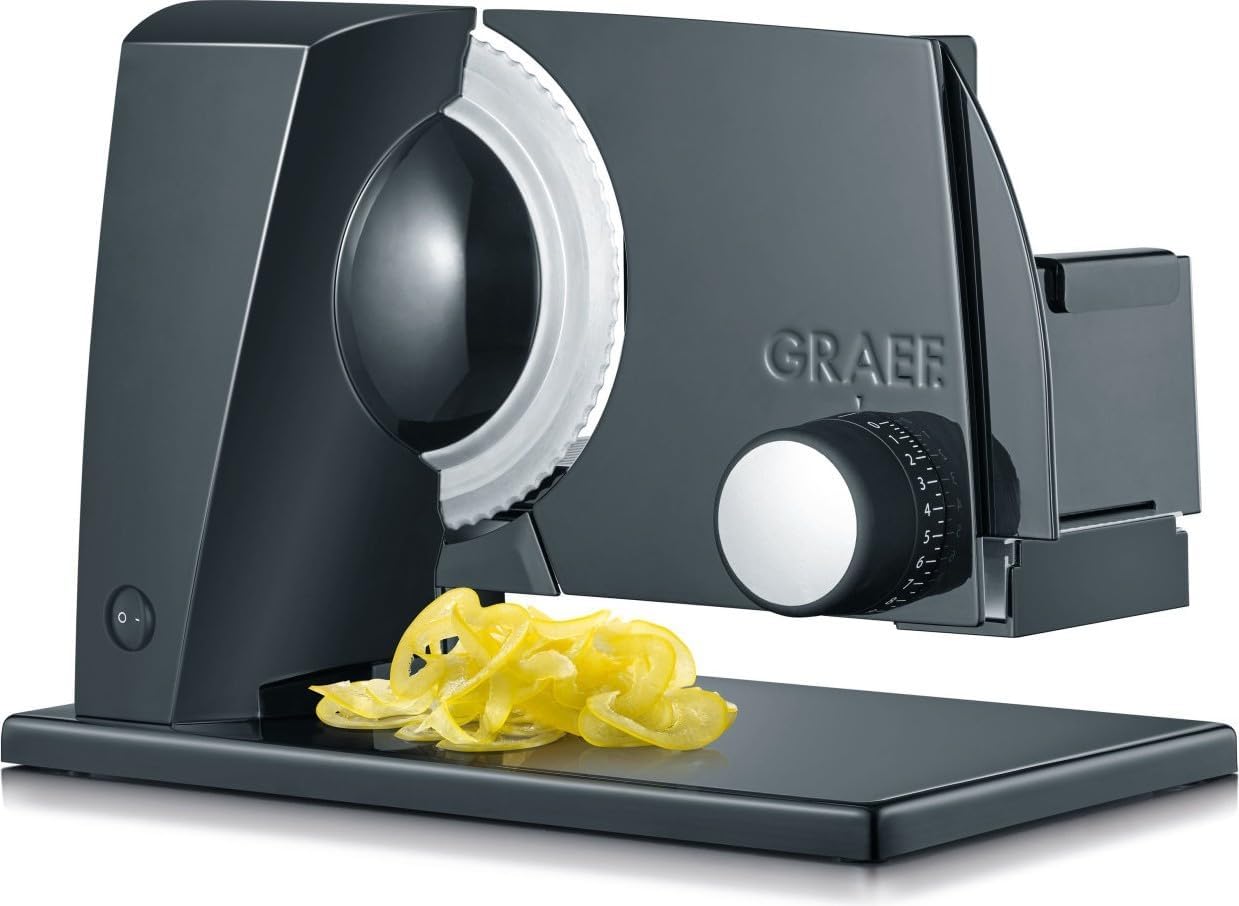
Image: The Graef SKS 110 Twin Electric Slicer in black, featuring a serrated blade, a slice thickness adjustment knob, and a power switch. Sliced yellow peppers are shown on the base.
- Newid Pwer (Ymlaen / Diffodd)
- Tai Modur
- Blade (Serrated or Smooth)
- Blade Cover/Guard
- Slice Thickness Adjustment Knob
- Cludo Bwyd
- Food Holder/Pusher
- Plât Sylfaen
5. Gosod
- Dadbacio: Carefully remove all packaging materials and ensure no parts are missing.
- Lleoliad: Place the slicer on a clean, dry, stable, and non-slip surface. Ensure there is enough space around the appliance for safe operation.
- Glanhau Cychwynnol: Before first use, wipe all parts that will come into contact with food (blade, food carriage, food holder) with a damp cloth. Refer to the "Cleaning and Maintenance" section for detailed instructions.
- Gosod Blade: The serrated blade is typically pre-installed. If you need to install or change a blade, refer to the "Changing Blades" section.
- Cysylltiad Pwer: Ensure the power switch is in the "Off" position (0) before plugging the appliance into a grounded 230V ~ 50Hz power outlet.
6. Cyfarwyddiadau Gweithredu
6.1. Newid Llafnau
Always unplug the slicer before changing blades. Handle blades with extreme care.
- Ensure the slicer is unplugged and the slice thickness is set to "0".
- Locate the blade locking mechanism (usually a central knob or lever on the blade).
- Turn the locking mechanism counter-clockwise to loosen and remove the blade.
- Carefully lift the blade off.
- To install a new blade, align it with the motor shaft and press it firmly into place.
- Turn the locking mechanism clockwise until the blade is securely fastened. Do not overtighten.
6.2. Addasu Trwch y Sleisen
The slice thickness can be adjusted from 0 to 20 mm.
- Turn the slice thickness adjustment knob (Component 5) to your desired thickness. The scale on the knob indicates the approximate thickness in millimeters.
- For very thin slices (e.g., carpaccio), set the knob to a lower number. For thicker slices (e.g., bread), set it to a higher number.
6.3. Slicing Food
Use the food holder/pusher at all times to protect your hands.
- Place the food item (e.g., bread, cheese, meat, vegetables) onto the food carriage (Component 6).
- Secure the food with the food holder/pusher (Component 7).
- Adjust the slice thickness using the knob (Component 5).
- Plug in the slicer and switch it on using the power switch (Component 1).
- Gently push the food carriage towards the rotating blade using the food holder. Apply even pressure.
- Collect the sliced food from the base plate (Component 8).
- Once finished, switch off the slicer and unplug it from the power outlet.
Tips for Slicing:
- For best results with soft cheeses or meats, chill them slightly before slicing.
- Use the serrated blade for bread, hard cheeses, and roasted meats.
- Use the smooth blade for cold cuts, vegetables, and very thin slices.
7. Glanhau a Chynnal a Chadw
Regular cleaning ensures optimal performance and extends the lifespan of your slicer. Tynnwch y plwg bob amser cyn glanhau.
- Llafnau: Carefully remove the blade as described in "Changing Blades". Wash the blade by hand with warm soapy water and a brush. Rinse thoroughly and dry immediately.
- Food Carriage and Food Holder: These parts can be removed and washed by hand with warm soapy water. Rinse and dry thoroughly.
- Motor Housing and Base: Sychwch yr arwynebau allanol gyda hysbysebamp lliain. Peidiwch â defnyddio glanhawyr sgraffiniol na throchi'r uned fodur mewn dŵr.
- Slice Thickness Plate: Ensure no food particles are lodged behind the slice thickness plate. Clean with a damp brethyn.
- Storio: Store the slicer in a clean, dry place. Ensure the slice thickness is set to "0" for safety during storage.
Pwysig: All parts should be hand washed only. Do not wash any parts in a dishwasher.
8. Datrys Problemau
| Problem | Achos Posibl | Ateb |
|---|---|---|
| Nid yw'r sleisiwr yn troi ymlaen. | Heb ei blygio i mewn; diffoddwch y pŵer; diffoddwch y pŵertage. | Check power cord connection; ensure switch is "On"; check power supply. |
| Mae modur yn stopio yn ystod y llawdriniaeth. | Overload protection activated; food too hard or too much pressure. | Switch off, unplug, let cool for 15-20 minutes. Reduce pressure or pre-cut very hard items. |
| Slices are uneven or torn. | Blade dull; incorrect blade for food type; food not firm enough. | Ensure blade is clean and sharp. Use appropriate blade (serrated for bread/hard items, smooth for delicate). Chill food if necessary. |
| Blade is difficult to remove/install. | Food residue or overtightened. | Ensure slicer is unplugged. Clean around the blade mechanism. Apply gentle, firm pressure. |
If the problem persists after attempting these solutions, please contact Graef customer support.
9. manylebau
| Model | SKS 110 Twin |
| Brand | GRAFF |
| Grym | 230 V ~ 50 Hz, 45-170 W |
| Diamedr Llafn | Ø 17 cm |
| Trwch Sleisen | 0 - 20 mm |
| Deunydd | Stainless steel (body, blades), Plastic (base) |
| Dimensiynau (L x W x H) | 32.5 x 23 x 24 cm |
| Pwysau | 2.33 kg |
| Nodweddion Arbennig | Eco Power motor, Overload protection, Includes serrated and smooth blades |
| Cyfarwyddiadau Gofal | Golchi dwylo yn unig |
10. Gwarant a Chefnogaeth
For warranty information, technical support, or to order spare parts, please refer to the official GRAEF websafle neu cysylltwch â'u gwasanaeth cwsmeriaid yn uniongyrchol. Cadwch eich prawf prynu ar gyfer hawliadau gwarant.
GRAEF Customer Service: Ymwelwch www.graef.de for contact details and further information.