
1. Rhagymadrodd
This manual provides comprehensive instructions for the installation, operation, and maintenance of the SINOTIMER TM919B 30A Programmable Electronic Timer Switch. This device is designed to automatically control the ON/OFF switching of various electrical appliances based on user-defined daily or weekly programs. Please read this manual carefully before installation and use to ensure proper function and safety.
2. Gwybodaeth Diogelwch
WARNING: Risk of electric shock. Installation should only be performed by a qualified electrician or trained personnel.
- Always disconnect power at the circuit breaker before installing or servicing the timer switch.
- Gwnewch yn siŵr bod yr holl gysylltiadau gwifrau yn ddiogel ac yn cydymffurfio â chodau trydanol lleol.
- Peidiwch â bod yn fwy na'r sgôr llwyth uchaf o 30A.
- This device is intended for indoor use only. Avoid exposure to moisture or extreme temperatures.
- Peidiwch â cheisio dadosod na thrwsio'r uned eich hun. Cysylltwch â phersonél gwasanaeth cymwys.
3. Cynnyrch Drosview
The SINOTIMER TM919B is a digital timer switch featuring a large LCD display, multiple programming options, and a manual override function. It is designed for DIN rail mounting.
3.1. Cydrannau a Rheolyddion
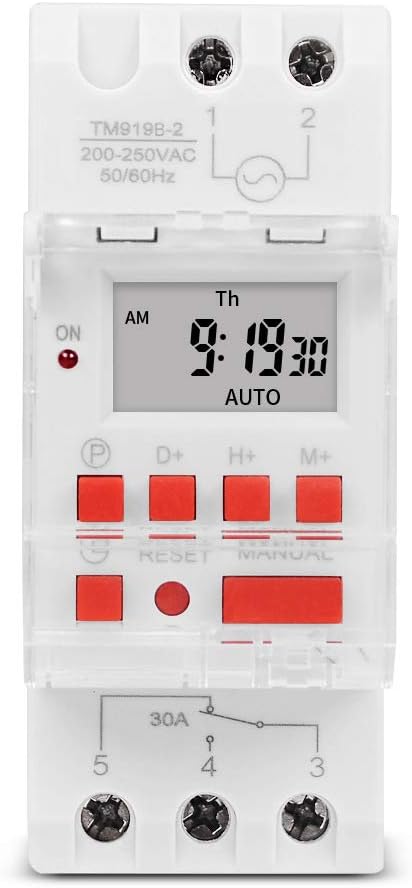
Ffigur 1: Blaen view of the TM919B timer switch, showing the LCD display, control buttons, and terminal connections.

Ffigur 2: Ongl view of the TM919B with the transparent protective cover open, revealing the programming buttons (P, D+, H+, M+, RESET, MANUAL).
- Arddangosfa LCD: Shows current time, day, and program status.
- P (Program) Button: Enters/exits program setting mode.
- D+ (Day) Button: Adjusts day of the week in setting modes.
- H+ (Hour) Button: Adjusts hour in setting modes.
- M+ (Minute) Button: Adjusts minute in setting modes.
- Botwm AILOSOD: Clears all settings and resets the timer to factory defaults.
- Botwm LLAW: Toggles between ON, AUTO, and OFF modes.
- Cysylltiadau Terfynell: For power input and load output.
4. manylebau
| Nodwedd | Manyleb |
|---|---|
| Model | TM919B |
| Cyftage | 220V (AC200-250V) |
| Amlder | 50/60Hz |
| Llwyth Uchaf | 30A (Llwyth Gwrthiannol) |
| Rhaglenni | 16 ON/OFF programs per day/week |
| Ysbaid Lleiaf | 1 munud |
| Batri wrth gefn | Built-in rechargeable battery (for memory retention) |
| Mowntio | Rheilffordd DIN 35mm |
| Dimensiynau | Cyfeiriwch at Ffigur 3 |

Ffigur 3: Detailed dimensions of the TM919B timer switch, showing height, width, and depth measurements.
5. Gosod a Gosod
Follow these steps for safe and correct installation of your timer switch.
5.1. Mowntio
- Ensure power is disconnected at the main circuit breaker.
- Mount the TM919B onto a standard 35mm DIN rail. The device features a clip mechanism on the back for secure attachment.
- Press the orange clip at the bottom of the unit to release it from the DIN rail if removal is necessary.

Ffigur 4: Ochr view of the TM919B, highlighting the orange DIN rail mounting clip.

Ffigur 5: Yn ol view of the TM919B, illustrating the DIN rail mounting mechanism.
5.2. Diagram Gwifrau
Refer to the diagram below for correct wiring connections. Ensure all connections are tight and insulated.

Ffigur 6: Ochr view of the TM919B showing the wiring diagram printed on the casing. Terminals 1 and 2 are for power input (L and N). Terminals 3, 4, and 5 are for load output (Common, Normally Open, Normally Closed).
- Terfynellau 1 a 2: Power Input (L - Live, N - Neutral). Connect your 220V AC supply here.
- Terfynell 3: Common (COM) for the output relay.
- Terfynell 4: Normally Open (NO) output. The load will be powered when the timer is ON.
- Terfynell 5: Normally Closed (NC) output. The load will be powered when the timer is OFF.
For typical applications where the load is switched ON by the timer, connect the load between Terminal 3 (COM) and Terminal 4 (NO).
6. Cyfarwyddiadau Gweithredu
6.1. Initial Setup and Reset
- After connecting power, the display may be blank or show random characters. Press the AILOSOD button with a pointed object (e.g., a pen tip) to clear all memory and reset the timer. The display will show "0:00" and "MO".
- Allow the internal battery to charge for at least 30 minutes before programming for optimal performance and memory retention during power outages.
6.2. Gosod yr Amser a'r Diwrnod Cyfredol
- Pwyswch a dal y D+ button to set the current day of the week (MO, TU, WE, TH, FR, SA, SU).
- Pwyswch a dal y H+ button to set the current hour (0-23).
- Pwyswch a dal y M+ button to set the current minute (0-59).
- Release the buttons when the correct time and day are displayed. The timer will automatically save the settings.
6.3. Programming ON/OFF Cycles
The TM919B supports up to 16 ON/OFF programs. Each program consists of an ON time and an OFF time.
- Gwasgwch y P button once. The display will show "1 ON". This is for the first ON program.
- Defnydd D+ to select the day(s) for this program. Options include:
- MO TU WE TH FR SA SU (Every day)
- MO (Monday only)
- TU (Tuesday only)
- ...
- LLUN MAW MER IAU GWEN (Dyddiau'r wythnos)
- SA SU (Weekends)
- MO TU WE (Mon-Wed)
- TH FR SA (Thu-Sat)
- MO WE FR (Mon, Wed, Fri)
- TU TH SA (Tue, Thu, Sat)
- MO TU WE TH FR SA (Mon-Sat)
- Defnydd H+ a M+ to set the desired ON hour and minute.
- Gwasgwch y P button again. The display will show "1 OFF". This is for the first OFF program.
- Defnydd D+, H+, a M+ to set the desired OFF day, hour, and minute. Ensure the OFF time is after the ON time for the same program.
- Repeat steps 1-5 for additional ON/OFF programs (up to 16). If you don't need all 16 programs, simply press P to cycle through unused programs until you return to the current time display.
- To exit programming mode and save settings, press the clock button (usually labeled with a clock icon, or simply wait for 30 seconds without input).
6.4. Gwrthwneud Llawlyfr
Gwasgwch y LLAWLYFR botwm i gylchu trwy'r dulliau gweithredu:
- AR: The timer output is continuously ON, ignoring all programs.
- CAR: The timer operates according to the programmed ON/OFF cycles. This is the standard operating mode.
- I FFWRDD: The timer output is continuously OFF, ignoring all programs.
Ensure the timer is set to AWTO for programmed operation.
7. cynnal
- The TM919B is designed for maintenance-free operation.
- Glanhewch y tu allan gyda lliain meddal, sych. Peidiwch â defnyddio glanhawyr sgraffiniol na thoddyddion.
- Ensure the internal battery is charged by keeping the unit powered for at least 24 hours initially, and periodically thereafter, to maintain time and program memory during power outages.
8. Datrys Problemau
| Problem | Achos Posibl | Ateb |
|---|---|---|
| Mae'r arddangosfa'n wag. | Dim cyflenwad pŵer; batri mewnol wedi'i ddadweud. | Check power connections. Allow unit to charge for 30 minutes. |
| Nid yw'r amserydd yn newid y llwyth. | Incorrect wiring; timer in MANUAL ON/OFF mode; incorrect program settings. | Verify wiring (refer to Figure 6). Ensure timer is in AUTO mode. Check program times and days. |
| Collir rhaglenni ar ôl diffodd y pŵertage. | Internal battery not fully charged or faulty. | Ensure unit is powered for at least 24 hours to fully charge the battery. If problem persists, contact support. |
| Nid yw botymau yn ymateb. | Unit frozen; temporary glitch. | Gwasgwch y AILOSOD botwm. |
9. Gwarant a Chefnogaeth
SINOTIMER products are manufactured to high-quality standards. For warranty information or technical support, please refer to the documentation provided with your purchase or visit the official SINOTIMER websafle. Cadwch eich derbynneb prynu fel prawf o brynu.
For further assistance, you may contact SINOTIMER customer service through their official channels.