Docooler XUH6362338938855GM
Docooler JINGSHA X99-8D3 Motherboard User Manual
Model: XUH6362338938855GM
1. Rhagymadrodd a Throsoddview
The Docooler JINGSHA X99-8D3 is a high-performance ATX gaming motherboard designed for LGA2011 V3 processors. It features four-channel DDR3 memory support, an M.2 NVME slot for high-speed storage, and multiple PCI-E expansion slots, making it suitable for demanding computing tasks and gaming setups. This manual will guide you through the installation, configuration, and maintenance of your motherboard.
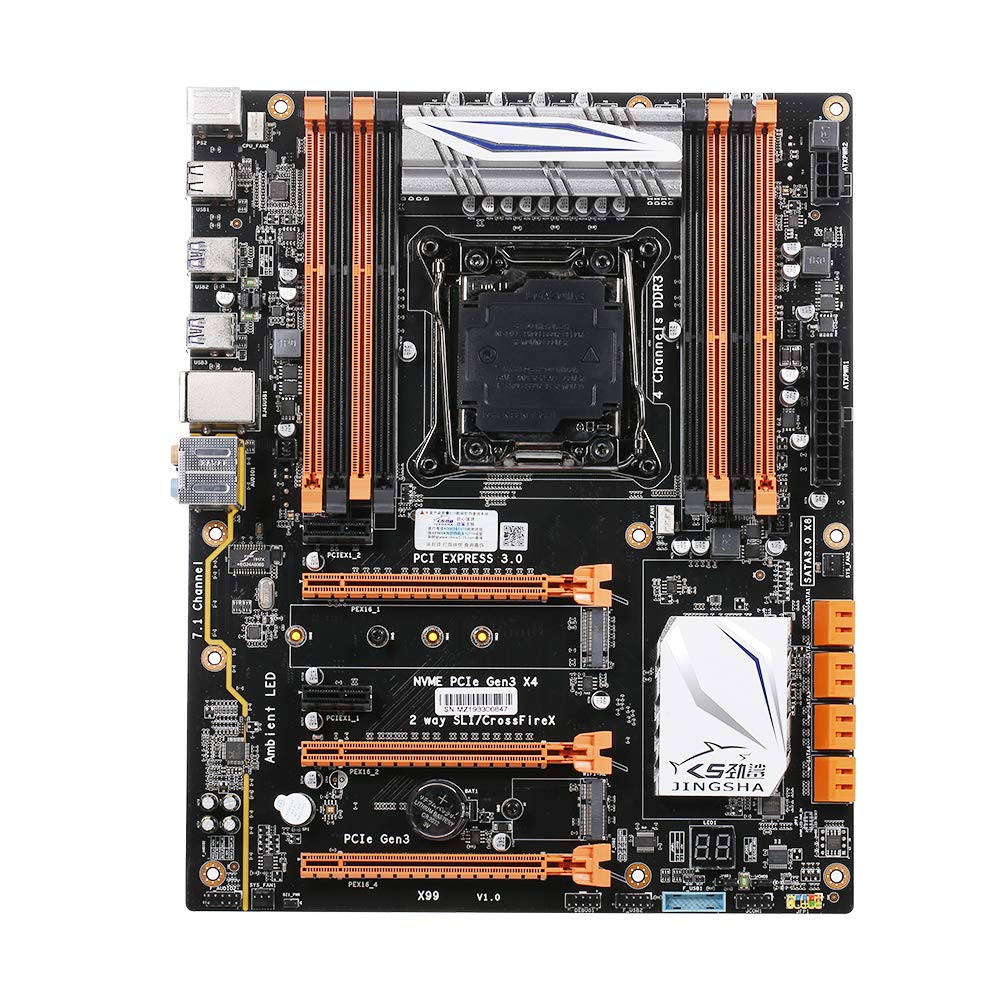
Ffigur 1.1: O'r brig i lawr view of the Docooler JINGSHA X99-8D3 Motherboard, showcasing its layout with CPU socket, RAM slots, and various expansion slots.
2. Nodweddion Allweddol
- M.2 NVME Support: Equipped with an M.2 hard disk port, supporting high-speed PCI-E NVME X4 for optimal operating system and application driver performance.
- Quad-Channel DDR3 Memory: Features 8 DDR3 memory slots across 4 channels, significantly improving capacity and performance, supporting up to 256GB.
- Digital Diagnostic Card: Integrated digital diagnostic card automatically tests hardware devices to ensure proper operation and assist in troubleshooting.
- Multiple PCI-E Expansion Slots: Provides 3 PCI-E expanded slots, configurable as X16/X8 to handle various workloads and multi-GPU setups.
- Adeiladu Gwydn: Built with a 10-layer PCB and high-quality capacitors for enhanced stability and heat resistance.

Figure 2.1: Diagram illustrating the six core technologies and features of the motherboard, including 4-channel DDR3*8, M.2 hard disk interface, digital diagnostic card, 7.1 channel audio, SATA3.0*8 interface, and Crossfire support.
3. Cynnwys Pecyn
Gwiriwch fod yr holl eitemau a restrir isod yn bresennol yn eich pecyn:
- 1x Docooler JINGSHA X99-8D3 Motherboard
- Cebl SATA 1x
- 1x I/O Baffle (Backplate)
- 1x CPU Fan Board
- A bag of screws
4. manylebau
| Nodwedd | Manyleb |
|---|---|
| Model | X99-8D3 |
| Ffactor Ffurf | ATX |
| Graphic Slot | PCIE3.0 16X*3 |
| Cerdyn Rhwydwaith | Cerdyn Rhwydwaith Gigabit |
| Sianel Sain | 7.1 Sianel |
| CPU Type Support | LGA2011 V3 (2629V3/2649V3/2669V3/2678V3/2696V3/2676V3/2673V3) |
| Haenau PCB | 10 Haen |
| Slot Cof | DDR3*8 |
| Capasiti Cof Uchaf | 256GB |
| Rhyngwyneb SATA | SATA3.0*8, M.2 NVME |
| PS/2 Interface | Llygoden / Bysellfwrdd |
| Cyflenwad Pŵer | 8 PIN*1, 24 PIN*1 |
| Rhyngwyneb USB | USB3.0*6, USB2.0*6 |
| Expanded Interface | PCIE 1X*2, M.2 WIFI*1 |
| Maint yr Eitem | 30.2 x 24.4 cm (11.89 x 9.61 modfedd) |
| Pwysau Eitem | 930.5g (32.82 owns) |

Ffigur 4.1: Manwl view of the motherboard's rear I/O panel, showing PS/2 ports, USB 2.0, USB 3.0, Gigabit Network Port, and 7.1 Audio Ports.
5. Gosod a Gosod
Cyn dechrau'r gosodiad, gwnewch yn siŵr bod eich system wedi'i diffodd a'i datgysylltu o'r soced wal. Daliwch y famfwrdd wrth ei ymylon i osgoi rhyddhau statig.
5.1 Gosod y CPU
- Locate the LGA2011 V3 CPU socket on the motherboard.
- Gently push down the CPU retention lever and swing it open.
- Align the triangular mark on your CPU with the corresponding mark on the socket. Carefully place the CPU into the socket without forcing it.
- Caewch y lifer cadw i sicrhau'r CPU.
- Rhowch haen denau, gyfartal o bast thermol ar ben y CPU.
- Install the CPU cooler according to its manufacturer's instructions, ensuring proper contact and pressure.

Ffigur 5.1: Agos view of the LGA2011 V3 CPU socket on the motherboard, ready for CPU installation.
5.2 Installing RAM Modules
- Agorwch y clipiau ar ddau ben y slotiau cof DDR3.
- Align the notch on the RAM module with the key in the memory slot.
- Press down firmly on both ends of the RAM module until the clips snap into place, securing the module.
- For optimal performance, install RAM modules in matching pairs across the four channels as indicated in the motherboard manual or silkscreen.

Ffigur 5.2: View of the eight DDR3 RAM slots on the motherboard, showing their arrangement for quad-channel memory configuration.
5.3 Installing Storage Devices (M.2 NVME & SATA)
- M.2 NVME SSD: Locate the M.2 slot. Insert the M.2 SSD at an angle into the slot, then gently push it down and secure it with the provided screw.
- Gyriannau SATA: Connect your SATA SSDs or HDDs to the SATA 3.0 ports using SATA data cables. Ensure the power supply SATA power connectors are also attached to the drives.

Figure 5.3: Close-up of the M.2 interface on the motherboard, highlighting its position and the PCI-E Gen3 X4 connection for high-speed data transfer.
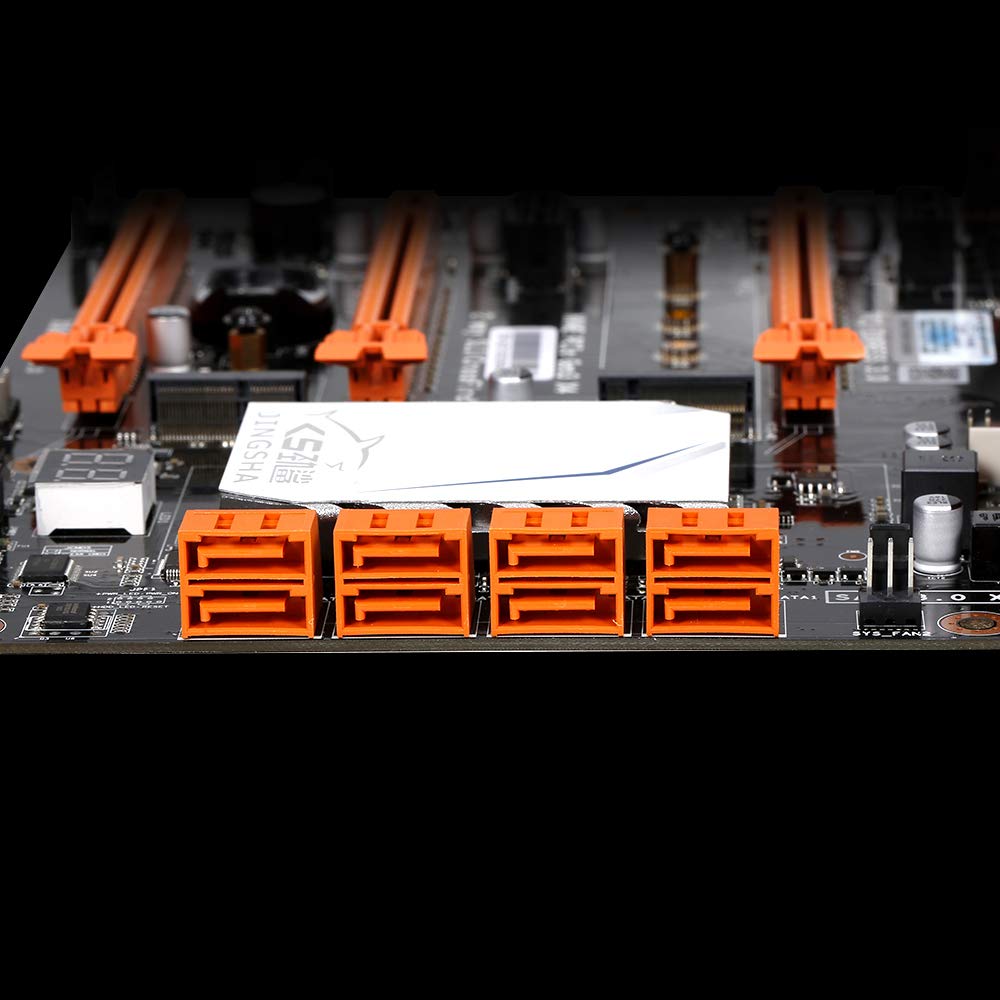
Ffigur 5.4: View of the eight orange SATA 3.0 ports on the motherboard, providing ample connectivity for storage devices.
5.4 Cysylltu Cyflenwad Pŵer
- Cysylltwch y cysylltydd pŵer ATX 24-pin o'ch uned cyflenwad pŵer (PSU) â'r porthladd cyfatebol ar y famfwrdd.
- Connect the 8-pin CPU power connector (EPS12V) from your PSU to the 8-pin port near the CPU socket.
5.5 Installing Expansion Cards (PCIe)
- Locate the desired PCI-E 3.0 x16 or x1 slots.
- Tynnwch y gorchudd slot ehangu cyfatebol o gas eich cyfrifiadur personol.
- Align the expansion card with the slot and press down firmly until it is fully seated. Secure the card with a screw to the case.

Ffigur 5.5: Ongl view of the motherboard, highlighting the three PCI Express 3.0 x16 slots and the smaller PCIe x1 slots, ready for graphics cards and other expansion cards.
6. Gweithredu'r Famfwrdd
6.1 Cychwyn Cyntaf a Gosod BIOS
- Ar ôl cydosod yr holl gydrannau, cysylltwch eich monitor, bysellfwrdd a llygoden.
- Power on your system. During the initial boot sequence, repeatedly press the DEL or F2 key (common for JINGSHA motherboards) to enter the BIOS/UEFI setup utility.
- Yn y BIOS, gwiriwch fod yr holl gydrannau sydd wedi'u gosod (CPU, RAM, storfa) wedi'u canfod yn gywir.
- Ffurfweddwch drefn gychwyn i flaenoriaethu cyfryngau gosod eich system weithredu (gyriant USB neu DVD).
- Cadwch y newidiadau a gadael y BIOS. Bydd y system yn ailgychwyn.
6.2 Gosod System Weithredu
Follow the instructions provided with your operating system (e.g., Windows, Linux) to complete the installation process. Ensure you install all necessary drivers for the motherboard's chipsets, network, audio, and other components from the manufacturer's websafle neu'r ddisg gyrrwr sydd wedi'i chynnwys.
7. cynnal
Mae cynnal a chadw priodol yn sicrhau hirhoedledd a gweithrediad sefydlog eich mamfwrdd.
- Tynnu Llwch: Glanhewch lwch o'r famfwrdd a'r cydrannau'n rheolaidd gan ddefnyddio aer cywasgedig. Gwnewch yn siŵr bod y system wedi'i diffodd a'i datgysylltu cyn glanhau.
- Diweddariadau BIOS: Periodically check the Docooler or JINGSHA official website for BIOS updates. BIOS updates can improve compatibility, stability, and performance. Follow update instructions carefully to avoid damaging the motherboard.
- Diweddariadau Gyrwyr: Cadwch yrwyr eich system wedi'u diweddaru i sicrhau perfformiad gorau posibl a chydnawsedd â meddalwedd a chaledwedd newydd.
- Amodau Amgylcheddol: Operate the motherboard in a well-ventilated environment with stable temperature and humidity to prevent overheating and component degradation.
8. Datrys Problemau
Mae'r adran hon yn mynd i'r afael â phroblemau cyffredin y gallech ddod ar eu traws.
8.1 Dim Pŵer / Dim Cychwyn
- Ensure the 24-pin ATX and 8-pin CPU power connectors are securely plugged into the motherboard.
- Check if the power supply unit (PSU) is switched on and connected to a working power outlet.
- Verify that the front panel power button cable is correctly connected to the motherboard's header.
8.2 Dim Allbwn Arddangos
- Ensure your graphics card (if dedicated) is properly seated in its PCI-E slot and has all necessary power cables connected.
- Check that your monitor cable is securely connected to the graphics card or motherboard (if integrated graphics are used, though X99 typically requires a dedicated GPU).
- Try reseating your RAM modules. Incorrectly seated RAM is a common cause of no display.
8.3 POST Code Display (Digital Diagnostic Card)
The motherboard is equipped with a digital diagnostic card (POST code display) that shows a two-digit code during boot-up. Refer to the motherboard's detailed technical documentation (often available on the manufacturer's website) for a list of POST codes and their meanings. This can help pinpoint the exact component causing a boot failure.

Ffigur 8.1: Agos view showing the integrated digital diagnostic card (POST code display) on the motherboard, which assists in identifying hardware issues during boot.
9. Gwarant a Chefnogaeth
For warranty information and technical support, please refer to the documentation provided with your purchase or visit the official Docooler or JINGSHA websafle. Cadwch eich prawf prynu ar gyfer hawliadau gwarant.
Ask a question about this manual
Ask about setup, troubleshooting, compatibility, parts, safety, or missing instructions. Manuals+ will review the question and use this page’s manual context to help answer it.