Panasonic HC-X1500
Panasonic HC-X1500 4K Professional Camcorder User Manual
Model: HC-X1500
1. Rhagymadrodd
This manual provides essential information for the proper operation and maintenance of your Panasonic HC-X1500 4K Professional Camcorder. Please read this manual thoroughly before using the camcorder to ensure safe and optimal performance.

Ffigur 1.1: Blaen view of the Panasonic HC-X1500 4K Professional Camcorder.
Nodweddion Allweddol:
- 4K 60p Recording: Capable of high-quality 4K 60p video recording in a compact and lightweight body.
- 24x Optical Zoom & 25mm Wide-Angle Lens: Features a Leica Dicomar lens with a wide 25mm angle and powerful 24x optical zoom.
- 5-Axis Hybrid O.I.S.: Advanced Optical Image Stabilization for smooth footage.
- Swyddogaethau Proffesiynol: Includes manual rings, built-in ND filters, and 24-bit high-resolution linear PCM audio recording.
- 4:2:2 10-bit Internal Recording: Supports high-quality internal recording for professional workflows.
- Dual SD Card Slots: Allows for relay recording or simultaneous recording for backup.
- Wi-Fi adeiledig: Enables HD live streaming capabilities.
- 3.5-inch Touch Panel LCD: High-resolution display for monitoring and control.
2. Gosod a Pharatoi
2.1. Unpacking the Camcorder
Carefully unpack all components from the box. The standard package includes:
- Panasonic HC-X1500 Camcorder
- Addasydd AC
- Cebl AC
- Batri
- Llygaid
- Hood Lens
2.2. Gwefru a Gosod y Batri
- Connect the AC adaptor to the camcorder's DC IN terminal and plug it into a power outlet.
- Insert the supplied battery into the battery slot on the rear of the camcorder until it clicks into place.
- The charge indicator will illuminate during charging. A full charge typically takes approximately 4 hours.

Figure 2.1: The camcorder's battery compartment, indicating the long battery life.
2.3. Inserting SD Cards
The HC-X1500 features dual SD card slots for flexible recording options.
- Open the SD card slot cover located on the side of the camcorder.
- Insert SDXC memory cards into Slot 1 and/or Slot 2 with the label facing the correct direction until they click into place.
- Caewch y clawr slot cerdyn SD.

Ffigur 2.2: Agos view of the dual SD card slots (1 and 2) on the camcorder.
2.4. Attaching the Lens Hood
Attach the supplied lens hood to protect the lens and reduce flare.
- Align the lens hood with the front of the lens barrel.
- Twist the lens hood clockwise until it locks securely into position.

Figure 2.3: The camcorder with its lens hood attached, providing protection and reducing glare.
3. Operating the Camcorder
3.1. Pweru Ymlaen / I ffwrdd
To power on the camcorder, slide the POWER switch to the ON position. To power off, slide it to the OFF position.
3.2. Basic Controls and Ergonomics
The HC-X1500 is designed for comfortable handheld operation, with key controls easily accessible.

Figure 3.1: Demonstrates the compact size and ergonomic design of the camcorder when held.
Familiarize yourself with the main control layout:
- Manual Rings: Located on the lens barrel for precise control over focus, zoom, and iris.
- ND Filter Switch: Adjusts the built-in Neutral Density filters (1/4, 1/16, 1/64, Clear) to control exposure in bright conditions.
- Botymau Defnyddiwr: Customizable buttons (USER 1, USER 2) for quick access to frequently used functions.
- IRIS/GAIN/SHUTTER Dials: Dedicated controls for exposure settings.

Ffigur 3.2: Ochr view highlighting the manual controls and dual SD card slots.
3.3. Recordio Fideo
To begin recording, press the REC START/STOP button. Press it again to stop recording.
3.3.1. 4K Recording and Codecs
The HC-X1500 supports 4K (UHD) recording at various frame rates, including 60p. It also supports 4:2:2 10-bit internal recording for enhanced color depth and grading flexibility.

Figure 3.3: Visual explanation of 4:2:2 color subsampling and 10-bit color depth, illustrating improved color information.
The camcorder utilizes an efficient heat-dispersing design to enable stable 4K 60p recording.

Figure 3.4: Internal diagram illustrating the heat-dispersing design for sustained performance.
3.3.2. Zoom and Focus
The camcorder features a 24x optical zoom Leica Dicomar lens, providing a wide-angle 25mm equivalent at its widest setting.

Ffigur 3.5: Blaen view of the Leica Dicomar lens, highlighting its 24x optical zoom and 25mm wide-angle capabilities.
Use the zoom rocker on the top handle or the manual zoom ring on the lens for adjusting focal length. The focus can be set to auto or manual using the A/M/OO switch on the lens barrel.
3.3.3. Image Stabilization (O.I.S.)
The 5-Axis Hybrid O.I.S. system helps to suppress blurring in various shooting conditions. Activate or deactivate O.I.S. using the dedicated button or menu setting.
3.3.4. arddangos a Viewdarganfyddwr
The camcorder is equipped with a 3.5-inch electrostatic touch panel LCD monitor and an up/down tiltable viewfinder (LVF).

Figure 3.6: Close-up of the tiltable electronic viewfinder (EVF) for comfortable viewing.
3.4. Wi-Fi and Live Streaming
The built-in Wi-Fi functionality allows for HD live streaming. Refer to the detailed user manual (PDF) for instructions on connecting to a Wi-Fi network and setting up live streams.
4. Cynnal a Chadw a Gofal
Proper maintenance ensures the longevity and optimal performance of your camcorder.
- Glanhau'r Lens: Use a soft, lint-free cloth specifically designed for optical lenses. Avoid touching the lens surface with your fingers.
- Glanhau'r Corff: Sychwch gorff y camcorder gyda lliain meddal, sych. Ar gyfer baw ystyfnig, defnyddiwch lliain sych yn ysgafnampened with water and then dry thoroughly. Do not use strong detergents or solvents.
- Storio: When not in use for extended periods, remove the battery and store the camcorder in a cool, dry place away from direct sunlight and extreme temperatures.
- Gofal Batri: Fully charge the battery before long-term storage and recharge it every six months to maintain its capacity.
5. Datrys Problemau
This section addresses common issues you might encounter. For more detailed troubleshooting, refer to the full user manual (PDF).
5.1. Problemau Ansawdd Delwedd
- Grainy or Noisy Footage in Low Light:
The camcorder's small sensor can produce noise in very low light conditions. Try to increase ambient light, use the built-in LED video light (if available on your model), or adjust gain settings carefully. Keep gain as low as possible (ideally below 6dB) to minimize noise.
- Overexposed or Underexposed Footage:
Adjust the ND filter, iris, shutter speed, or gain settings. Ensure the correct exposure mode (Auto/Manual) is selected for your shooting environment.
- Delweddau Blurry:
Check focus settings (auto/manual). Ensure the O.I.S. is active for handheld shooting. If using a tripod, ensure the tripod is stable and O.I.S. is set appropriately (some O.I.S. systems can cause issues on very stable tripods).
5.2. Materion Clywedol
- Noise in Recorded Audio (External Mic):
Ensure the external microphone is properly connected and its gain settings are appropriate. If using the 1/8" jack, some users have reported noise; consider using the XLR inputs on the detachable handle (if applicable) or an external audio recorder for critical audio.
- No Audio Recording:
Check audio input settings in the menu. Ensure microphone is connected and powered (if required). Verify audio levels are not muted.
5.3. Problemau Cysylltedd
- Problemau Cysylltiad Wi-Fi:
Ensure the camcorder is within range of the Wi-Fi access point. Check Wi-Fi settings on both the camcorder and the connecting device. Restart both devices if necessary.
- File Transfer Issues (USB):
Ensure the correct USB cable (micro USB) is used and the camcorder is set to "Card Reader Mode" in the menu (MENU > OTHER > USB DEVICE > CARD READER MODE).
6. manylebau
Below are the key specifications for the Panasonic HC-X1500 Camcorder:
| Nodwedd | Manyleb |
|---|---|
| Brand | Panasonic |
| Rhif Model | HC-X1500 |
| Dimensiynau Cynnyrch | 12.79 x 11.1 x 8.46 modfedd |
| Pwysau Eitem | 5.1 pwys |
| Batris | Angen 1 batris Ion Lithiwm (wedi'u cynnwys) |
| Technoleg Synhwyrydd Ffotograffau | CMOS |
| Datrysiad Dal Fideo | 4K |
| Hyd Ffocal Uchaf | 98.9 Milimetrau |
| Agorfa Uchaf | 1.8 f |
| Math Cof Fflach | SD |
| Fformat Dal Fideo | MOV |
| Fformat Sain â Chymorth | PCM llinellol |
| Maint Sgrin | 3.5 modfedd |
| Technoleg Cysylltedd | Wi-Fi |
| Gwlad Tarddiad | Malaysia |
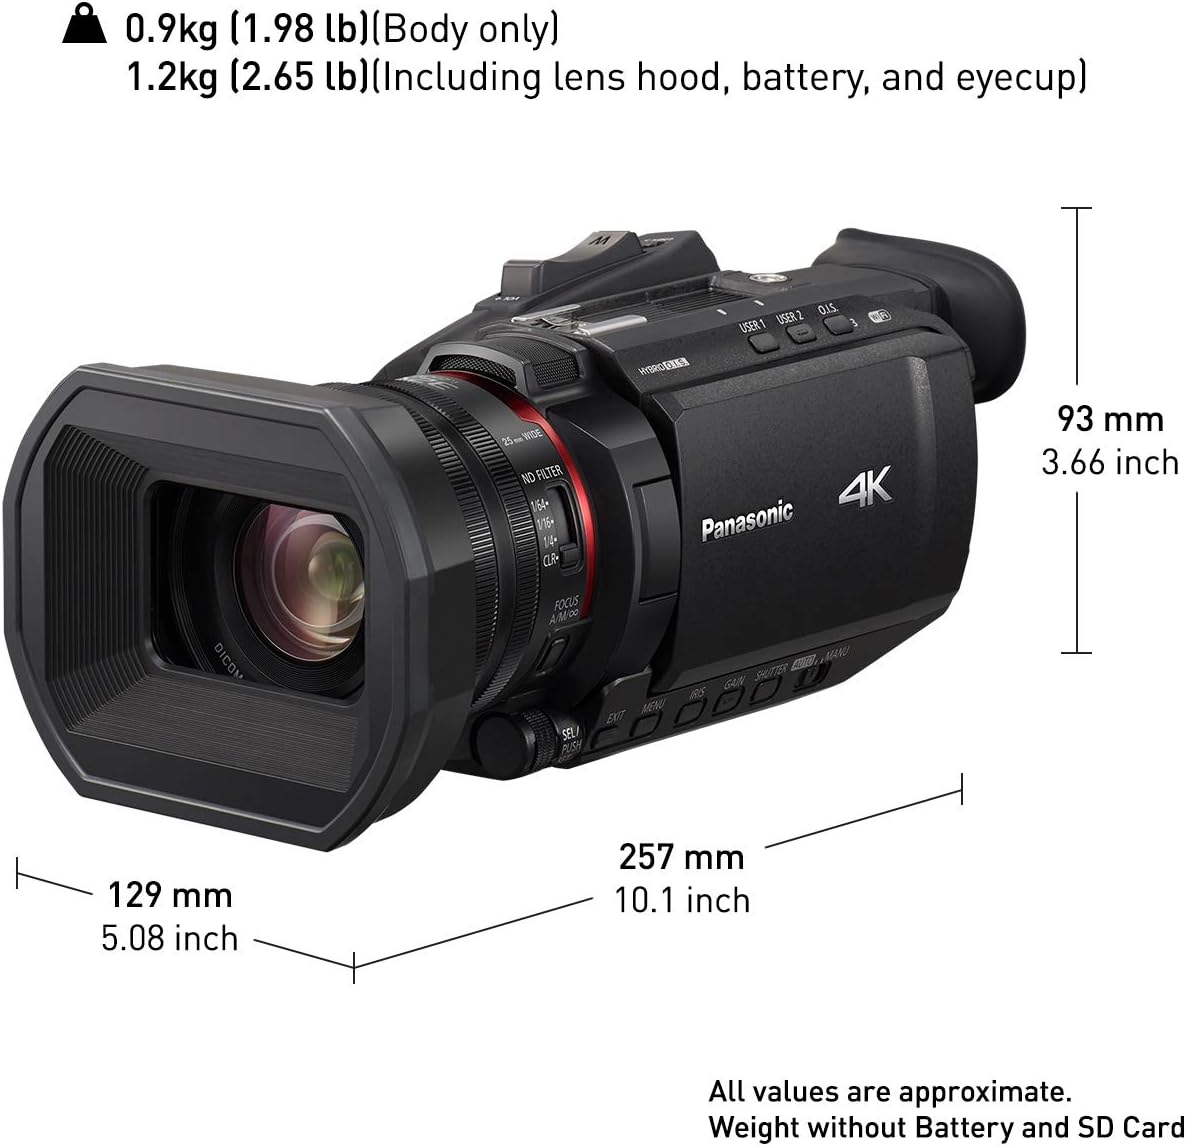
Figure 6.1: Physical dimensions of the Panasonic HC-X1500 camcorder.
7. Gwarant a Chefnogaeth
Am wybodaeth fanwl am y warant, cyfeiriwch at y cerdyn gwarant sydd wedi'i gynnwys gyda'ch cynnyrch neu ewch i wefan swyddogol Panasonic websafle.
A comprehensive User Manual in PDF format is available for download, providing more in-depth information on advanced features, settings, and troubleshooting. You can access it via the following link:
Lawrlwythwch y Llawlyfr Defnyddiwr Llawn (PDF)
For technical support or service inquiries, please contact Panasonic customer service.
Ask a question about this manual
Ask about setup, troubleshooting, compatibility, parts, safety, or missing instructions. Manuals+ will review the question and use this page’s manual context to help answer it.