
1. Rhagymadrodd
This manual provides detailed instructions for the installation and maintenance of the Spohn Performance D03-09-CAM-980-981 Complete Front Control Arms Cam Bolts & Hardware Kit. This kit is designed to replace the mounting hardware for the front upper and lower control arms on specific Dodge Ram models, addressing common issues such as seized factory cam bolts.
Proper installation of this hardware kit is crucial for the safe and effective operation of your vehicle's suspension system. Please read all instructions carefully before beginning the installation process.
2. Cynnyrch Drosview a Chydrannau
The Spohn Performance D03-09-CAM-980-981 kit includes all necessary hardware for mounting the front upper and lower control arms. The components are manufactured to high-grade specifications to ensure durability and proper fitment.
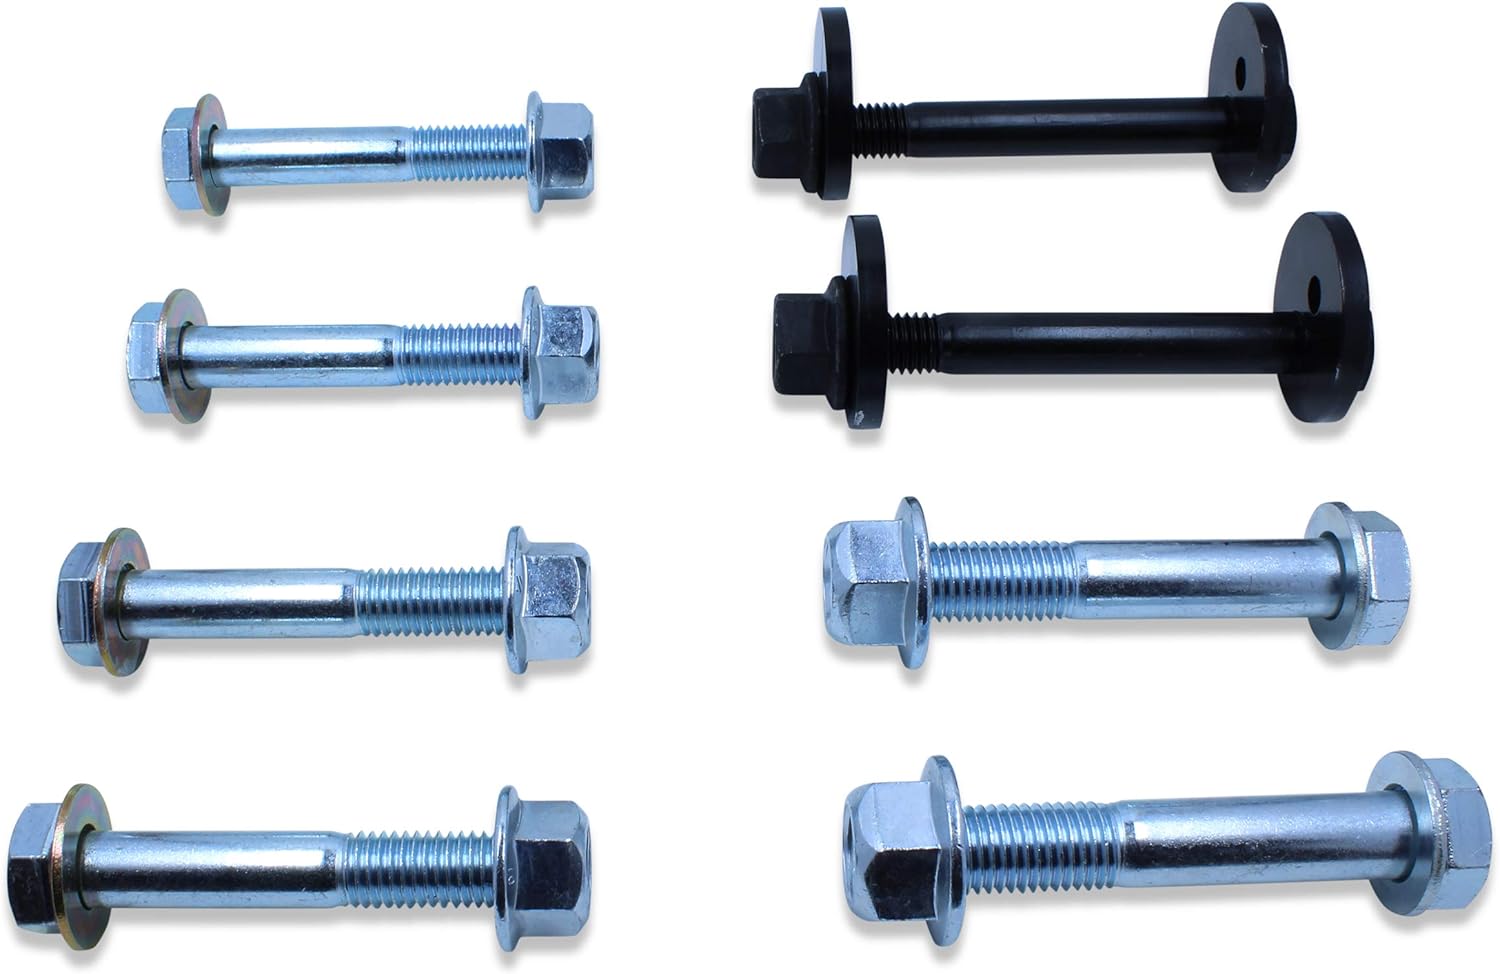
Ffigur 1: Drosoddview of the complete Spohn Performance D03-09-CAM-980-981 hardware kit, showing all bolts, washers, and nuts.
Cynnwys y Pecyn:
- (2) Grade 12.9 16mm Cam Bolts: These bolts feature a black E-coating for corrosion protection and are designed for the front ends of the front lower control arms. Each cam bolt includes an eccentric cam washer and a flanged "Top Lock" nut.
- (2) Grade 10.9 16mm Bolts: These bolts are silver zinc plated for corrosion protection and come with two flat washers and two flanged "Top Lock" nuts. These are typically used for the rearward ends of the front lower control arms.
- (4) Grade 10.9 14mm Bolts: These bolts are also silver zinc plated for corrosion protection and include four flat washers and four flanged "Top Lock" nuts. These are used for both ends of the front upper control arms.

Ffigur 2: Manwl view of the two Grade 12.9 16mm cam bolts with eccentric cam washers and flanged nuts.
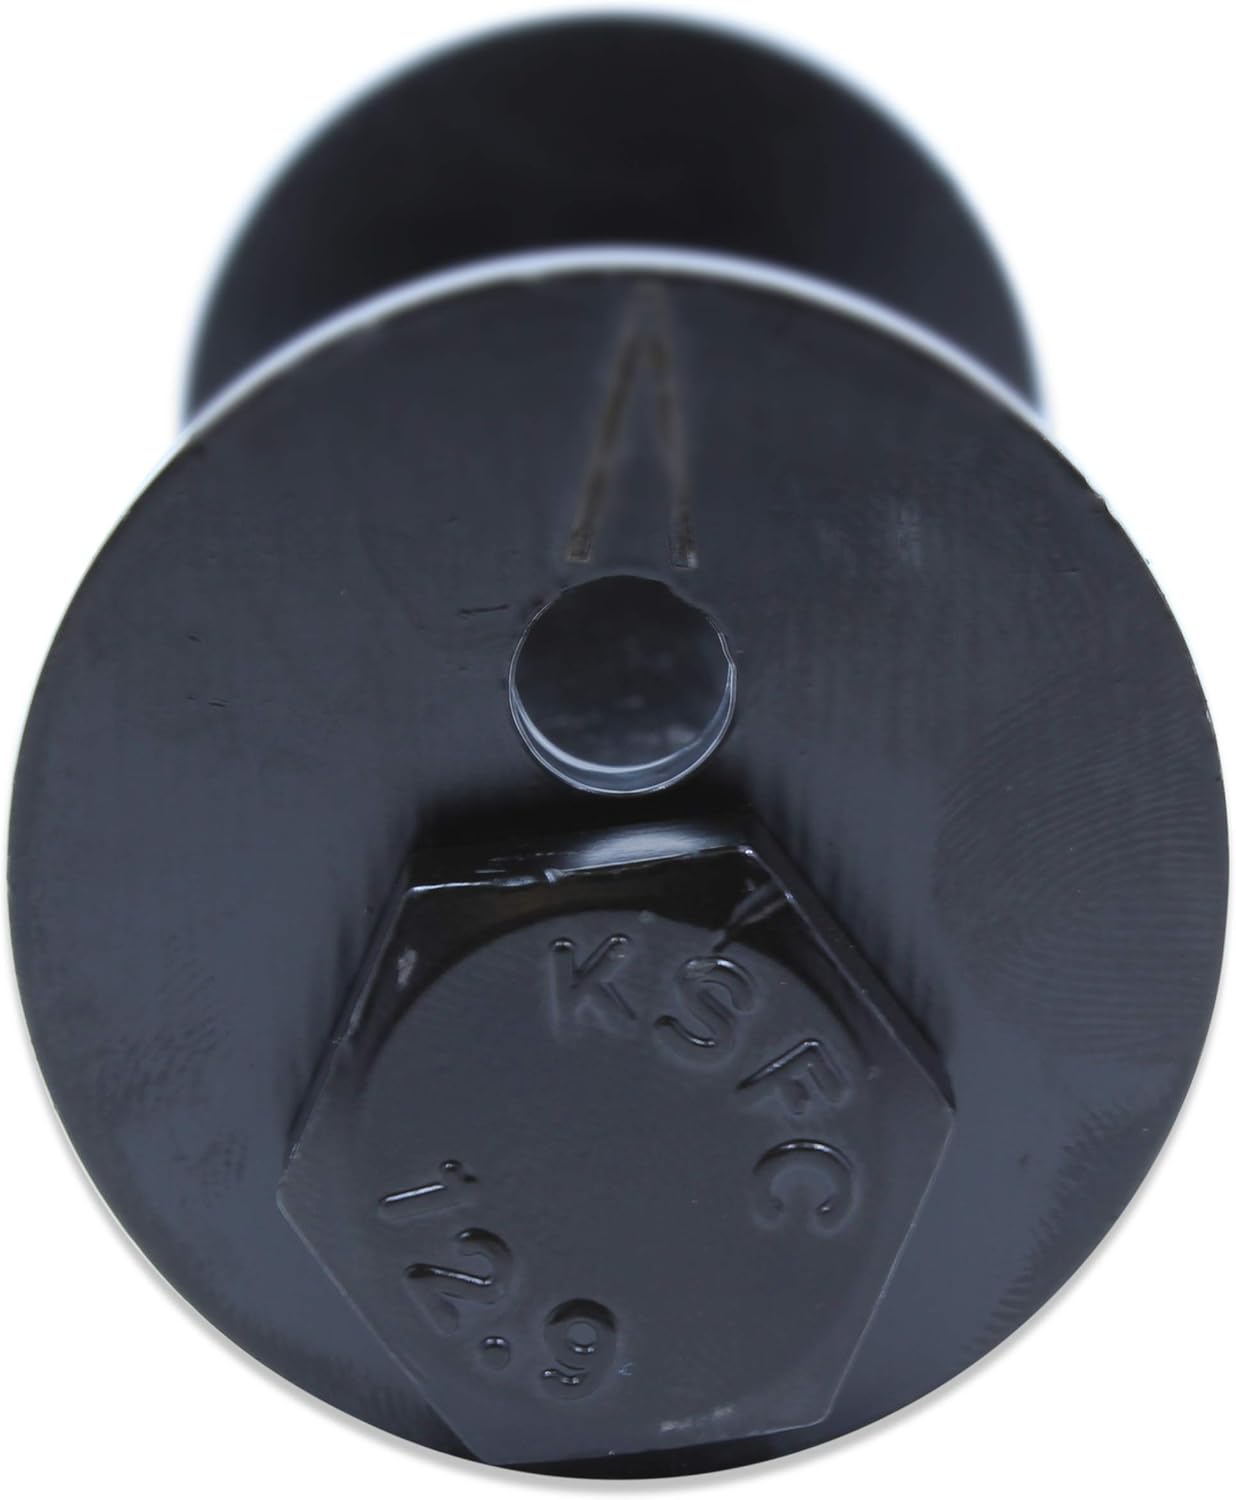
Ffigur 3: Close-up of the head of a Grade 12.9 cam bolt, showing its design.

Ffigur 4: The Grade 10.9 bolts, flat washers, and flanged "Top Lock" nuts for the rearward lower control arms and upper control arms.
3. Cydweddoldeb
This hardware kit is specifically designed for the following vehicle applications:
- 2003-2009 Dodge Ram 2500
- 2003-2009 Dodge Ram 3500
Nodyn Pwysig: Mae'r pecyn hwn yn NID compatible with 2003-2009 Dodge Ram 1500 models.
4. Cyfarwyddiadau Gosod
Installation of this hardware kit requires mechanical knowledge and appropriate tools. If you are not comfortable performing this installation, it is recommended to seek professional assistance.
Offer a Deunyddiau Angenrheidiol:
- Stondin lifft cerbyd neu jac
- Olwyn chocks
- Socket and wrench set (metric)
- Wrench torque
- Olew treiddiol
- Grinder or reciprocating saw (potentially for seized bolts)
- Sbectol diogelwch a menig
Gweithdrefn Gosod:
- Paratoi'r cerbyd: Park the vehicle on a level surface. Engage the parking brake and place wheel chocks behind the rear wheels. Lift the front of the vehicle using a suitable lift or jack stands, ensuring it is securely supported. Remove the front wheels.
- Access Control Arms: Locate the front upper and lower control arms. The hardware to be replaced is at the mounting points where the control arms attach to the frame.
- Remove Old Hardware (Lower Control Arms - Front Mount): The factory front cam bolts on 2003-2009 Dodge Ram 2500/3500 models are prone to seizing due to water ingress and corrosion. It is highly probable that these bolts will need to be cut for removal.
- Attempt to loosen the existing cam bolts and nuts. If they do not turn freely, apply penetrating oil and allow it to soak.
- If the bolts remain seized, carefully use a grinder or reciprocating saw to cut the bolts. Exercise extreme caution to avoid damaging the control arm, frame, or surrounding components.
- Once the bolts are cut or removed, carefully detach the front end of the lower control arm from its mounting bracket.
- Remove Old Hardware (Lower Control Arms - Rear Mount & Upper Control Arms): Remove the bolts and nuts securing the rearward ends of the front lower control arms and both ends of the front upper control arms. These bolts are generally less prone to seizing but may still require effort to remove.
- Install New Hardware (Lower Control Arms - Front Mount):
- Align the front end of the lower control arm with its mounting bracket.
- Mewnosodwch y newydd Grade 12.9 16mm Cam Bolt through the control arm bushing and the frame bracket. Ensure the eccentric cam washer is correctly positioned on the bolt head side, allowing for alignment adjustments.
- Thread the flanged "Top Lock" nut onto the cam bolt. Do not fully tighten at this stage.
- Install New Hardware (Lower Control Arms - Rear Mount):
- Align the rearward end of the front lower control arm with its mounting bracket.
- Mewnosodwch y newydd Grade 10.9 16mm Bolt with a flat washer through the control arm bushing and frame bracket.
- Thread the flanged "Top Lock" nut onto the bolt. Do not fully tighten.
- Install New Hardware (Upper Control Arms):
- Align both ends of the front upper control arms with their respective mounting brackets.
- Mewnosodwch y newydd Grade 10.9 14mm Bolts with flat washers through the control arm bushings and frame brackets.
- Thread the flanged "Top Lock" nuts onto the bolts. Do not fully tighten.
- Final Tightening and Alignment:
- Lower the vehicle partially so that the suspension is under normal load (or at ride height). This is critical for proper bushing seating and preventing premature wear.
- Using a torque wrench, tighten all control arm bolts to the manufacturer's specified torque values for your vehicle model. Refer to your vehicle's service manual for exact specifications.
- Adjust the front lower control arm cam bolts to achieve the correct alignment specifications. This step is crucial and typically requires a professional wheel alignment service.
- Ailosod: Reinstall the front wheels and lower the vehicle completely. Remove wheel chocks.
- Ôl-osod: It is highly recommended to have a professional wheel alignment performed immediately after installing new control arm hardware to ensure proper vehicle handling and tire wear.
5. cynnal
To ensure the longevity and proper function of your Spohn Performance hardware kit, consider the following maintenance guidelines:
- Arolygiad Rheolaidd: Periodically inspect all control arm hardware for signs of looseness, corrosion, or damage. Address any issues promptly.
- Gwiriad Torque: After the initial installation and a few hundred miles of driving, re-check the torque on all control arm bolts to ensure they remain properly tightened.
- Diogelu rhag cyrydiad: While the bolts are coated for corrosion resistance, operating in harsh environments (e.g., road salt, excessive moisture) may necessitate additional protective measures or more frequent inspection.
6. Datrys Problemau
This section addresses common issues that may arise during or after the installation of the control arm hardware kit.
Issue: Factory Cam Bolts are Seized
Disgrifiad: The original front lower control arm cam bolts are notoriously difficult to remove on 2003-2009 Dodge Ram 2500/3500 trucks due to corrosion between the bolt and the inner sleeve of the control arm bushing.
Ateb: As detailed in the installation section, it is often necessary to cut the seized bolts. Use a reciprocating saw or angle grinder with appropriate safety precautions. Ensure the control arm and frame are not damaged during this process. The Spohn Performance kit provides new, high-grade replacement cam bolts designed for durability.
Issue: Vehicle Alignment Issues After Installation
Disgrifiad: Improper alignment can lead to poor handling, uneven tire wear, and reduced safety.
Ateb: A professional wheel alignment is mandatory after replacing control arm hardware. The cam bolts on the front lower control arms allow for adjustment of camber and caster. Ensure the alignment technician is aware that new adjustable hardware has been installed.
7. manylebau
| Cydran | Nifer | Grade/Type | Gorchuddio | Cais |
|---|---|---|---|---|
| Cam Bolts (16mm) | 2 | Gradd 12.9 | Black E-Coating | Front Lower Control Arm (Front) |
| Eccentric Cam Washers | 2 | Amh | Amh | Front Lower Control Arm (Front) |
| Flanged "Top Lock" Nuts | 2 | Amh | Amh | Front Lower Control Arm (Front) |
| Bolltau (16mm) | 2 | Gradd 10.9 | Silver Zinc Plating | Front Lower Control Arm (Rear) |
| Golchwyr Fflat | 2 | Amh | Amh | Front Lower Control Arm (Rear) |
| Flanged "Top Lock" Nuts | 2 | Amh | Amh | Front Lower Control Arm (Rear) |
| Bolltau (14mm) | 4 | Gradd 10.9 | Silver Zinc Plating | Front Upper Control Arms (Both Ends) |
| Golchwyr Fflat | 4 | Amh | Amh | Front Upper Control Arms (Both Ends) |
| Flanged "Top Lock" Nuts | 4 | Amh | Amh | Front Upper Control Arms (Both Ends) |
Dimensiynau Cynnyrch: 8 x 8 x 3 modfedd
Pwysau Eitem: 4.99 pwys
8. Gwybodaeth Diogelwch
Always prioritize safety when working on your vehicle. Failure to follow safety guidelines can result in serious injury or damage to property.
- Gwisgwch offer amddiffynnol personol (PPE) priodol, gan gynnwys sbectol ddiogelwch a menig.
- Ensure the vehicle is securely supported on a lift or jack stands before working underneath it. Never rely solely on a jack.
- Defnyddiwch offer yn gywir ac at eu diben bwriadedig.
- Cadwch eich dwylo a'ch dillad yn glir o rannau symudol.
- If using cutting tools, be aware of sparks and potential fire hazards. Have a fire extinguisher nearby.
- Consult a professional mechanic if you are unsure about any step of the installation process.
9. Gwybodaeth Gwarant
Specific warranty details for the Spohn Performance D03-09-CAM-980-981 hardware kit are not provided in this manual. For information regarding product warranty, please refer to the official Spohn Performance websafle neu cysylltwch â'u cymorth cwsmeriaid yn uniongyrchol.
10. Cefnogaeth
For technical assistance, product inquiries, or further support regarding your Spohn Performance hardware kit, please contact Spohn Performance directly through their official channels. Contact information can typically be found on their websafle.
Gwneuthurwr: Perfformiad Spohn, Inc.