
1. Rhagymadrodd
This manual provides detailed instructions for the installation, operation, and maintenance of your Vibe Powerbox Micro Mono Amplifier, model POWERBOX400.1M-V7. Please read this manual thoroughly before attempting installation or operation to ensure proper use and to prevent damage to the unit or your vehicle's audio system.
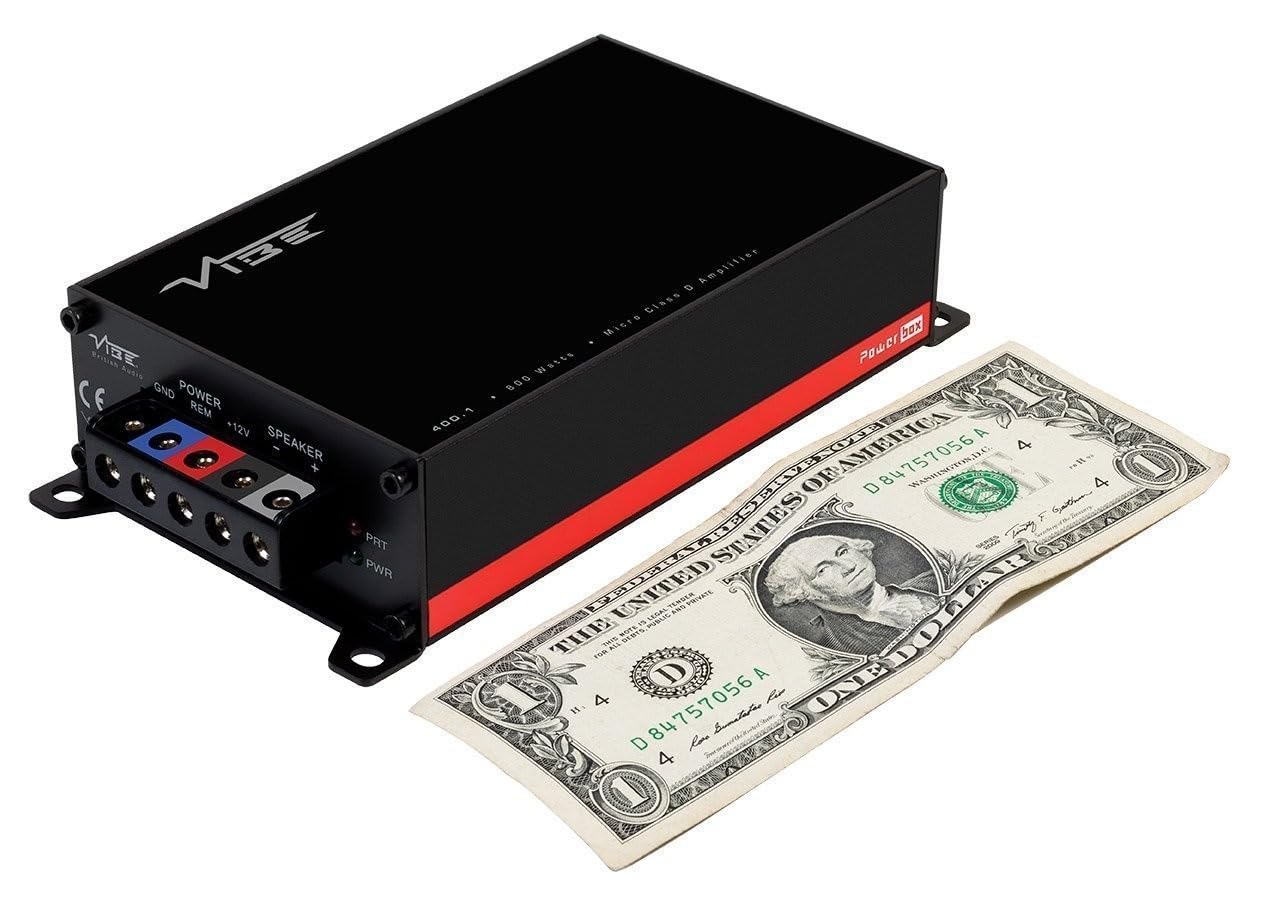
The Vibe Powerbox Micro Mono Amplifier is a compact, high-performance Class D amplifier designed for car audio systems. It delivers up to 400W RMS, making it suitable for powering subwoofers. Its small footprint allows for flexible installation options.
2. Gwybodaeth Diogelwch
- Datgysylltwch derfynell negatif batri'r cerbyd bob amser cyn dechrau unrhyw waith trydanol.
- Ensure all wiring is correctly routed and secured to prevent damage from moving parts or sharp edges.
- Use appropriate gauge wiring for power and speaker connections as specified in this manual to prevent overheating and potential fire hazards.
- Peidiwch â gosod y amplifter mewn lleoliadau sy'n agored i olau haul uniongyrchol, gwres gormodol, lleithder neu lwch.
- Ymgynghorwch â gosodwr sain car proffesiynol os ydych chi'n ansicr ynghylch unrhyw ran o'r broses osod.
- Gweithredu'r amplifier at excessively high volumes for prolonged periods can cause hearing damage.
3. Cynnwys Pecyn
Gwiriwch fod yr holl eitemau yn bresennol yn y pecyn cyn bwrw ymlaen â'r gosodiad:
- Vibe Powerbox Micro Mono Amplifier (POWERBOX400.1M-V7)
- Remote Gain Control Unit
- Ceblau Sain RCA
- Mounting Hardware (screws, connectors)
- Llawlyfr Defnyddiwr

4. Nodweddion Cynnyrch
- Class D Micro Amplifier design for high efficiency and compact size.
- Ultra-compact footprint for easy and discreet installation.
- Output: 1 x 400W RMS at 1 ohm, with a maximum output of 800W.
- Dimensions: 37 x 157 x 82mm (approximately 1.46 x 6.18 x 3.23 inches).
- Compatible with Critical Link Rapid kits for simplified integration.
- Features Deltabox™ Connectivity auto turn-on.
- VIBE Sound Studio™ Active crossovers.
- 1 Ohm Stable operation.
5. Adnabod Cydran
5.1 Power and Speaker Terminals

The power input section includes terminals for Ground (GND), Remote Turn-On (REM), and +12V power. The speaker output section provides terminals for connecting your subwoofer.
5.2 Input and Control Panel
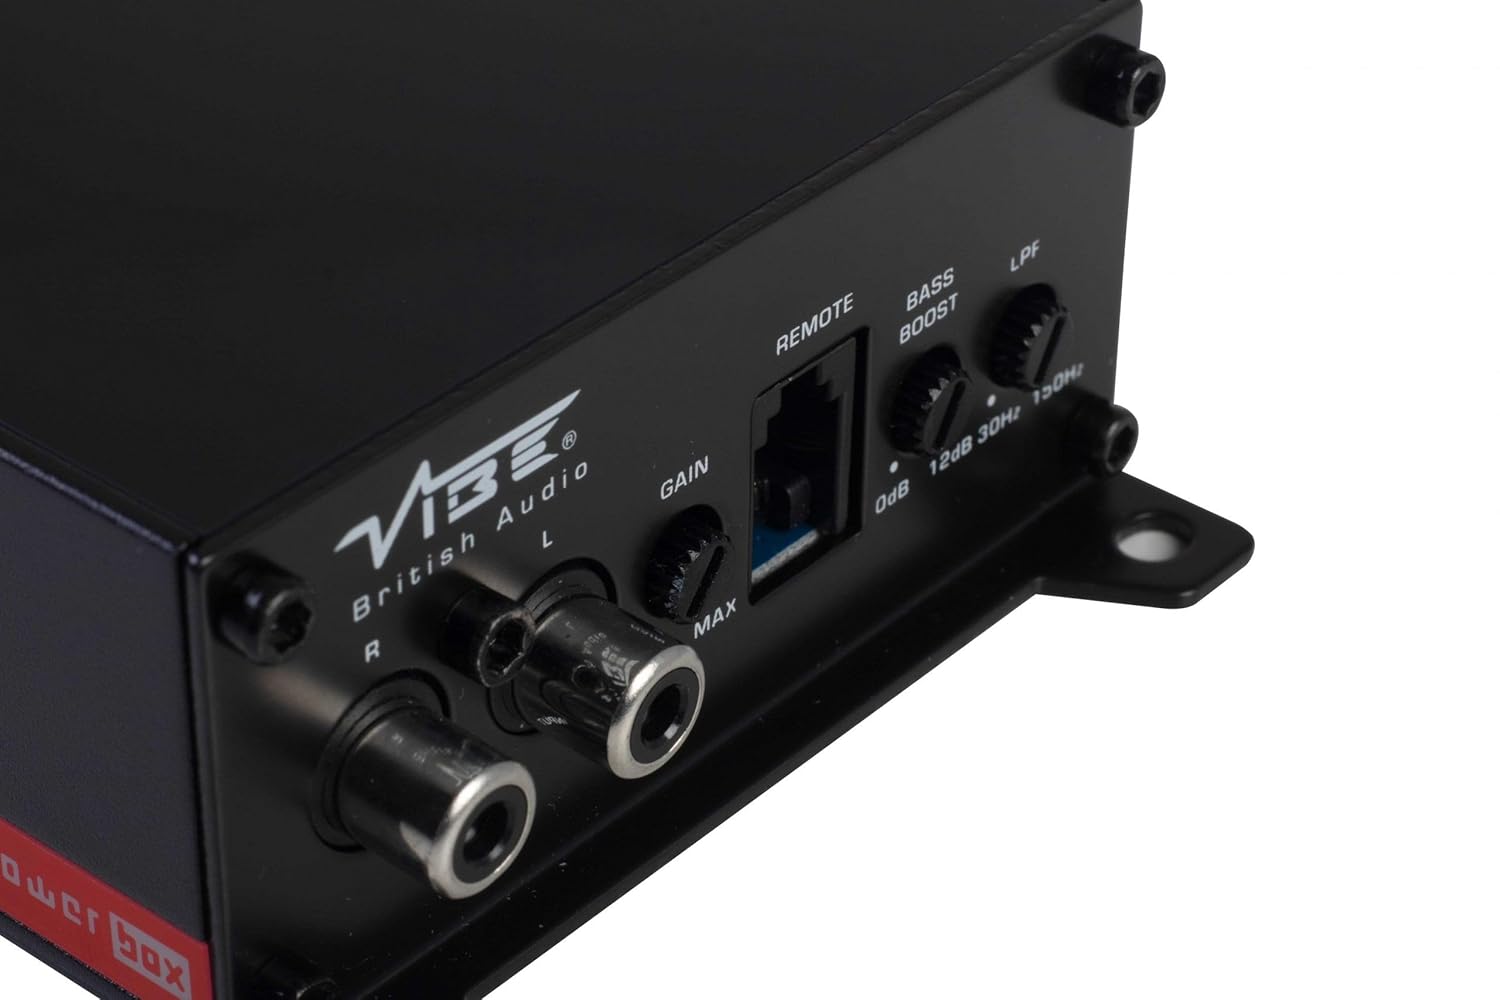
This panel features the RCA input jacks for audio signal, a Gain control knob to match the amplifier's input sensitivity to your head unit's output, a dedicated port for the remote gain control, a Bass Boost switch for enhancing low frequencies, and an LPF (Low Pass Filter) control to adjust the upper frequency limit for the subwoofer.
5.3 Remote Gain Control

The remote gain control unit connects to the amplifier via the 'REMOTE' port and allows for convenient adjustment of the subwoofer's output level from the vehicle's cabin.
6. Gosod a Gosod
Proper installation is crucial for optimal performance and safety. If you are not confident in your ability to install the amplifier, seek professional assistance.
6.1 Lleoliad Mowntio
Choose a mounting location that is dry, well-ventilated, and away from direct heat sources. The compact size of the Powerbox Micro allows for installation under seats, behind trim panels, or in other discreet locations. Ensure there is sufficient airflow around the ampllestr ar gyfer oeri.
6.2 Gwifro Cysylltiadau
Gwifrau Pwer:
- Cysylltwch y +12V terminal to the vehicle's positive battery terminal using a suitable gauge power cable (e.g., 8 AWG or 10 AWG). Install an in-line fuse holder within 18 inches (45 cm) of the battery.
- Cysylltwch y GND terminal to a clean, unpainted metal surface on the vehicle's chassis. Ensure a good electrical connection. The ground cable should be of the same gauge as the power cable and as short as possible.
- Cysylltwch y REM (Remote Turn-On) terminal to the remote output of your head unit. This wire signals the amplifier to turn on and off with your stereo. If your head unit lacks a remote output, you can use an accessory wire that turns on with the ignition, or utilize the amplifier's auto-sense feature if applicable.
Gwifrau siaradwr:
- Cysylltwch eich subwoofer i'r Allbwn Siaradwr terminals (+ and -). Ensure correct polarity. This amplifier is 1 Ohm stable, allowing flexibility in subwoofer impedance configurations. Refer to your subwoofer's specifications for optimal impedance matching.
Signal Input (RCA):
- Connect the RCA output from your head unit or signal processor to the INPUT (L/R) RCA jacks on the ampllewywr.
Rheolaeth Cynnydd o Bell:
- Plug the remote gain control unit into the dedicated PELL porthladd ar y amplifier. Route the cable to a convenient location for adjustment.
ISO T Harness / ISOAWK Kit:
- For simplified installation with existing stereo looms, an optional ISOAWK kit (available separately) can be used to make the amplifier compatible with an ISO T harness. This allows for plug-and-play integration for audio signal, power, and ground, potentially eliminating the need for separate battery connections.
7. Gweithrediad
7.1 Pŵer Cychwynnol
After all connections are made and verified, reconnect the vehicle's battery. Turn on your head unit. The amplifier's power indicator (PWR) should illuminate green. If the protection indicator (PRT) illuminates red, refer to the troubleshooting section.
7.2 Ennill Addasiad
The Gain control matches the ampsensitifrwydd mewnbwn y lifer i'r gyfaint allbwntage of your head unit. To set the gain:
- Trowch y amplifier's Gain control to its minimum (MIN) setting.
- Gosodwch gyfaint eich uned ben i tua 75-80% o'i uchafswm.
- Play a dynamic piece of music.
- Cynyddwch y amplifier's Gain control until you hear distortion, then back it off slightly until the sound is clear.
The remote gain control unit allows for real-time adjustment of the subwoofer level without affecting the main system volume.
7.3 Hidl Tocyn Isel (LPF)
The LPF control sets the upper frequency limit for the amplifier's output. This is essential for subwoofers, ensuring they only reproduce low frequencies. Adjust the LPF knob (typically 30Hz to 150Hz) to blend the subwoofer's output seamlessly with your main speakers. A common starting point is around 80-100Hz.
7.4 Hwb Bas
The Bass Boost switch provides an adjustable low-frequency enhancement. Use this feature sparingly, as excessive bass boost can lead to distortion and potential damage to your subwoofer. Adjust the boost level (0dB to 12dB) to your preference.
8. cynnal
- Glanhau: Sychwch y o bryd i'w gilydd ampGlanhewch du allan y liferydd gyda lliain meddal, sych. Peidiwch â defnyddio cemegau llym na glanhawyr sgraffiniol.
- Cysylltiadau: Regularly check all power, ground, and speaker connections to ensure they are secure and free from corrosion. Loose connections can cause performance issues or damage.
- Awyru: Sicrhau bod y amplifier's cooling fins are not obstructed to maintain proper heat dissipation.
9. Datrys Problemau
| Problem | Achos Posibl | Ateb |
|---|---|---|
| Dim Pŵer (LED PWR i ffwrdd) | Ffiws wedi chwythu, cysylltiad pŵer/daear rhydd, dim signal o bell. | Check in-line fuse, verify +12V, GND, and REM connections. |
| Protection Mode (PRT LED on) | Overheating, short circuit in speaker wiring, impedance too low. | Ensure proper ventilation, check speaker wiring for shorts, verify speaker impedance. |
| Dim Allbwn Sain | No input signal, gain too low, speaker wires disconnected. | Check RCA input connections, adjust gain, verify speaker wiring. |
| Sain ystumiedig | Gain set too high, LPF incorrectly set, poor ground connection. | Reduce gain, adjust LPF, check ground connection. |
10. manylebau
- Rhif Model: POWERBOX400.1M-V7
- Amplifier Math: Dosbarth D Mono Ampllewywr
- Allbwn pŵer RMS: 1 x 400W RMS @ 1 Ohm
- Allbwn Pwer Uchaf: 800W
- Dimensiynau Cynnyrch (L x W x H): Tua 157 x 82 x 37 mm (6.18 x 3.23 x 1.46 modfedd)
- Pwysau: Tua 1.54 pwys
- Cyftage: 12 Folt (Enwol)
- Uchafswm Cyflenwad Cyftage: 12 folt
- Math Mowntio: Mount Wyneb
- Gwneuthurwr: Vibe Audio
- Dyddiad Ar Gael Cyntaf: Gorffennaf 21, 2018
11. Gwarant a Chefnogaeth
Vibe Audio products are designed and manufactured to the highest standards. For warranty information and technical support, please refer to the warranty card included with your product or visit the official Vibe Audio websafle. Cadwch eich prawf prynu ar gyfer hawliadau gwarant.