
1. Cynnyrch Drosview
The Excelvan Wireless Weather Station (Model AOK-5061A) is designed to provide accurate indoor and outdoor temperature and humidity readings, along with weather forecasts and an alarm clock function. It features a large, colorful LCD display with LED backlight for easy readability.
Nodweddion Allweddol:
- Indoor/Outdoor Temperature and Humidity Measurement
- Weather Forecast with 5 Icons (Sunny, Partially Sunny, Cloudy, Rain, Heavy Rain)
- DCF Radio-Controlled Clock with Manual Setting
- Larwm gyda Swyddogaeth Snooze
- Large Color LCD Display with LED Backlight
- DST (Daylight Saving Time) Automatic Update
- Wireless Outdoor Sensor with up to 50m range

Ffigur 1: Blaen view of the Excelvan Wireless Weather Station main unit, displaying weather forecast, outdoor/indoor temperature and humidity, and time.
2. Canllaw Gosod
2.1 Cynnwys Pecyn
Before proceeding with the setup, ensure all items are present in the package:
- 1 x Prif Uned Gorsaf Dywydd
- 1 x Wireless Remote Sensor
- 1 x Addasydd Pwer AC
- 1 x Llawlyfr Defnyddiwr

Figure 2: The complete package contents, including the main weather station unit, wireless remote sensor, power adapter, and user manual.
2.2 Pweru'r Prif Uned
- Gosod Batri (Dewisol): Open the battery compartment on the back of the main unit. Insert 3 x 1.5V AA batteries (not included), ensuring correct polarity. The LED backlight will stay on for 5 minutes when powered by batteries.
- AC Power Adapter (Recommended): For continuous backlight, connect the provided AC power adapter (4.5V, 150mA) to the main unit's power input and then plug it into a wall outlet.

Ffigur 3: Cefn view of the main unit showing the battery compartment with the cover removed, ready for battery insertion.

Ffigur 4: Cefn view of the main unit with the AC power adapter connected, illustrating the power input port.
2.3 Powering the Wireless Remote Sensor
- Open the battery compartment of the wireless remote sensor.
- Insert 2 x 1.5V AAA batteries (not included), ensuring correct polarity.
- Caewch yr adran batri yn ddiogel.

Figure 5: The wireless remote sensor, showing its display and the battery compartment on the back.
2.4 Lleoli Synhwyrydd
- The main unit is intended for indoor use only.
- Place the wireless remote sensor outdoors in a sheltered area, away from direct sunlight and rain, to ensure accurate readings.
- Ensure the sensor is within 50 meters (open space) of the main unit for optimal signal reception.
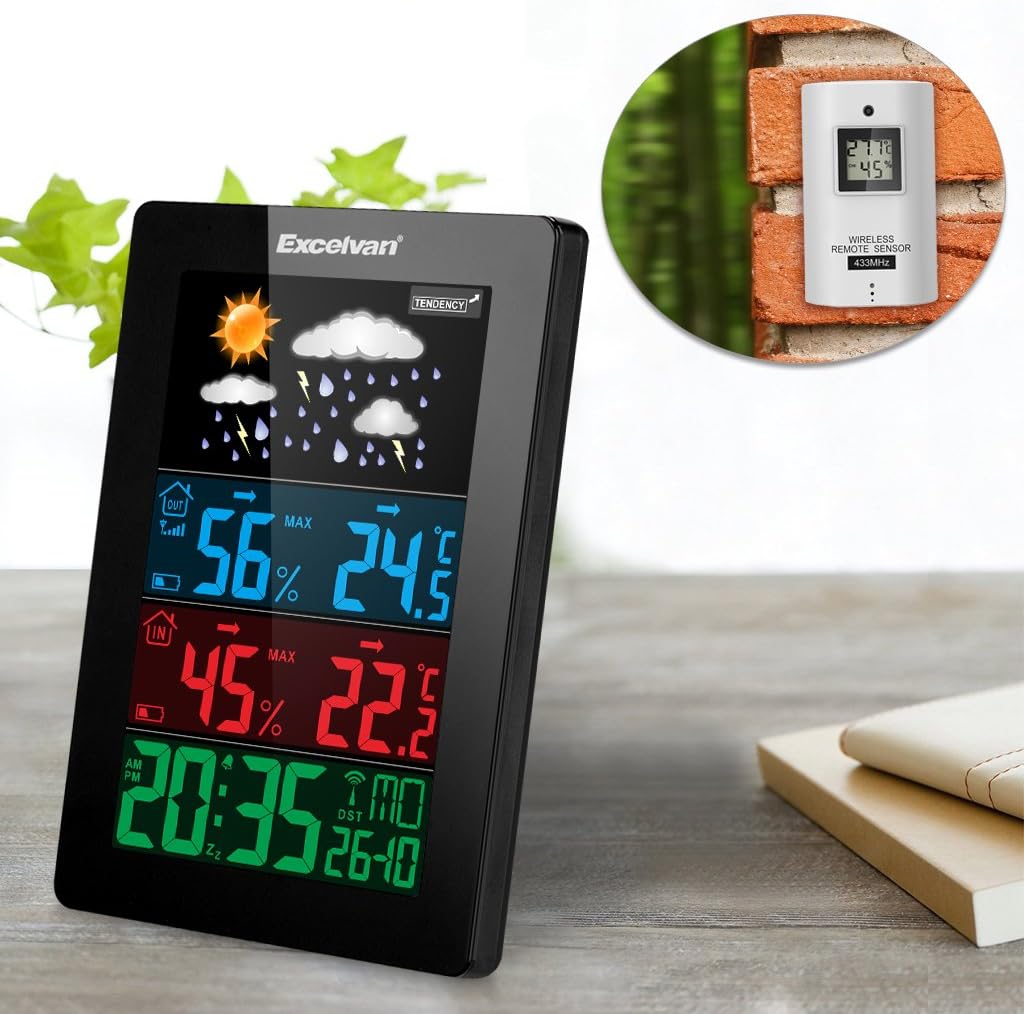
Figure 6: An illustration showing the main weather station unit indoors and the wireless remote sensor mounted on an outdoor wall.

Figure 7: A diagram highlighting the effective wireless transmission distance of 50 meters between the main unit and the remote sensor.
3. Cyfarwyddiadau Gweithredu
3.1 Cydamseru Cychwynnol
After powering both units, the main unit will automatically attempt to synchronize with the remote sensor and receive the DCF radio-controlled time signal. This process may take a few minutes.
3.2 Arddangos Drosoddview
The large LCD display shows various information:
- Adran Uchaf: Weather forecast icons (sunny, cloudy, rainy, etc.) and weather tendency indicator.
- Middle-Top Section (Blue): Outdoor humidity and temperature.
- Middle-Bottom Section (Red): Indoor humidity and temperature.
- Bottom Section (Green): Current time (12/24 hour format), day of the week, and date.
Figure 8: Close-up of the main unit's display, illustrating the different data sections for weather, outdoor/indoor conditions, and time.
3.3 Setting Time and Date Manually
While the unit is radio-controlled, manual adjustments can be made:
- Gwasgwch y MODD button to cycle through display modes.
- Daliwch y MODD button for a few seconds to enter time setting mode.
- Defnyddiwch y + a - botymau i addasu gwerthoedd.
- Gwasgwch MODD again to confirm and move to the next setting (e.g., hour, minute, year, month, day, language for day of week).
3.4 Larwm a Swyddogaeth Ailatgoffa
- Gwasgwch y ALARM botwm i view or set the alarm time.
- Daliwch y ALARM botwm i fynd i mewn i'r modd gosod larwm. Defnyddiwch + a - i addasu.
- I actifadu/dadactifadu'r larwm, pwyswch y ALARM button briefly. An alarm icon will appear/disappear on the display.
- Pan fydd y larwm yn canu, cyffwrdd â'r SNOOZE / GOLAU button on top of the unit to activate the snooze function. The alarm will sound again after a few minutes.
- To stop the alarm completely, press any other button.

Figure 9: Top edge of the main unit, highlighting the "SNOOZE/LIGHT" touch-sensitive button for alarm snooze and backlight activation.
3.5 Dewis Uned Tymheredd
Gwasgwch y - button to switch between Celsius (°C) and Fahrenheit (°F) temperature units.
3.6 Rhagolwg y Tywydd
The weather station predicts weather conditions based on atmospheric pressure changes. The icons (sunny, partially sunny, cloudy, rain, heavy rain) indicate the forecast for the next 12-24 hours, not the current weather.
4. cynnal
- Glanhau: Sychwch y prif uned a'r synhwyrydd gyda lliain meddal, damp brethyn. Peidiwch â defnyddio glanhawyr neu doddyddion sgraffiniol.
- Amnewid Batri: Replace batteries in both the main unit and the remote sensor when the low battery indicator appears on the display. Ensure correct polarity.
- Lleoliad Synhwyrydd: Periodically check the outdoor sensor's placement to ensure it remains sheltered and within range.
- Storio: If storing the unit for an extended period, remove all batteries to prevent leakage.
5. Datrys Problemau
| Problem | Achos Posibl | Ateb |
|---|---|---|
| Dim darlleniad tymheredd/lleithder awyr agored. |
|
|
| Arddangosfa amser anghywir. |
|
|
| Mae'r arddangosfa'n dywyll neu'n wag. |
|
|
6. manylebau
| Nodwedd | Manylyn |
|---|---|
| Cloc a Reolir gan Radio | DCF77 |
| Ystod Tymheredd Dan Do. | 0 ° C i +50 ° C (32 ° F i 122 ° F) |
| Ystod Tymheredd Awyr Agored | -20 °C i +60 °C (-4 °F i 140 °F) |
| Cywirdeb Mesur Tymheredd | ±2 °C |
| Ystod Lleithder Dan Do/Awyr Agored | 20-90% RH |
| Datrys Lleithder | 1 % |
| Wireless Sensor Frequency | 433 MHz |
| Amrediad Signal Di-wifr | Hyd at 50 metr (man agored) |
| Probe Cable Length (for external probe, if applicable) | 1 m |
| Waterproof Level of Sensor | IPX3 |
| Main Station Power | 3 x 1.5V AA batteries (not included) or 4.5V, 150mA AC adapter (included) |
| Pŵer Synhwyrydd o Bell | 2 x batris AAA 1.5V (heb eu cynnwys) |
| Main Station Dimensions | 148 × 110 × 30 mm |
| Main Station Weight (without batteries) | 242 g |
| Remote Sensor Dimensions | 60 × 100 × 20 mm |
| Remote Sensor Weight (without batteries) | 50 g |
| Day of Week Languages | German, English, Italian, French, Dutch, Spanish, Danish |
7. Gwarant a Chefnogaeth
For warranty information or technical support, please refer to the documentation provided with your purchase or contact Excelvan customer service through their official websafle neu eich manwerthwr.
Nodyn: At ddibenion gwybodaeth yn unig y mae'r llawlyfr hwn. Gall manylebau newid heb rybudd.