Rhagymadrodd
This manual provides detailed instructions for the installation, operation, and maintenance of your Venstar T1900 Residential Slimline Platinum Thermostat. Please read this manual thoroughly before attempting to install or operate the thermostat to ensure proper function and to avoid potential damage.
Gwybodaeth Ddiogelwch Bwysig
- Always turn off power to the heating/cooling system at the main circuit breaker or fuse box before installing or servicing the thermostat.
- This thermostat operates on 24 Volts AC. Do not connect to line voltage (120V neu 240V).
- Dylai technegydd cymwys wneud y gosodiad os nad ydych chi'n gyfarwydd â gwifrau trydanol.
- Do not short circuit the terminals on the gas valve or at the system control to test the thermostat. This will damage the thermostat and void the warranty.
- Ensure all wiring connections are secure and insulated to prevent short circuits.
Cynnwys Pecyn
Gwiriwch fod eich pecyn yn cynnwys yr eitemau canlynol:
- Venstar T1900 Thermostat Unit
- Caledwedd Mowntio (sgriwiau ac angorau wal)
- Llawlyfr Defnyddiwr (y ddogfen hon)
Cynnyrch Drosview
The Venstar T1900 is a 7-day programmable digital thermostat designed for residential use. It offers precise temperature control and energy-saving scheduling capabilities. This thermostat is compatible with heat/cool, heat pump, and dual-fuel systems, controlling up to three heat stages a dau oer stages.
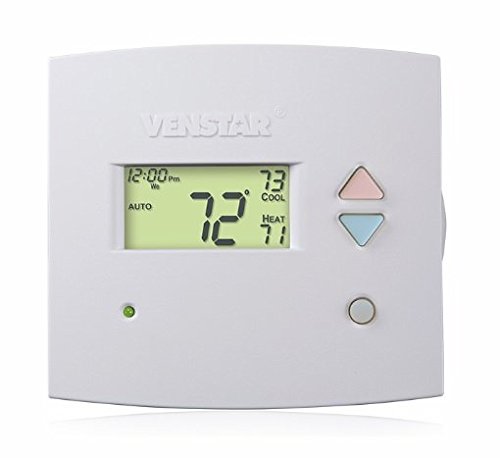
Ffigur 1: Blaen view of the Venstar T1900 Thermostat. This image displays the thermostat's LCD screen and control buttons, indicating its slimline design.
Nodweddion Allweddol:
- Rhaglenadwyedd 7 Diwrnod: Allows for customized heating and cooling schedules for each day of the week.
- Cydnawsedd System: Works with heat/cool, dual-fuel, and heat pump systems.
- Aml-Stage Rheolaeth: Manages up to three heat stages a dau oer stages.
- Gallu rheoli o bell: Controllable by phone using an optional add-on (sold separately).
- Automatic or Manual Operation: Provides flexibility for scheduled or on-demand temperature adjustments.
Canllaw Gosod
Offer Angenrheidiol:
- Sgriwdreifer (Phillips a/neu ben fflat)
- Drill with appropriate drill bit (if installing new wall anchors)
- Stripwyr gwifren
- Pensil
- Lefel (dewisol)
1. Diffoddwch Bŵer
Locate the circuit breaker or fuse box that controls your heating and cooling system. Turn off the power completely before proceeding with any wiring.
2. Remove Old Thermostat (if applicable)
- Tynnwch glawr eich hen thermostat yn ofalus.
- Tynnwch lun o'r cysylltiadau gwifrau presennol i gyfeirio atynt.
- Label each wire with the terminal designation it was connected to (e.g., R, G, Y, W).
- Disconnect the wires and remove the old thermostat's mounting plate from the wall.
3. Mount the New Thermostat Base
- Separate the front cover of the T1900 thermostat from its base plate.
- Position the base plate on the wall where you want to install the thermostat. Ensure it is level.
- Marciwch y tyllau mowntio gyda phensil.
- Drill pilot holes if necessary and insert wall anchors.
- Sicrhewch blât sylfaen y thermostat i'r wal gan ddefnyddio'r sgriwiau a ddarperir.
4. Gwifrau
Connect the wires from your HVAC system to the corresponding terminals on the T1900 thermostat base. Refer to the wiring diagram provided with your specific HVAC system for precise connections. Ensure wires are stripped approximately 3/8 inch and securely fastened under the terminal screws.
Common Terminal Designations:
- R/Rc/Rh: 24V Power (Heating/Cooling)
- C: Common (24V return)
- G: Fan
- B/B1: Cywasgydd S.tage 1 (Oeri)
- B2: Cywasgydd S.tage 2 (Oeri)
- W/W1: Gwres S.tage 1 (Gwresogi)
- W2: Gwres S.tage 2 (Gwresogi)
- O / B: Reversing Valve (Heat Pumps)
Note: The T1900 supports various system types. Consult the detailed wiring diagrams in the full installation manual for specific configurations (e.g., heat pump with auxiliary heat, conventional multi-stage systems).
5. Attach Thermostat to Base
Once wiring is complete and verified, carefully align the thermostat front cover with the mounted base plate and snap it into place.
6. Adfer Pwer
Return to your circuit breaker or fuse box and restore power to your heating and cooling system.
Gosodiad Cychwynnol
Upon initial power-up, the thermostat may prompt you to configure basic settings. Follow the on-screen instructions to set the current date, time, and system type (e.g., Conventional, Heat Pump).
System Type Configuration:
It is crucial to correctly configure the thermostat for your specific HVAC system. Incorrect settings can lead to improper operation or damage. Access the installer settings menu (refer to the full installation guide for specific button sequences) to select:
- Math o System: Heat/Cool, Heat Pump, Dual Fuel
- Nifer y gwres Stages
- Nifer y Cool Stages
- Reversing Valve Operation: O (Oeri) neu B (Gwresogi)
Cyfarwyddiadau Gweithredu
Deall yr Arddangosfa:
The LCD screen displays the current temperature, set temperature, system mode, fan mode, time, and programming status. Refer to the icons and indicators on the screen for current operational status.
Setting System Mode:
Gwasgwch y MODD button to cycle through available system modes:
- GWRES: The system will operate to maintain the heating setpoint.
- CWL: The system will operate to maintain the cooling setpoint.
- CAR: The thermostat automatically switches between heating and cooling as needed to maintain the set temperature range.
- I FFWRDD: Mae'r system wresogi ac oeri wedi'i diffodd.
Setting Fan Mode:
Gwasgwch y FAN button to cycle through fan modes:
- CAR: Dim ond pan fydd y system wresogi neu oeri yn gweithredu'n weithredol y mae'r ffan yn rhedeg.
- AR: Mae'r ffan yn rhedeg yn barhaus, waeth beth fo'r galwadau gwresogi neu oeri.
Addasu tymheredd:
Defnyddiwch y UP a I LAWR arrow buttons to adjust the desired temperature setpoint. In programmable modes, this will temporarily override the schedule until the next scheduled change.
Amserlenni Rhaglenni (7 Diwrnod):
The T1900 allows for 7-day programming, enabling different schedules for each day of the week. This feature helps save energy by adjusting temperatures when you are away or asleep.
- Gwasgwch y RHAGLEN botwm i fynd i mewn i'r modd rhaglennu.
- Defnyddiwch y DYDD button to select the day or group of days you wish to program (e.g., Mon-Fri, Sat-Sun, or individual days).
- Defnyddiwch y AMSER button to cycle through the four available periods: Wake, Leave, Return, Sleep.
- Defnyddiwch y UP a I LAWR arrow buttons to set the desired temperature for each period.
- Defnyddiwch y DALWCH button to exit programming mode or save changes.
Refer to the detailed programming section in the full user guide for advanced options and specific button sequences.
Remote Control (Optional Add-on):
The Venstar T1900 thermostat can be controlled remotely via a phone using an optional add-on module (sold separately). This module connects to the thermostat and allows for remote access and control through a dedicated application. Installation and setup instructions for the remote control module are provided with the module itself.
Cynnal a chadw
Cleaning the Thermostat:
To maintain the appearance and functionality of your thermostat, periodically wipe the exterior with a soft, damp lliain. Peidiwch â defnyddio glanhawyr sgraffiniol, toddyddion na chwistrellau cemegol, gan y gall y rhain niweidio'r cydrannau plastig ac electronig.
Amnewid Batri:
The Venstar T1900 thermostat does not require batteries for operation as it is powered by the 24V AC system.
Datrys problemau
If you experience issues with your Venstar T1900 thermostat, consult the following common problems and solutions:
| Problem | Achos Posibl | Ateb |
|---|---|---|
| Mae'r arddangosfa thermostat yn wag | Dim pŵer i'r thermostat. | Check the circuit breaker for your HVAC system. Ensure all wiring connections are secure. |
| Heating/Cooling system does not respond | Incorrect system mode selected; wiring issue; system lockout. | Verify the system mode (HEAT/COOL/AUTO). Check wiring connections. Wait 5 minutes for system lockout to reset. |
| Mae'n ymddangos bod y darlleniad tymheredd yn anghywir | Lleoliad y thermostat; rhwystr yn y synhwyrydd. | Ensure the thermostat is not exposed to direct sunlight, drafts, or heat sources. Clean any dust from the thermostat vents. |
| Programming schedule is not working | Program not saved; temporary override active; incorrect time/day setting. | Ensure programs are saved. Check if a temporary override is active and cancel it. Verify current time and day settings. |
| Fan runs continuously in AUTO mode | Fan mode set to ON; wiring issue. | Press the FAN button to ensure it is set to AUTO. Check fan wiring. |
If these solutions do not resolve the issue, please contact customer support or a qualified HVAC technician.
Manylebau
| Nodwedd | Manyleb |
|---|---|
| Brand | Venstar |
| Enw Model | Venstar T1900 |
| Math o Reolwr | Botwm Gwthio |
| Nodwedd Arbennig | Rhaglenadwy |
| Lliw | Gwyn |
| Defnydd Penodol Ar Gyfer Cynnyrch | Heat Pump, Heater |
| Math Rheoli Tymheredd | Programmable, Smart/Remote (with add-on) |
| Cyftage | 24 folt AC |
| Math Arddangos | LCD neu LED |
| Dull Rheoli | Remote (with add-on) |
| Golau cefn | Oes |
| Dimensiynau Cynnyrch | 5.3 x 2 x 2 modfedd |
| Pwysau Eitem | 0.01 owns |
| Angen Batris? | Nac ydw |
Gwybodaeth Gwarant
Venstar products are manufactured to high-quality standards. This product is covered by a limited warranty against defects in materials and workmanship. The specific terms and duration of the warranty may vary. Please refer to the warranty card included with your product or visit the official Venstar websafle am wybodaeth fanwl am warant a gweithdrefnau cofrestru.
Cefnogaeth i Gwsmeriaid
For technical assistance, troubleshooting, or warranty inquiries, please contact Venstar customer support. You can typically find contact information, including phone numbers and email addresses, on the official Venstar websafle (www.venstar.com) neu ar becynnu'r cynnyrch.
When contacting support, please have your thermostat model number (T1900) and any relevant purchase information ready.