Rhagymadrodd
This manual provides comprehensive instructions for the installation, operation, and maintenance of your Duravit Starck 2 Wall-Mounted One-Piece Elongated Toilet. Please read this manual thoroughly before beginning installation or use to ensure proper function and safety. Keep this manual for future reference.

Delwedd: Blaen view of the Duravit Starck 2 Wall-Mounted Elongated Toilet in white alpin, showcasing its sleek, modern design and compact form factor.
Gwybodaeth Diogelwch
Arsylwch y rhagofalon diogelwch canlynol bob amser:
- Ensure water supply is turned off before any installation or maintenance.
- Gwisgwch offer amddiffynnol personol (PPE) priodol fel menig ac amddiffyniad llygaid yn ystod y gosodiad.
- Os ydych chi'n ansicr ynghylch unrhyw ran o'r broses osod, ymgynghorwch â phlymwr cymwys.
- Do not use abrasive cleaners or materials that could damage the ceramic surface.
- Verify all connections are secure and leak-free before restoring water supply.
Cynnwys Pecyn
Please verify that all components are present before beginning installation. The package typically includes:
- Duravit Starck 2 Wall-Mounted Toilet Bowl
- Mounting Hardware (specific to wall-mounted installation, may vary by carrier system)
- Cyfarwyddiadau Gosod (y llawlyfr hwn)
- Note: Toilet seat and wall hand lever are sold separately.
Gosod a Gosod
Installation of a wall-mounted toilet requires a compatible in-wall carrier system (not included). Refer to the carrier system's manual for its specific installation instructions. The following steps pertain to the toilet bowl installation onto a pre-installed carrier.
Dimensions and Rough-in
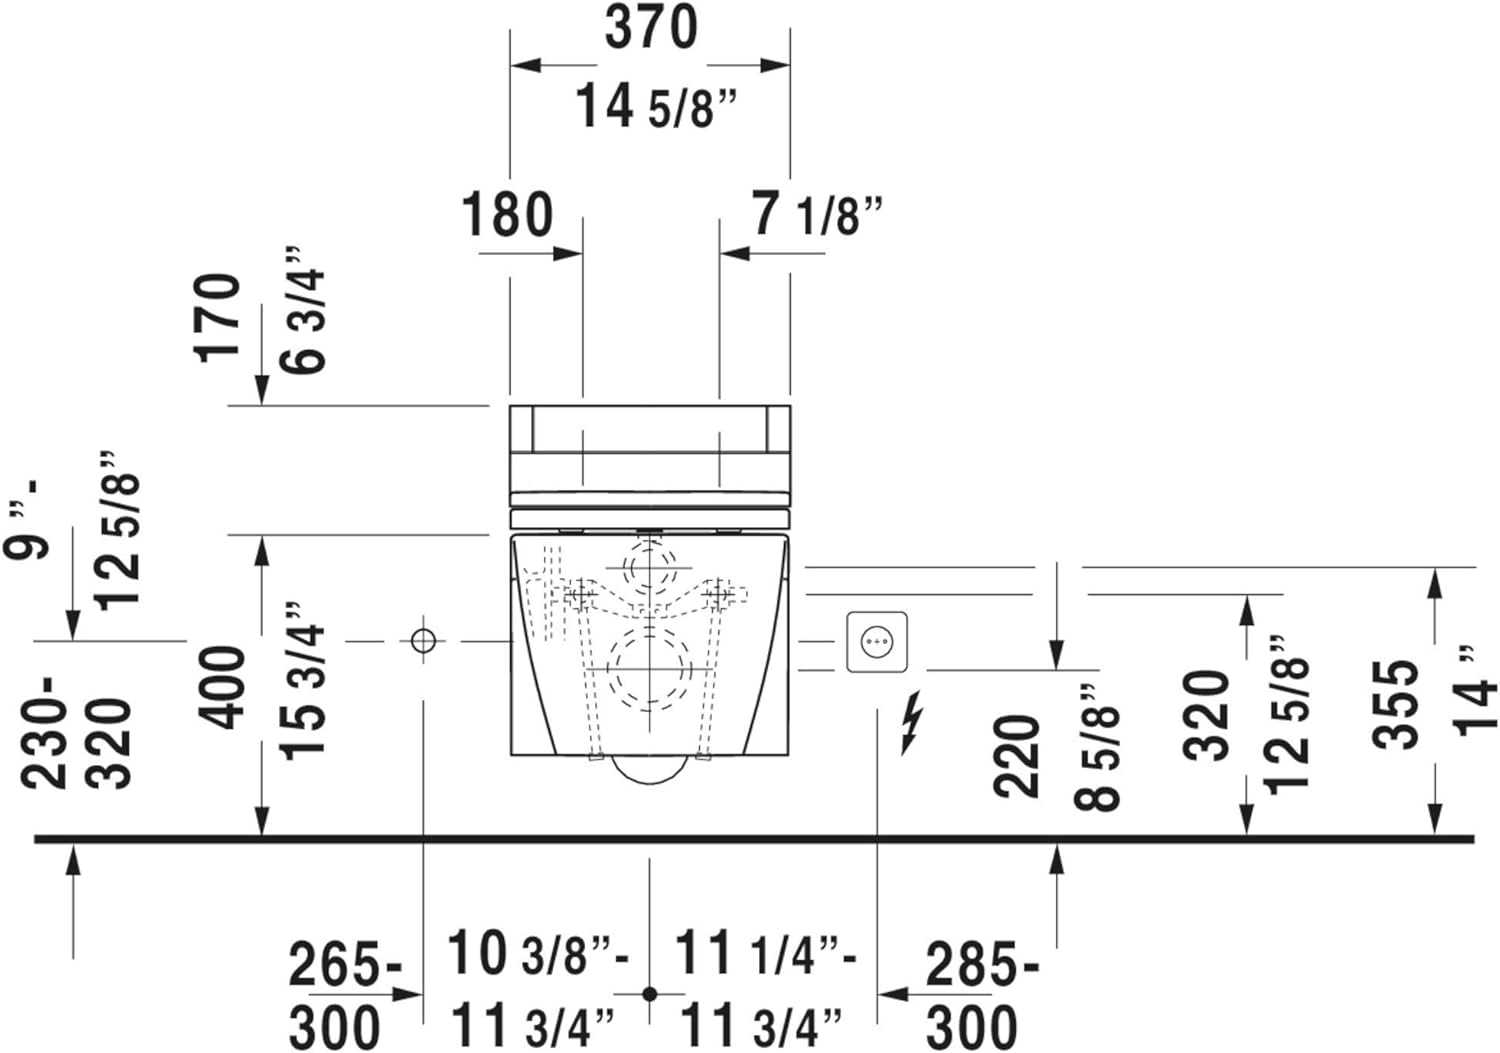
Accurate measurements are crucial for proper installation. Refer to the diagrams below for detailed dimensions.
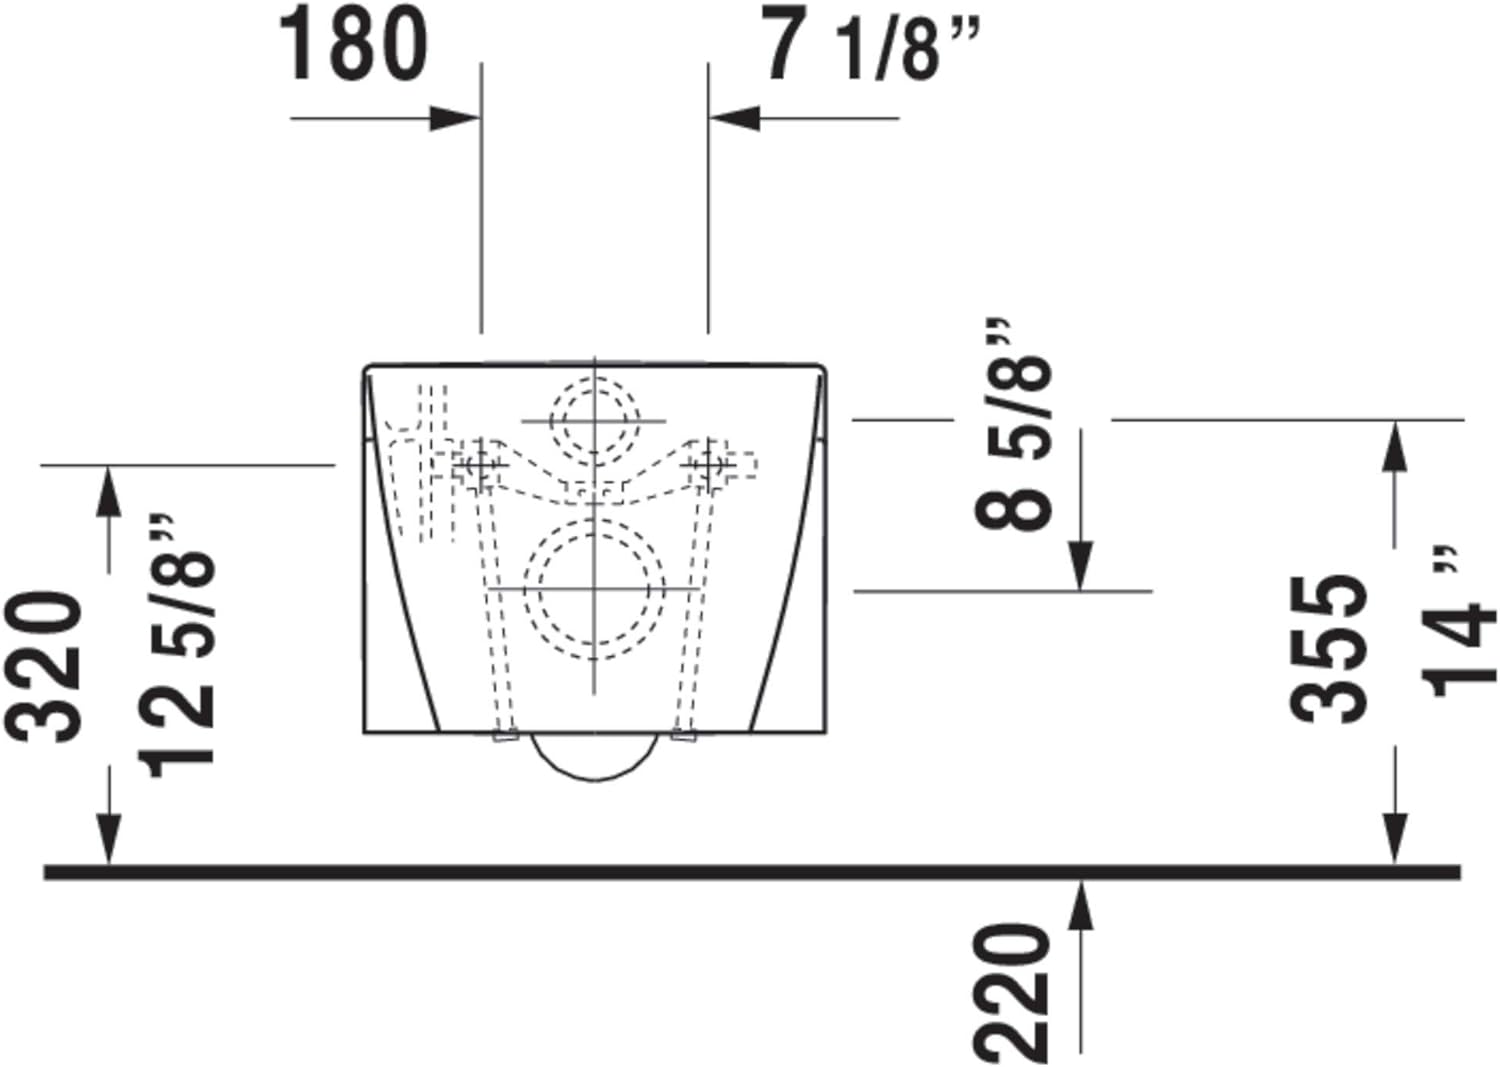
Delwedd: O'r brig i lawr view diagram showing key dimensions for the toilet's mounting points and overall width, including measurements in millimeters and inches (e.g., 180mm / 7 1/8 inches, 320mm / 12 5/8 inches).
Delwedd: Blaen view diagram illustrating the toilet's height and width dimensions, including distances from the floor and wall, with measurements in millimeters and inches (e.g., 370mm / 14 5/8 inches width, 355mm / 14 inches height from floor).

Delwedd: Ochr view diagram detailing the toilet's projection from the wall and connection points, including pipe diameters and distances (e.g., 400mm / 15 3/4 inches projection, 102mm / 4 inches outlet diameter).

Delwedd: Ochr view diagram showing the toilet with an installed seat, indicating overall projection and seat height, with measurements in millimeters and inches (e.g., 610mm / 24 inches total projection with seat).

Delwedd: O'r brig i lawr view diagram of the toilet bowl, showing the outline for a standard elongated toilet seat and its mounting points, with measurements (e.g., 620mm / 24 3/8 inches overall length, 360mm / 14 1/8 inches width).

Delwedd: O'r brig i lawr view diagram of the toilet bowl, specifically highlighting the elongated shape and seat mounting area, with measurements (e.g., 620mm / 24 3/8 inches overall length, 370mm / 14 5/8 inches width).
Camau Gosod
- Prepare Carrier System: Ensure your in-wall carrier system is securely installed according to its manufacturer's instructions, with all rough-in plumbing and waste connections in place and tested.
- Install Mounting Rods: Thread the mounting rods from the carrier system into the toilet bowl's mounting holes. Ensure they are tightened securely but do not overtighten.
- Cysylltu cyflenwad dŵr: Connect the flexible water supply line from the in-wall tank to the toilet bowl's inlet. Use a wrench to tighten, ensuring a watertight seal.
- Connect Waste Outlet: Carefully align the toilet bowl's waste outlet with the waste pipe from the carrier system. Apply a wax ring or appropriate sealing gasket as per carrier instructions to ensure a leak-proof connection.
- Mount the Toilet: Slide the toilet bowl onto the mounting rods and push it firmly against the finished wall. Secure the toilet using the provided nuts and washers on the mounting rods. Tighten evenly to prevent cracking the ceramic.
- Gosod Sedd Toiled: Follow the instructions provided with your chosen toilet seat for installation onto the toilet bowl.
- Prawf am ollyngiadau: Slowly turn on the water supply to the in-wall tank. Allow the tank to fill. Flush the toilet several times, checking all connections for any signs of leaks.

Delwedd: Ongl view of the Duravit Starck 2 Wall-Mounted Elongated Toilet, highlighting its smooth, easy-to-clean exterior and integrated design.

Image: The Duravit Starck 2 Wall-Mounted Elongated Toilet installed in a modern bathroom setting with green tiled walls, demonstrating its space-saving and minimalist aesthetic.
Cyfarwyddiadau Gweithredu
This toilet features a dual-flush mechanism, allowing you to choose between a full flush (1.6 GPF) and a partial flush (0.8 GPF) for water conservation. The flush mechanism is controlled by the wall-mounted flush plate (not included, typically part of the carrier system).
- Partial Flush (0.8 GPF): Press the smaller button or section of the flush plate for liquid waste.
- Fflysio Llawn (1.6 GPF): Press the larger button or section of the flush plate for solid waste.
Ensure the flush plate is properly installed and calibrated according to its manufacturer's instructions for optimal performance.
Cynnal a Chadw a Glanhau
Regular cleaning and proper maintenance will ensure the longevity and appearance of your Duravit toilet.
- Cleaning the Ceramic: Use a soft cloth or sponge with mild, non-abrasive bathroom cleaners. Rinse thoroughly with water after cleaning.
- Osgoi sgraffinyddion: Do not use abrasive powders, scouring pads, or cleaners containing harsh chemicals (e.g., strong acids, alkalis, bleach) as these can damage the ceramic glaze.
- Toilet Seat Care: Clean the toilet seat according to its manufacturer's instructions. Many plastic seats can be cleaned with mild soap and water.
- Cydrannau Mewnol: The internal flushing mechanism is housed within the in-wall carrier. Refer to the carrier system's manual for maintenance of its internal components.
Datrys problemau
If you encounter issues with your toilet, refer to the following common troubleshooting steps. For problems related to the in-wall tank or flush mechanism, consult the carrier system's manual.
| Problem | Achos Posibl | Ateb |
|---|---|---|
| Fflysio Gwan | Insufficient water in tank; partially clogged rim jets; flush plate not fully actuated. | Check water level in tank (refer to carrier manual); clean rim jets; ensure flush plate is pressed completely. |
| Toilet Not Flushing | Water supply off; flush mechanism issue in carrier; flush plate disconnected. | Verify water supply is on; consult carrier manual for flush mechanism troubleshooting; check flush plate connection. |
| Gollyngiadau mewn Cysylltiadau | Loose connections; damaged seals/gaskets. | Turn off water supply, tighten connections; replace damaged seals/gaskets. If leak persists, contact a plumber. |
| Stains in Bowl | Hard water deposits; inadequate cleaning. | Use a non-abrasive toilet bowl cleaner designed for hard water stains. Regular cleaning prevents buildup. |
Manylebau
| Nodwedd | Manylyn |
|---|---|
| Model | 253309-DUAL (25330900921) |
| Brand | Duravit |
| Math | Wall Mounted, One-Piece Elongated Toilet |
| Math Fflys | Dual Flush (0.8 GPF / 1.6 GPF) |
| Deunydd | Ceramic, Vitreous China |
| Lliw | Alpin gwyn |
| Math Gosod | Wal |
| Siâp | Hirgrwn (Hirlun) |
| Math Deunydd Sedd | Plastic (Note: Seat sold separately) |
Gwarant a Chefnogaeth
For specific warranty information and customer support, please refer to the official Duravit websafle neu cysylltwch â'u gwasanaeth cwsmeriaid yn uniongyrchol. Cadwch eich prawf prynu ar gyfer hawliadau gwarant.
Duravit Official Websafle: www.duravit.us