
1. Rhagymadrodd
This manual provides instructions for the proper setup, operation, and maintenance of the Vividia Mini 8mm USB Flexible Inspection Camera, Model VV-Flex-8-MF. This device is designed for detailed visual inspection in hard-to-reach areas by connecting to a personal computer via a USB interface. It features a flexible cable, manual focus, and integrated LED illumination, making it suitable for various inspection tasks.
2. Cynnyrch Drosview
2.1. Cynnwys Pecyn
- Vividia Mini USB Flexible Inspection Camera Endoscope
- CD Software (includes User's Manual and application software)
- Mirror Attachments (30°, 45°, 60° for side view)
- Calibrator for Measurement Application
2.2. Nodweddion Allweddol
- Cydraniad Delwedd: 640x480 pixels (JPEG format)
- Datrysiad Fideo: 640x480 pixels (WMV format, up to 30FPS @ VGA)
- Ffocws: Manual focus, focal range 0.5cm to infinite
- Chwyddiad: 1X-150X (adjustable)
- Goleuo: 4 white LED lights with adjustable brightness
- Pennaeth Camera: 8mm outer diameter, waterproof
- Cebl: 50cm (1.6ft) flexible cable, 7mm diameter, waterproof
- Cysylltedd: USB 2.0 interface (147cm / 4.8ft cable length)
- Swyddogaethau: Snapshot capture (hardware button or software), video recording, measurement functions (length, arc, angle)
- Cydnawsedd: Windows 8/7/Vista/XP, MAC 10.5 or above, Linux
2.3. Adnabod Cydran
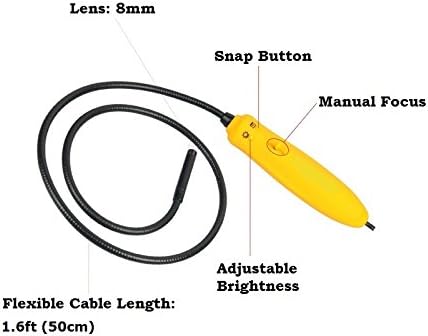
Ffigur 1: Drosoddview of the inspection camera components. Key features include the 8mm lens, flexible cable, manual focus wheel, snap button, and adjustable brightness control.
3. Gosod
3.1. Gosod Meddalwedd
- Insert the provided CD Software into your computer's CD/DVD drive.
- Follow the on-screen instructions to install the inspection camera software.
- For Mac users (OS 10.5 or above), dedicated software is not required. The camera can be used with built-in applications such as Photo Booth or Facetime.
3.2. Cysylltu'r Camera
Connect the USB plug of the inspection camera to an available USB 2.0 port on your computer. The device is powered via the USB connection, requiring no external batteries.
3.3. Attaching Mirror Accessories
The package includes 30°, 45°, and 60° mirror attachments for side viewing. To attach a mirror:
- Carefully screw the desired mirror attachment onto the threaded end of the camera head.
- Ensure the attachment is securely fastened but do not overtighten.

Ffigur 2: Mirror attachments for side viewing and their connection point on the camera head.
4. Cyfarwyddiadau Gweithredu
4.1. Launching the Software
After installation, launch the inspection camera software from your desktop or Start menu. For Mac users, open Photo Booth or Facetime.
4.2. Selecting the Device Source
In the software, navigate to the 'Setting' menu and select 'Device Source' to ensure the Vividia inspection camera is selected as the active video input device.
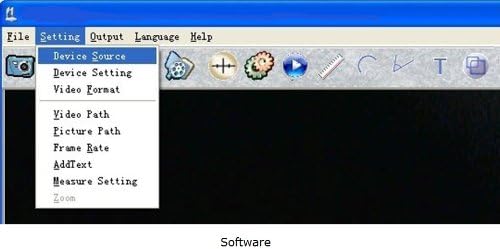
Ffigur 3: Software interface demonstrating how to select the device source.
4.3. Addasu Ffocws
The camera features manual focus. Rotate the focus wheel on the handle to achieve a clear image of your inspection target. The focal range is from 0.5cm to infinite.
4.4. Addasu Disgleirdeb LED
Use the adjustable brightness control on the camera handle to illuminate the inspection area. There are four white LED lights to provide sufficient lighting in dark environments.

Ffigur 4: Camera handle controls, including the snap button, manual focus, and adjustable brightness.
4.5. Cipio Delweddau a Fideos
- Cipluniau: Press the hardware snap button on the camera handle or use the software control to capture still images. Images are saved in JPEG format.
- Fideos: Use the software to record video footage. Videos are saved in WMV format.
4.6. Using Measurement Functions
The included software provides measurement functions for length, arc, and angle. Refer to the software's user manual (available on the CD) for detailed instructions on using these features with the calibrator.
4.7. Example Ceisiadau

Ffigur 5: Examples of detailed inspections possible with the camera, including electronic components, text, and surfaces.

Ffigur 6: Manwl view of a Printed Circuit Board (PCB) showing the camera's magnification capabilities.
5. cynnal
5.1. Cleaning the Camera Head
The camera head is waterproof. To clean, gently wipe the lens and surrounding area with a soft, damp brethyn. Ceisiwch osgoi defnyddio glanhawyr neu doddyddion sgraffiniol.
5.2. Storio
Store the inspection camera in a clean, dry place away from extreme temperatures and direct sunlight. Ensure the flexible cable is not sharply bent or kinked during storage.
5.3. Gwrthiant Dŵr
The camera head and flexible cable are waterproof. However, the handle and USB connection are ddim waterproof. Do not submerge the handle or expose it to liquids.
6. Datrys Problemau
- Camera heb ei ganfod: Ensure the USB cable is securely connected to both the camera and the computer. Try a different USB port. Restart your computer.
- No image or black screen: Verify that the correct 'Device Source' is selected in the software. Check if the LED lights are on and adjusted for brightness.
- Delwedd aneglur: Adjust the manual focus wheel on the camera handle until the image is clear. Ensure the camera lens is clean.
- Software issues on Mac: If the dedicated software does not function, use Photo Booth or Facetime as alternative applications.
- Ansawdd delwedd gwael: Ensure adequate lighting using the built-in LEDs. Adjust focus carefully.
7. manylebau
| Nodwedd | Manyleb |
|---|---|
| Rhif Model | VV-Flex-8-MF |
| Cydraniad Delwedd | 640x480 pixels (JPEG) |
| Datrysiad Fideo | 640x480 pixels (WMV, up to 30FPS @ VGA) |
| Ffocws | Ffocws â Llaw |
| Ystod Ffocws | 0.5cm – infinite |
| Chwyddiad | 1X-150X (adjustable) |
| Goleuo | 4 white LED lights with adjustable brightness |
| Camera Head Outer Diameter | 8mm (0.31 modfedd) |
| Hyd y Cebl Hyblyg | 50cm (1.6 troedfedd) |
| Flexible Cable Diameter | 7mm (0.28 modfedd) |
| Hyd Cebl USB | 147cm (4.8 troedfedd) |
| Technoleg Cysylltedd | USB 2.0 |
| Lefel Gwrthsefyll Dŵr | Waterproof (camera head & cable only) |
| Dyfeisiau Cydnaws | Personal Computer (Windows 8/7/Vista/XP, MAC 10.5+, Linux) |
| Pwysau Eitem | 168 gram |
| UPC | 858499002636 |
8. Gwybodaeth Gwarant
The Vividia Mini 8mm USB Flexible Inspection Camera comes with a Gwarant gwneuthurwr 1 flynedd from the date of purchase. This warranty covers defects in materials and workmanship under normal use. Please retain your proof of purchase for warranty claims. The warranty does not cover damage caused by misuse, accident, unauthorized modification, or improper handling.
9. Cefnogaeth
For technical assistance, troubleshooting beyond this manual, or warranty inquiries, please refer to the contact information provided with your product packaging or visit the official VIVIDIA website. Ensure you have your product model number (VV-Flex-8-MF) and proof of purchase available when contacting support.