
Rhagymadrodd
This manual provides essential information for the safe and efficient operation of your Technical Pro AW1 Torque Audio 2U Professional 2-Channel Power Amplifier. The AW1 is designed to deliver robust audio amplification for various professional sound applications. Please read this manual thoroughly before operating the unit to ensure proper setup and performance.
Gwybodaeth Diogelwch
RHYBUDD: To reduce the risk of electric shock, do not open the amplifer casing. Cyfeiriwch yr holl waith cynnal a chadw at bersonél cymwys.
- Ffynhonnell Pwer: Connect the unit only to a 110 Volt AC power outlet. Ensure the power cord is securely connected.
- Awyru: Peidiwch â rhwystro agoriadau awyru. Sicrhewch fod digon o lif aer o amgylch yr uned i atal gorboethi.
- Lleithder: Peidiwch ag amlygu'r uned i law na lleithder. Peidiwch â gosod gwrthrychau sy'n llawn hylifau, fel fasys, ar yr uned.
- Glanhau: Datgysylltwch y llinyn pŵer cyn glanhau. Defnyddiwch frethyn sych yn unig.
- Lleoliad: Rhowch yr uned ar arwyneb sefydlog, gwastad. Osgowch ei gosod ger ffynonellau gwres neu mewn golau haul uniongyrchol.
- Gwasanaethu: Do not attempt to service this unit yourself. Contact qualified service personnel for any repairs.
Cynnwys Pecyn
Gwiriwch fod yr holl eitemau yn bresennol yn y pecyn:
- Technical Pro AW1 Torque Audio 2U Professional 2-Channel Power AmpUned lififier
- Cord pŵer AC

Cynnyrch Drosview
Panel blaen
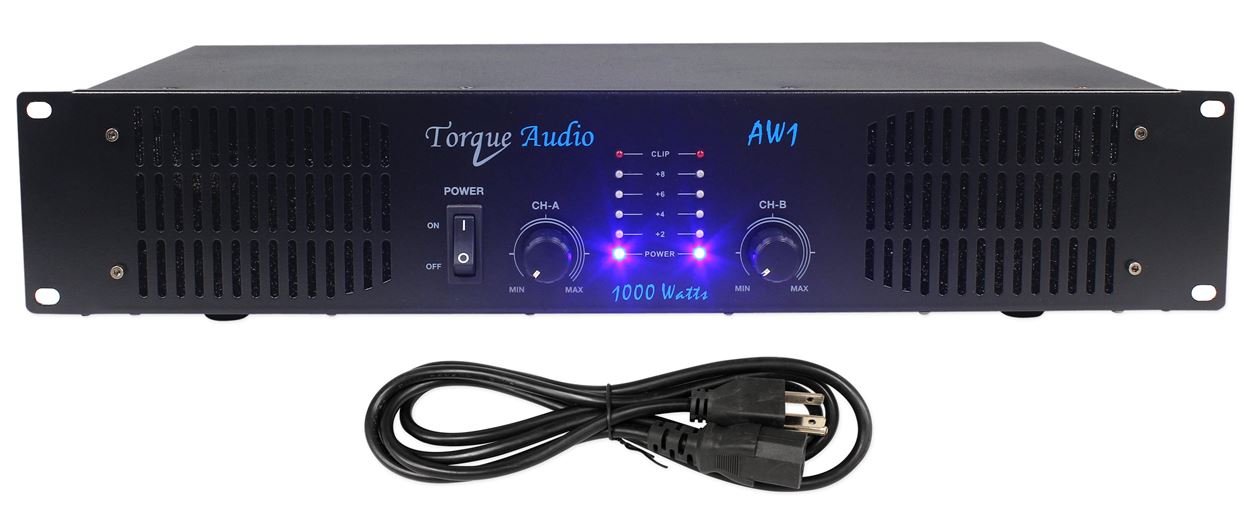
- Newid POWER: Toglo'r amppŵer y lifer ymlaen neu i ffwrdd.
- Channel A/B Level Controls: Rotary knobs to adjust the output level for each channel independently.
- Dangosyddion Pwer: LEDs that illuminate when the unit is powered on.
- Level Indicators: LEDs that show the output signal level for each channel.
- Dangosyddion Clipio: LEDs that illuminate when the audio signal is clipping, indicating potential distortion.
Panel Cefn

- Audio Inputs (CH A, CH B): RCA jacks for connecting audio sources (e.g., mixer, preampllewywr).
- Channel A/B Outputs: Banana binding posts for connecting passive speakers.
- Cilfach bŵer AC: Connector for the supplied AC power cord.
Gosod
- Lleoliad: Swydd y amplifier in a location with adequate ventilation, away from direct sunlight, heat sources, and moisture. Ensure it is on a stable surface.
- Cysylltu Ffynonellau Sain: Using RCA cables, connect your audio source (e.g., mixer, DJ controller, preamplifier) to the "AUDIO INPUTS" (CH A and CH B) on the rear panel. Match the left channel of your source to CH A input and the right channel to CH B input.
- Cysylltu Siaradwyr: Connect your passive speakers to the "CH A OUTPUTS" and "CH B OUTPUTS" using speaker wire terminated with banana plugs or bare wire. Ensure correct polarity (+ to + and - to -) for each speaker. The amplifier supports speakers with appropriate impedance (typically 2 ohms or higher).
- Pwer Cysylltu: Sicrhau y amplifier's POWER switch is in the OFF position. Connect the supplied AC power cord to the "AC POWER INLET" on the rear panel and then plug the other end into a standard 110 Volt AC wall outlet.
Pwysig: Before powering on, double-check all connections to prevent damage to the amplifier or connected equipment.
Cyfarwyddiadau Gweithredu
- Pŵer Ymlaen: Turn the Channel A and Channel B Level Controls to their minimum (MIN) position. Then, press the POWER switch to the ON position. The Power Indicators on the front panel should illuminate.
- Addasu Cyfrol: Start playing audio from your source. Slowly increase the Channel A and Channel B Level Controls to achieve the desired listening volume.
- Dangosyddion Monitro: Observe the Level Indicators to ensure the signal is not consistently peaking. If the Clipping Indicators illuminate frequently or stay lit, reduce the input level from your source or the amplifier's channel level controls to prevent distortion and potential damage to speakers.
- Pwer i ffwrdd: Before powering off, turn both Channel A and Channel B Level Controls to their minimum (MIN) position. Then, press the POWER switch to the OFF position.
Cynnal a chadw
- Glanhau: Sychwch y amplifier's exterior with a soft, dry cloth. Do not use liquid cleaners or solvents.
- Awyru: Ensure that the ventilation grilles on the sides and top of the unit remain clear of dust and obstructions. Proper airflow is crucial for preventing overheating.
- Cysylltiadau: Periodically check all audio and power connections to ensure they are secure.
- Storio: Os yn storio'r amplifier for an extended period, disconnect it from power, clean it, and store it in a cool, dry place, preferably in its original packaging.
Datrys problemau
| Problem | Achos Posibl | Ateb |
|---|---|---|
| Dim pŵer | Llinyn pŵer heb ei gysylltu; Allfa bŵer heb ei gweithio; Ampdiffoddwch switsh pŵer y lifer. | Ensure power cord is firmly connected. Check the power outlet with another device. Turn the POWER switch to ON. |
| Dim allbwn sain | Audio input cables not connected; Speaker cables not connected; Channel level controls at minimum; Audio source not playing or volume too low. | Verify all audio input and speaker connections. Increase channel level controls. Check audio source playback and volume. |
| Sain gwyrgam | Input signal too high (clipping); Speaker impedance mismatch; Damaged speaker or cable. | Reduce input level from source or amplifier channel controls until clipping indicators stop illuminating. Ensure speakers meet impedance requirements. Check speakers and cables for damage. |
| Mae'r uned yn teimlo'n boeth | Inadequate ventilation; Prolonged high-volume operation. | Ensure ventilation openings are clear. Reduce volume or allow the unit to cool down. |
If the problem persists after attempting these solutions, contact Technical Pro customer support.
Manylebau
- Model: AW1
- Pwer Uchaf: 1000 Wat
- RMS Power: 450 Wat @ 2 Ohm
- Sianeli: 2
- Mewnbynnau Sain: RCA (CH A, CH B)
- Allbynnau Sain: Banana Binding Post
- Dangosyddion: Power, Level, Clipping (per channel)
- Cyftage: 110 folt (AC)
- Dimensiynau (L x W x H): 20 x 12 x 6 modfedd (Dimensiynau Cynnyrch)
- Pwysau Eitem: Approximately 6 pounds (based on product description)
- Deunydd: Metel
Gwarant a Chefnogaeth
For warranty information and technical support, please refer to the documentation provided with your purchase or visit the official Technical Pro websafle. Cadwch eich derbynneb prynu fel prawf o brynu ar gyfer unrhyw hawliadau gwarant.
Technical Pro Store: Visit the Technical Pro Store on Amazon