
1. Rhagymadrodd
This manual provides essential information for the proper installation, operation, and maintenance of your Behringer Truth B1031A Active 2-Way Reference Studio Monitor. Please read this manual thoroughly to ensure optimal performance and longevity of your device. The B1031A is designed for professional audio applications, offering ultra-linear frequency response and precise sound reproduction.
2. Cyfarwyddiadau Diogelwch Pwysig
- Ffynhonnell Pwer: Connect the unit only to a power supply of the voltage specified in the manual or on the unit.
- Sylfaen: Sicrhewch fod yr uned wedi'i seilio'n iawn i atal sioc drydanol.
- Awyru: Peidiwch â rhwystro agoriadau awyru. Gosod yn unol â chyfarwyddiadau'r gwneuthurwr.
- Dŵr a lleithder: Do not use this apparatus near water or expose it to rain or moisture.
- Gwres: Peidiwch â gosod yn agos at unrhyw ffynonellau gwres fel rheiddiaduron, cofrestrau gwres, stofiau, neu gyfarpar arall (gan gynnwys amplifyddion) sy'n cynhyrchu gwres.
- Glanhau: Glanhewch â lliain sych yn unig.
- Gwasanaethu: Cyfeirio pob gwasanaeth i bersonél gwasanaeth cymwys. Mae angen gwasanaethu pan fydd y cyfarpar wedi'i ddifrodi mewn unrhyw ffordd, fel llinyn cyflenwad pŵer neu blwg wedi'i ddifrodi, hylif wedi'i ollwng neu wrthrychau wedi disgyn i'r offer, mae'r cyfarpar wedi bod yn agored i law neu leithder, nid yw'n gweithredu'n normal , neu wedi cael ei ollwng.
3. Cynnwys Pecyn
Upon unpacking your Behringer Truth B1031A, please verify that all components are present and in good condition:
- Behringer Truth B1031A Active Studio Monitor (1 unit)
- Cebl Pŵer
- Llawlyfr Defnyddiwr (y ddogfen hon)
Os oes unrhyw eitemau ar goll neu wedi'u difrodi, cysylltwch â'ch deliwr ar unwaith.
4. Cynnyrch Drosview
The Behringer Truth B1031A is an active 2-way reference studio monitor featuring an 8-inch Kevlar woofer and a 1-inch silk dome tweeter. It incorporates precision Class A/B amplifiers with active protection circuits, delivering 100 W for low frequencies and 50 W for high frequencies. Its design aims for ultra-linear frequency response and wide dispersion characteristics.
4.1. Panel Blaen

The front panel features the primary acoustic components: the 8-inch Kevlar woofer for low-frequency reproduction and the 1-inch silk dome tweeter for high frequencies. Indicator LEDs provide visual feedback on the monitor's power status and signal clipping.
4.2. Panel Cefn
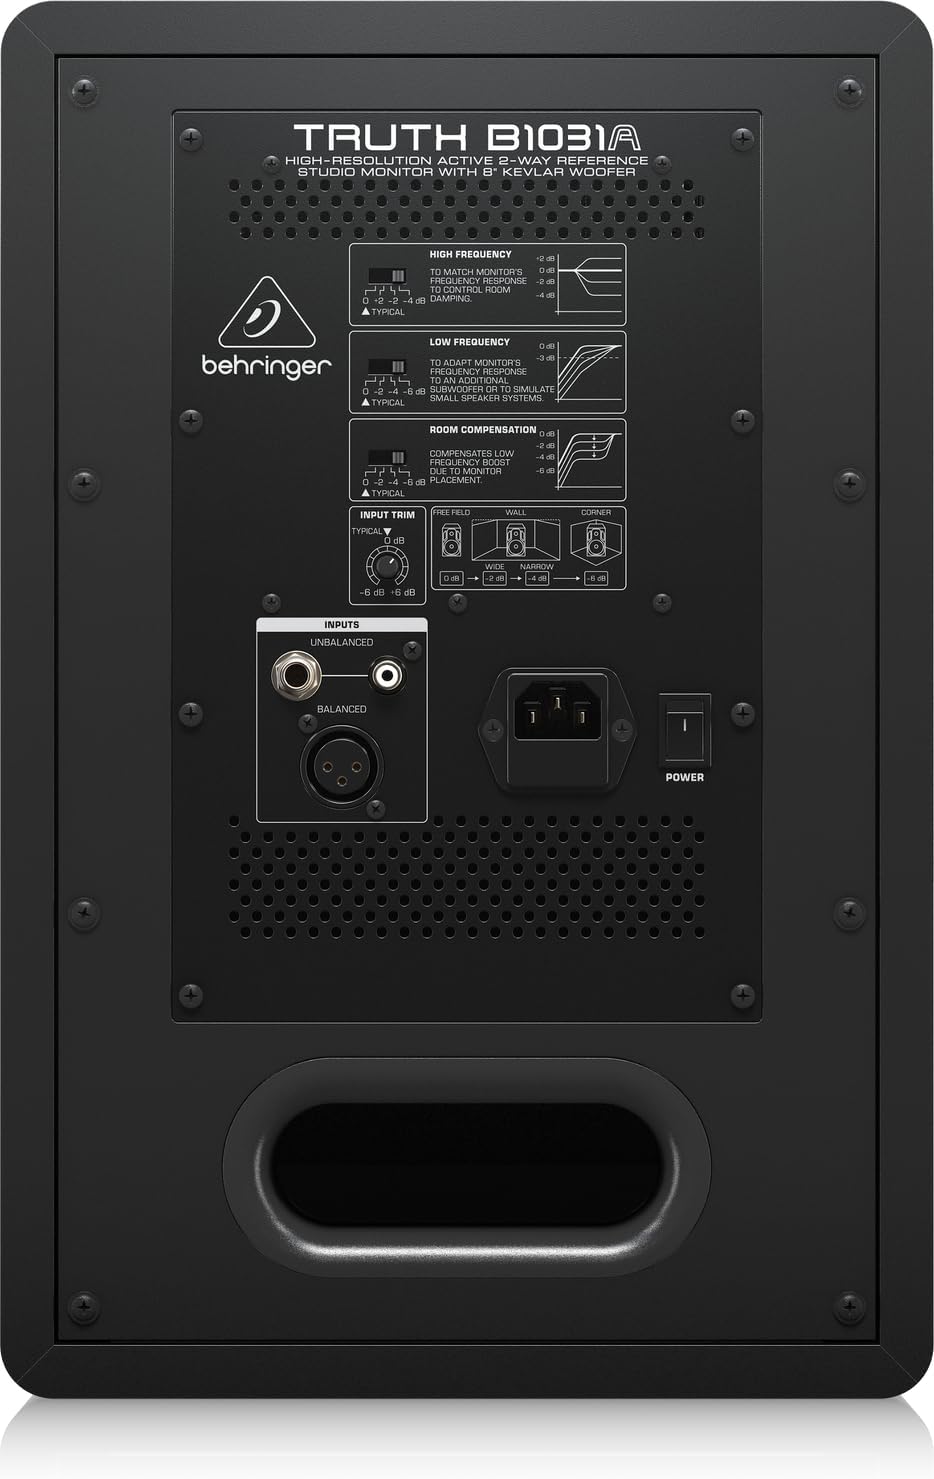
The rear panel houses all input connections and acoustic adjustment controls. These include:
- Mewnbwn XLR Cytbwys: For professional audio connections.
- Balanced 1/4" TRS Input: For professional audio connections.
- Unbalanced RCA Input: For consumer audio devices.
- Trim Mewnbwn: Yn addasu'r sensitifrwydd mewnbwn.
- High Frequency Adjustment: Allows tailoring of the high-frequency response.
- Low Frequency Adjustment: Allows tailoring of the low-frequency response.
- Room Compensation Switches: Adjusts the monitor's response to compensate for room acoustics (e.g., placement near walls or corners).
- Power Switch and IEC Power Inlet: For connecting the power cable and turning the unit on/off.
5. Gosod
5.1. Lleoliad
Proper placement of your studio monitors is crucial for accurate sound reproduction. Consider the following guidelines:
- Triongl Stereo: Position the monitors and your listening position to form an equilateral triangle. The distance between the two monitors should be equal to the distance from each monitor to your head.
- Ear Level: The tweeters should ideally be at ear level when you are in your primary listening position.
- Pellter o'r Waliau: Avoid placing monitors directly against walls or in corners, as this can exaggerate bass frequencies. If unavoidable, use the Iawndal Ystafell switches on the rear panel to adjust.
- Cymesuredd: Ensure the left and right monitors are placed symmetrically within the room to maintain a balanced stereo image.
5.2. Cysylltiadau
Before making any connections, ensure the monitor is powered off and unplugged from the mains.
- Mewnbwn sain: Connect your audio source (e.g., audio interface, mixer) to the B1031A using either an XLR, 1/4" TRS, or RCA cable. For optimal signal integrity, balanced XLR or TRS connections are recommended.
- Cysylltiad Pwer: Insert the supplied power cable into the IEC power inlet on the rear panel of the monitor, then plug the other end into a suitable AC power outlet.
6. Gweithredu
6.1. Pweru Ymlaen / I ffwrdd
- Ensure all audio connections are secure and the input trim is set to a low level.
- Flip the power switch on the rear panel to the 'ON' position. The power indicator LED on the front panel will illuminate.
- To power off, flip the power switch to the 'OFF' position. It is recommended to power off your audio source first, then the monitors.
6.2. Addasu Rheolaethau
- Trim Mewnbwn: Use this knob to match the output level of your audio source. Start with a low setting and gradually increase until you achieve a comfortable listening level without distortion.
- High Frequency Adjustment: This switch allows you to boost or cut high frequencies to suit your listening environment or preference.
- Low Frequency Adjustment: This switch allows you to boost or cut low frequencies. This is particularly useful for compensating for room acoustics or if you are using a separate subwoofer.
- Room Compensation: These switches are designed to optimize the monitor's performance based on its placement in your room. Refer to the diagram on the rear panel for recommended settings when placing the monitor near walls or in corners.
7. cynnal
To ensure the longevity and optimal performance of your Behringer Truth B1031A monitor, follow these maintenance guidelines:
- Glanhau: Use a soft, dry cloth to clean the exterior of the monitor. Avoid using abrasive cleaners, solvents, or waxes, as these can damage the finish.
- Llwch: Regularly dust the speaker cones and vents to prevent accumulation, which can affect sound quality and cooling.
- Amgylchedd: Operate the monitor in a stable environment, away from extreme temperatures, humidity, and direct sunlight.
- Cludiant: When moving the monitor, ensure it is powered off and disconnected. Use appropriate packaging to protect it from physical damage.
8. Datrys Problemau
If you encounter issues with your B1031A monitor, consult the following table for common problems and solutions:
| Problem | Achos Posibl | Ateb |
|---|---|---|
| Dim sain | No power; incorrect input connection; input trim too low; audio source issue. | Check power cable and switch; verify audio cable connections; increase input trim; check audio source output. |
| Sain gwyrgam | Input signal too high; damaged cable; faulty audio source. | Reduce input trim or output level from source; try a different audio cable; test with another audio source. |
| Sŵn hymian neu suo | Ground loop; interference from other electronics; unbalanced cable used for long runs. | Ensure proper grounding; move monitor away from other electronic devices; use balanced cables (XLR/TRS). |
| Uneven stereo image | Improper monitor placement; differing acoustic settings between monitors. | Adjust monitor placement for symmetry; ensure High/Low Frequency and Room Compensation settings are identical on both monitors. |
Os yw'r broblem yn parhau ar ôl rhoi cynnig ar yr atebion hyn, cysylltwch â chymorth cwsmeriaid Behringer neu dechnegydd gwasanaeth cymwys.
9. manylebau
Technical specifications for the Behringer Truth B1031A Active Studio Monitor:
| Nodwedd | Manyleb |
|---|---|
| Enw Model | GWIR B1031A |
| Math o Siaradwr | Active 2-Way Reference Studio Monitor |
| Diamedr Woofer | 8 Inches (Kevlar cone) |
| Math Tweeter | 1 Inch Silk Dome |
| AmpMath lifier | Dosbarth A/B |
| LF AmpAllbwn lifier | 100 Wat |
| HF AmpAllbwn lifier | 50 Wat |
| Cyfanswm Allbwn Watage | 150 Wat |
| Technoleg Cysylltedd | XLR, 1/4" TRS, RCA |
| Ffynhonnell Pwer | Trydan Cordiog (110 Volt) |
| Dimensiynau Cynnyrch (D x W x H) | 13.3" x 10.28" x 15.47" |
| Pwysau Eitem | 24.91 Bunt |
| Lliw | Du |
| Deunydd | Metel |
10. Gwarant a Chefnogaeth
Behringer products are designed and manufactured to high-quality standards. For detailed warranty information, including terms and conditions, please refer to the warranty card included with your product or visit the official Behringer website. For technical support, service, or spare parts, please contact your local Behringer dealer or authorized service center. You can also find support resources and contact information on the Siop Behringer.