1. Rhagymadrodd
The WENKO Wall Grip Secura is designed to provide temporary support and stability in areas such as bathrooms and showers. It features a suction cup mounting system with an indicator for secure attachment. This manual provides essential information for the safe and correct installation, operation, and maintenance of your Wall Grip Secura.

Image 1: WENKO Wall Grip Secura
2. Gwybodaeth Diogelwch
- This product is intended as a temporary support aid and is not designed to bear full body weight or for climbing.
- Always ensure the Wall Grip Secura is securely attached before use. Refer to the indicator for confirmation.
- Only attach to smooth, non-porous, and airtight surfaces such as tiles, glass, or metal. Do not attach to textured, porous, or uneven surfaces, grout lines, or wood.
- Regularly check the suction cups and indicator for secure attachment, especially before each use.
- Do not use if the indicator shows red or if the grip feels loose. Reattach immediately.
- Keep out of reach of children when not in use or if not securely installed.
3. Gosod a Gosod
3.1 Paratoi Arwyneb
- Clean the intended mounting surface thoroughly. Ensure it is free from dirt, dust, soap residue, and grease.
- Dry the surface completely. A clean, dry, smooth, and non-porous surface is critical for proper suction.
3.2 Camau Gosod
- Position the Wall Grip Secura on the desired smooth, airtight surface. Avoid placing suction cups over grout lines or textured areas.
- Press both suction cups firmly against the surface.
- Flip down the levers on both ends of the grip. You should hear a click as the suction cups engage.
- Observe the safety indicators on each suction cup. A gwyrdd indicator signifies a secure and proper attachment. A coch indicator means the suction is insufficient, and the grip is not securely attached.

Image 2: Safety Indicator System (Green = OK, Red = Loose)
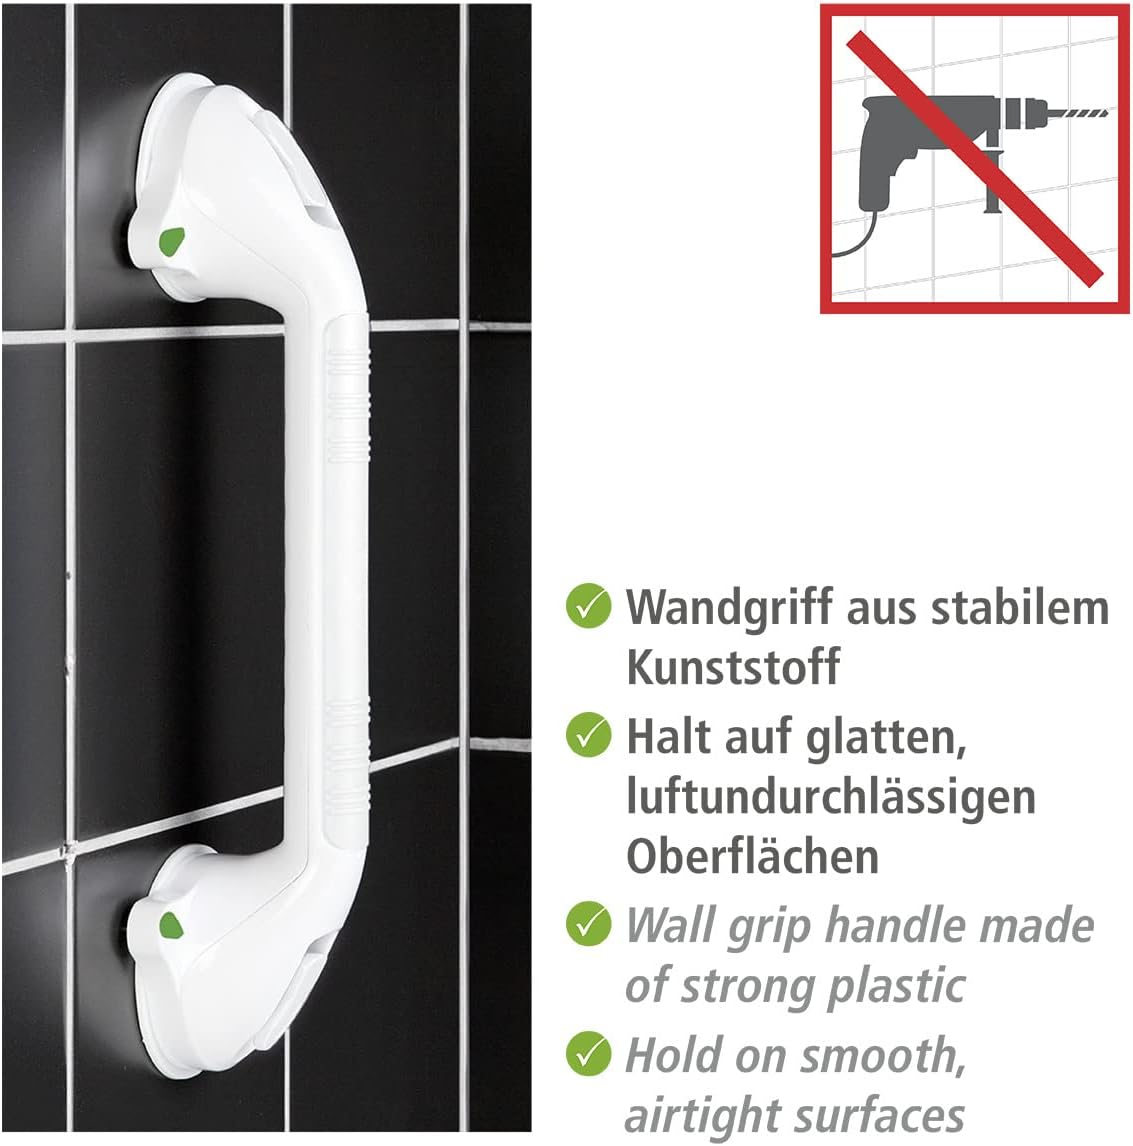
Image 3: Product features and surface requirements (no drilling required)
3.3 Dilysu
After installation, gently pull on the grip to confirm it is firmly attached. Both indicators must show green. If either indicator shows red, or if the grip feels loose, release the levers, reposition, and repeat the installation steps.

Image 4: Wall Grip Secura installed on a tiled surface
4. Cyfarwyddiadau Gweithredu
Once securely installed with both indicators showing green, the WENKO Wall Grip Secura can be used as a temporary support handle. Always apply pressure in the direction of the wall, not pulling directly away from it, to maintain suction integrity. Before each use, visually inspect the green indicators to ensure continued secure attachment.
5. cynnal
To maintain the effectiveness and hygiene of your Wall Grip Secura:
- Clean the grip regularly with a mild soap and water solution.
- Avoid abrasive cleaners or harsh chemicals, as these can damage the plastic and rubber components.
- Periodically remove the grip, clean both the suction cups and the mounting surface, and then reattach it following the installation steps. This helps to ensure optimal suction performance.
6. Datrys Problemau
6.1 Grip Does Not Hold / Indicator Shows Red
- Surface Issue: Ensure the mounting surface is perfectly smooth, non-porous, and airtight. Textured tiles, grout lines, or porous materials will not allow for proper suction.
- Glendid: Thoroughly clean both the suction cups and the mounting surface. Any dirt, dust, or residue can prevent a secure seal.
- Lleithder: Ensure the surface is completely dry before installation.
- Cais: Press firmly on the suction cups before flipping the levers down. Ensure both levers are fully engaged.
- Ail-leoli: If the issue persists, try repositioning the grip to a different spot on the surface.

Image 5: Warning - Incorrect or Loose Installation
7. manylebau
| Nodwedd | Manylyn |
|---|---|
| Brand | WENKO |
| Rhif Model | WK7821 |
| Rhif Rhan | 7821100 |
| Deunydd | Plastig |
| Lliw | Gwyn |
| Pwysau Eitem | 0.3 cilogram (tua 10.6 owns) |
| Dimensiynau Cynnyrch | 8.5 x 42 x 11.5 cm (3.35" x 16.54" x 4.53") |
| Math Mowntio | Wall (Suction) |

Delwedd 6: Dimensiynau'r Cynnyrch
8. Gwybodaeth Gwarant
Specific warranty details for the WENKO Wall Grip Secura may vary by region and retailer. Please refer to your purchase documentation or contact the retailer where the product was purchased for information regarding warranty coverage and terms.
9. Cefnogaeth
For further assistance, technical support, or inquiries regarding your WENKO Wall Grip Secura, please contact WENKO customer service or visit the official WENKO website. Contact information can typically be found on the product packaging or on the manufacturer's websafle.
You can visit the WENKO Store for more products and information: WENKO Store on Amazon