Rhagymadrodd
This manual provides detailed instructions for the installation, operation, and maintenance of your Lorex SG6350 2.4 GHz Wireless Camera and Receiver System. This system offers a simple and reliable solution for remote monitoring, featuring wireless technology to minimize cable connections. It is compatible with all Lorex 2.4 GHz wireless devices and includes listen-in audio capabilities.
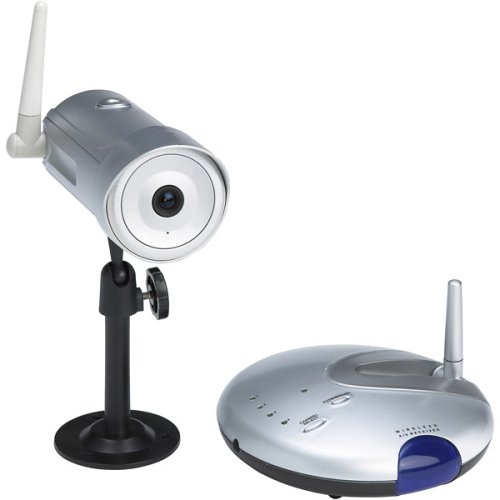
Image: The Lorex SG6350 Wireless Camera and Receiver System, showing the camera unit, receiver, and associated cables.
Gosod
- Dadbacio Cydrannau: Carefully remove all items from the packaging: wireless camera, wireless receiver, 2 power adapters, 2 RCA A/V cables, 1 coaxial cable, and this owner's manual.
- Pweru'r Camera: Connect one AC/DC adapter to the wireless camera. Alternatively, the camera can be powered by four AA batteries (not included) for portable use. Ensure batteries are inserted with correct polarity.
- Pweru'r Derbynnydd: Connect the second AC/DC adapter to the wireless receiver.
- Connect Receiver to Display: Use the provided RCA A/V cable to connect the receiver's video output to a TV or VCR's video input. Ensure the correct input source is selected on your display device.
- Lleoli'r Camera: Place the camera in the desired monitoring location. For optimal signal reception, ensure a clear line of sight between the camera and the receiver. The system supports signal transmission up to 300 feet in open areas.
- Ehangu System: The receiver can accept signals from up to four cameras simultaneously. Additional Lorex 2.4 GHz wireless cameras can be purchased separately and integrated into the system.
Cyfarwyddiadau Gweithredu
- Viewing Footage: Once the receiver is connected to your TV or VCR and powered on, the camera's video feed will appear on your display.
- Autoscan Feature: If multiple cameras are connected, the receiver can automatically cycle through the camera feeds. Refer to the receiver's controls for activating the autoscan function.
- Camera Sengl View: I view a single camera's feed in full-screen, use the receiver's controls to select the desired camera channel.
- Listen-in Audio: The camera features a built-in electronic condenser microphone. Audio from the camera's vicinity will be transmitted to the receiver and output through your display device's speakers.
Cynnal a chadw
- Glanhau: Use a soft, dry cloth to clean the camera and receiver surfaces. Do not use liquid cleaners or aerosol sprays directly on the units.
- Amnewid Batri: If using AA batteries for the camera, replace them when the battery indicator (if present) shows low power or when the camera ceases to function. Ensure proper battery type and polarity.
- Ystyriaethau Amgylcheddol: The camera's CMOS sensor can be permanently damaged by prolonged exposure to direct sunlight or strong halogen light. Avoid mounting or pointing the camera directly at the sun or other intense light sources. The system is primarily designed for indoor use.
- Tymheredd Gweithredu: The camera and receiver are designed to operate within a temperature range of -10 to 50 degrees Celsius (14 to 122 degrees Fahrenheit).
Datrys problemau
- Dim Arwydd Fideo:
- Ensure both the camera and receiver are powered on and their respective AC/DC adapters are securely connected.
- Check the RCA A/V cable connection between the receiver and your display device.
- Verify that your TV or VCR is set to the correct input source (e.g., AV1, Video 1).
- Reduce the distance between the camera and receiver, or clear any obstructions that might be blocking the wireless signal.
- If using batteries in the camera, check if they need replacement.
- Ansawdd Fideo Gwael/Ymyrraeth:
- Wireless interference from other 2.4 GHz devices (Wi-Fi routers, cordless phones) can affect signal quality. Try repositioning the camera or receiver.
- Ensure a clear line of sight between the camera and receiver. Walls and other structures can degrade signal strength.
- Dim Sain:
- Confirm the camera's microphone is not obstructed.
- Check the audio connection of the RCA A/V cable to your display device.
- Increase the volume on your TV or VCR.
Manylebau
| Nodwedd | Manylyn |
|---|---|
| Rhif Model | SG6350 |
| Technoleg Cysylltedd | Di-wifr (Wi-Fi 2.4 GHz) |
| Pellter Arwyddion | Up to 300 feet (with clear line of sight) |
| Cydraniad Llorweddol | 380 TV lines (TVL) |
| Light Sensitivity (Minimum Illumination) | 2 Lux |
| Synhwyrydd Delwedd | CMOS (Color) |
| Lens | 3.6-millimeter fixed wide-angle |
| Cyflymder caead | 1/60 to 1/6,000 of a second (Electronic Auto-Iris) |
| Sain | Built-in electronic condenser microphone |
| Pwer Camera | 9V DC via AC/DC adapter or 4 AA batteries (not included) |
| Pwer Derbynnydd | 9V DC via AC/DC adapter |
| Cysylltiad Allbwn | Standard RCA composite video |
| Tymheredd Gweithredu | -10 i 50 gradd Celsius (14 i 122 gradd Fahrenheit) |
| Dimensiynau Camera | 2.2 x 6.2 inches (diameter x depth) |
| Dimensiynau Derbynnydd | 5.25 x 1.5 inches (diameter x depth) |
| UPC | 778597063509 |
Technical Feature Explanations:
- Sgôr Lux: Measures a camera's sensitivity to light. A lower Lux value indicates better performance in low-light conditions. The SG6350's 2 Lux rating allows for acceptable picture quality in dimly lit environments.
- Horizontal TVL (TV Lines): Represents the horizontal resolution of the camera. Higher TVL values indicate a sharper image. 380 TVL provides a clear color picture.
- Synhwyrydd CMOS: Complementary Metal-Oxide Semiconductor sensors are cost-effective and energy-efficient, providing good image quality for general surveillance.
Beth Sydd yn y Bocs
- Camera Di-wifr
- Derbynnydd Di-wifr
- 2 Power Adapters (AC/DC)
- 2 RCA A/V Cables
- 1 Cebl Cyfechelog
- Llawlyfr y Perchennog
Gwarant a Chefnogaeth
The Lorex SG6350 system comes with a manufacturer's warranty covering 1 year for parts and 1 year for labor from the date of purchase. For warranty claims, technical assistance, or further support, please refer to the contact information provided on the official Lorex websafle neu yn eich pecynnu cynnyrch.
Cadwch eich prawf prynu i ddilysu'r warant.


